HP System Management Homepage Installation Guide HP-UX, Linux, and Windows Systems HP Part Number: 438862-006 Published: September 2007 Edition: 13
© Copyright 2004 - 2007 Hewlett-Packard Development Company, L.P. Legal Notices Confidential computer software. Valid license from HP required for possession, use or copying. Consistent with FAR 12.211 and 12.212, Commercial Computer Software, Computer Software Documentation, and Technical Data for Commercial Items are licensed to the U.S. Government under vendor's standard commercial license. The information contained herein is subject to change without notice.
Table of Contents About this document..........................................................................................................5 Intended audience..................................................................................................................................5 New and changed information in this edition.......................................................................................5 Typographic conventions...............................................................
6 Installing HP SMH using the ProLiant Remote Deployment Utility...........................29 Installing remotely on Windows using ProLiant Remote Deployment Utility....................................30 7 Installing in-place on Linux..........................................................................................33 Installation for Linux on x86 and x86_64..............................................................................................33 Installing HP SMH on Linux x86 systems.........
About this document Intended audience The HP System Management Homepage (HP SMH) is a web-based interface that consolidates and simplifies single system management for HP servers on HP-UX, Linux, andMicrosoft® Windows® operating systems. This installation guide is for system administrators who are installing HP SMH.
Chapter 12 “Uninstalling HP SMH” (page 57) Related information This section lists the HP SMH documentation and related HP documentation. HP SMH documentation For more information regarding HP SMH, refer to the following sources: 6 • HP System Management Homepage Release Notes The release notes provide documentation for what's new with the release, features and change notifications, system requirements, and known issues.
home at http://www.hp.com/go/softwaredepot and search for System Management Homepage. • HP ProLiant Essentials software page manage. This web page is at http://www.hp.com/servers/ Related documentation For more information relating to HP SMH, refer to the following sources. They are available on the Instant Information DVD and on the HP Technical Documentation web site at http:// docs.hp.com. • HP-UX 11i Installation and Update Guides (v1, B.11.11; v2, B.11.23; v3 B.11.
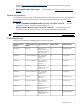
Manufacturing Part Number Supported Operating Systems Supported Versions Edition Number Publication Date 381372-006-en HP-UX, Linux, and Windows For HP-UX: HP-UX 11i v2 (B.11.23), HP-UX 11i v1 (B.11.11). For Linux and Windows: See “Installation requirements” (page 11). 4 June 2006 381372-005 Linux and Windows See “Installation requirements” (page 11). 4 February 2006 381372-004-en HP-UX HP-UX 11i v2 (B.11.23), HP-UX 11i v1 (B.11.11) 3 December 2005 381372-002 HP-UX HP-UX 11i v2 (B.11.
1 Product overview The HP System Management Homepage (HP SMH) is a web-based interface that consolidates and simplifies single system management for HP servers running the HP-UX, Linux, and Microsoft Windows operating systems. HP SMH aggregates and displays data from Web Agents and other HP Web-enabled System Management Software that includes HP Insight Diagnostics, the Array Configuration Utility, and the HP Software Version Control Agents.
2 Installation requirements This chapter provides requirements for the HP-UX, Linux, and Windows systems to run HP System Management Homepage (HP SMH): • • • • • • • “Supported operating systems” (page 11) “Supported browsers” (page 12) “RPMs supported on the x86 platform” (page 12) “RPMs supported on the AMD64 and EM64T platform” (page 13) “RPMs supported on the Itanium platform” (page 13) “Verifying system requirements” (page 14) “Obtaining the HP SMH software” (page 14) — — “HP media” (page 14) “HP web
• • • • • • • • Microsoft Windows Server 2003 Slipstream, Enterprise Edition RTM Microsoft Windows Server 2003 SBS, Standard and Premium Microsoft Windows Server 2003 Web Edition Microsoft Windows Server 2003, Enterprise Edition for Itanium-based Systems Microsoft Windows Server 2003, Datacenter Edition for Itanium-based Systems Microsoft Windows XP Microsoft Windows Server Longhorn Microsoft Windows Vista NOTE: For Linux, the Lightweight Directory Access Protocol (LDAP) is supported on SUSE Linux Enterpr
SUSE Linux Enterprise Server 9 (x86) • • • • glibc 2.3.3-98 or later pam 0.77-221 or later perl 5.8.0 or greater zlib 1.2.1 or greater Red Hat Enterprise Linux 4.0 (x86) • • • • glibc 2.3.3-36 pam 0.77-47 or greater perl 5.8.0 or greater zlib 1.2.1-3 or greater RPMs supported on the AMD64 and EM64T platform HP SMH supports the following RPMs for each of the Linux operating systems on the AMD64 and EM64T platform.
NOTE: The AMD64 is an AMD Opteron processor. The EM64T is an Intel Xeon processor with Extended Memory 64 Technology. The x86 is an Intel Pentium III/IV/Xeon 32-bit processor. The IPF is an Intel Itanium 64-bit processor. Verifying system requirements Before installation begins, the installation utility verifies whether: • • • • For HP-UX, Linux, and Windows, the operating system meets the minimum requirements.
3 Initial setup You can install HP System Management Homepage (HP SMH) on systems running HP-UX, Linux, and Windows. Additionally, you can install HP SMH locally using the Windows ProLiant Support Pack or the Linux RPM (Red Hat Package Manager), or remotely with optional preconfiguration using the ProLiant Remote Deployment Utility or the Linux Deployment Utility.
4 Installing on HP-UX This chapter provides steps to install HP System Management Homepage (HP SMH) on the HP-UX Operating Environments (OEs): • • • • • • • • “System Administration Management Tool changes: SAM and HP SMH” (page 17) “Installing on HP-UX” (page 17) “Installation requirements” (page 18) “Installing HP SMH and dependent applications” (page 18) “Using the Applications media” (page 19) “Using Software Depot” (page 20) “Configuring HP SMH” (page 20) “Patching or updating the software” (page 22)
Installation requirements To install HP SMH, your system must meet the minimum requirements. The following list provides a general review of requirements. For detailed information regarding minimum requirements, see Chapter 2: “Installation requirements” (page 11). • HP-UX 11i v1 (B.11.11) for HP Servers and Workstations HP-UX 11i v2 (B.11.23) for HP Integrity Servers and HP 9000 Servers HP-UX 11i v3 (B.11.
Product Bundle Path Status Release HP-UX CDE User Interface CDE Optional: Certain HP HP-UX 11i v1, v2, v3 /usr/dt/lib/, /usr/dt/lib/hpux32/, SMH plugins require it; e.g., DSAU. and /usr/dt/lib/hpux64/ HP-UX X Window Software X11 Optional: Certain HP HP-UX 11i v1, v2, v3 /opt/atok/X11, SMH plugins require /usr/bin/X11 , and /usr/lib/X11/ it; e.g., fsweb.
See the swinstall(1M) manpage for details. 4. Select and install software from the Applications DVD. The swinstall program has an interface for selecting and installing software from the DVD. 5. Unmount and eject the Applications DVD. You must unmount the DVD before you can eject it from the DVD-ROM drive. The DVD is automatically unmounted whenever the server reboots. Use the umount command to unmount the DVD. For example, umount /cdrom unmounts the /cdrom file system.
Variable Description Script TIMEOUT_SMH The TIMEOUT_SMH environment /opt/hpsmh/conf/timeout.conf variable defines the HP SMH server timeout in minutes. If it is defined and lower than the HP SMH session timeout, the HP SMH server will be stopped three minutes after the HP SMH session timeout. If it is defined and greater than the HP SMH session timeout, then the HP SMH server is stopped after the time period has elapsed without any user activity.
Syntax: smhstartconfig [ -a -b ] [ -t ] Options: -a -b -t Enable/disable the autostart URL mode. Enable/disable the automatic startup on boot mode. Set the Tomcat startup mode where: on off Start Tomcat when HP SMH starts. Start Tomcat on demand (default). If no options are specified, then smhstartconfig displays the current startup mode. The smhstartconfig command does not accept -a on and -b on options simultaneously.
5 Installing on Windows This chapter provides steps to install HP System Management Homepage (HP SMH) on the Windows operating system. • • “Installing HP SMH in-place on Windows” (page 23) “Installing HP SMH for Windows silently” (page 26) The next chapter provides steps to install HP SMH on the Windows operating system using the ProLiant Remote Deployment Utility: • “Installing HP SMH using the ProLiant Remote Deployment Utility” (page 29) Installing HP SMH in-place on Windows 1. 2. 3.
7. Select the level of security you want to provide from one of the following trust modes: a. Trust By Certificate i. Click Next. The Trusted Certificates dialog box appears. The Trusted Certificates dialog box allows trusted certificate files to be added to the Trusted Certificate List. ii. Click Add File to browse and select any certificates to be included in the Trusted Certificate List. The Add File dialog box appears.
Note: The server name cannot contain the following characters: ~, !, `, @, #, $, %, ^, &, *, (, ), +, =, ", :, ', <, >, ?, ,, |, and ;. iv. v. Click Add to add the name of a server you want to trust. Click Next. The IP Binding dialog box appears. Note: If you click Next without adding any server names to the list, an error message appears, indicating that if you do not specify any trusted server names, HP Systems Insight Manager cannot access the HP Web-based Agents on this system.
10. Select IP Restricted Login, and click Next. The IP Address to Include dialog box appears. This dialog box enables you to specify the IP address or IP address ranges to grant login access permission. If there are IP addresses in the Inclusion list, then only those IP addresses are enabled for login privileges. If there are no IP addresses in the Inclusion list, then login privileges are permitted to all IP addresses that are not in the Exclusion list.
NOTE: Do not copy or import certificates when using the setup.exe /r option. Generating a setup.iss file To generate your own setup.iss, run the following command: 1. 2. 3. setup.exe /r The HP SMH Installation interface appears and records your selections. The setup.iss file is placed into the Windows directory. You can move this file to the location of your choice. Installing silently using the CLI To install silently using the CLI, use the following command: setup.exe /s /f1
6 Installing HP SMH using the ProLiant Remote Deployment Utility This chapter provides steps to install HP System Management Homepage (HP SMH) on the Windows operating system using the ProLiant Remote Deployment Utility. • “Installing remotely on Windows using ProLiant Remote Deployment Utility” (page 30) The previous chapter provides steps to install HP SMH in-place on the Windows operating system.
Installing remotely on Windows using ProLiant Remote Deployment Utility To preconfigure the HP SMH component: 1. 2. 3. Under All configurable components, right-click on the HP System Management Homepage component and select Configure. The Welcome wizard appears. Click Next. The Operating System Group dialog box appears providing you with an option to add the groups and select the Operating level. To add HP SMH groups: a. In the Group Name field, enter a name for the group.
7. Select the level of security you want to provide from one of the following trust modes: a. Trust By Certificate i. Select Trust By Certificate. ii. Click Next. The Trusted Certificates dialog box appears. The Trusted Certificates dialog box allows trusted certificate files to be added to the Trusted Certificate List. iii. Click Browse to select the certificate file. After the certificate file is selected, the certificate data appears on the screen. iv. Click Add.
Note: The Trust All option leaves your system vulnerable to security attacks and sets up HP SMH to accept certain requests from any server. For example, you might want to use Trust All if you have a secure network, and everyone in the network is trusted. 8. Select IP Binding to enable the Subnet IP Address and NetMask. The IP Binding dialog box enables you to bind to specific IP addresses that match a specific Subnet IP Address or NetMask. It restricts the subnet you want to manage. a. b. c.
7 Installing in-place on Linux This chapter provides steps to install HP System Management Homepage (HP SMH) in-place on Linux x86 systems and x86_64 systems. • “Installation for Linux on x86 and x86_64” (page 33) — — — “Installing HP SMH on Linux x86 systems” (page 33) “Installing HP SMH on x86_64” (page 33) “Configuring HP SMH” (page 33) The next chapter provides steps to install HP SMH in-place on Linux systems using the Linux Deployment Utility.
To configure HP SMH settings: 1. Enter the following command to start the configuration: perl /usr/local/hp/hpSMHSetup.pl The Welcome screen appears, indicating that you can configure security and access parameters on the following screens. 2. The Welcome screen indicates that you can configure security and access parameters for HP System Management Homepage and related HP web-based management tools. Press Enter. The Operating System Groups screen appears. 3.
4. Configure Local and Anonymous Access. The following options are available: • Enter 1 to enable Anonymous Access. Caution: HP does not recommend the use of anonymous access. • • • Enter 2 to disable Anonymous Access. Enter 3 to disable Local Access. Enter 4 to enable Local Access - Anonymous. Local Access enables you to locally gain access to HP SMH without being challenged for authentication. Any local user has access limited to unsecured pages without being challenged for a username and password.
a. Trust by Certificate i. To add a certificate file: A. Enter 1. You are prompted for the certificate location. B. Enter the file path of the trusted certificates to be added to the Trusted Certificates List. Press Enter when you are finished. For example: I. II. File: /home/ServerName/cert1.pem . Press Enter. The cert1.pem is added to the Trusted Certificates List. If the certificate file does not exist, a message appears indicating that /home/ServerName/cert1.pem does not exist. C. ii.
c. Trust All i. Enter 3 to Trust All. Trust Mode: Trust All appears. ii. Enter n for next. The IP Binding screen appears. d. Modify Certificate List Enter 4 to Modify Certificate List. 8. Bind IP addresses that match a subnet and netmask. The following options are available: a. Enable IP Binding i. Enter 1 to enable the IP Binding, which sets it to ON. IP Binding: ON appears. ii. Enter n to go to the next screen. The following options are available: To add an IP address: A.
9. Configure HP SMH to restrict login access based on the IP address of the system from which the login is attempted. The following options are available: a. Enter 1 to enable an IP Restricted Login, which sets it to ON. IP Restricted Login:ON appears. To enable the IP Restricted Login: i. ii. Enter 1. IP Restricted Login is set to ON. Press n for next. The Set IP Address Restrictions screen appears. To add IP addresses to the Inclusion List: A. Enter 1 for Include Login Restriction IP Address. B.
10. Enter n to go to the next screen. The configuration completes, and a message appears indicating that HP SMH is successfully set up. The HP SMH service is stopped and started automatically. 11. Verify HP SMH is configured and working properly by navigating to it and verifying that it displays correctly.
8 Installing directly on Linux Installing in-place on Linux Itanium This chapter provides steps to install HP System Management Homepage (HP SMH) in-place on Linux Itanium. • “Installation for Linux Itanium” (page 41) — — “Installing HP SMH on Linux Itanium systems” (page 41) “Configuring HP SMH” (page 41) The next chapter provides steps to install HP SMH in-place on Linux systems using the Linux Deployment Utility.
3. The Operating System Groups screen enables you to add operating system groups to HP SMH. Add or delete operating system groups in HP SMH. The following options are available: a. To add groups: i. At the prompt, enter 1 to add a group. The Add Operating System Groups screen displays the operating system group lists. Note: You can add up to five entries per group. Enter one of the following options to assign the operating system group to the Administrator Group List: • Enter 1 for Administrator.
5. 6. 7. Enter n to go to the next screen or enter p to go to the previous screen. Enter n to go to the next screen. The Trust Mode screen appears. Configure the HP SMH trust mode. Enter 1 for Trust by Certificate. Trust Mode: Trust by Certificate appears. The following options are available: Trust by Certificate, Trust by Name, Trust All and Modify Certificate List. a. Trust by Certificate i. To add a certificate file: A. Enter 1. You are prompted for the certificate location. B.
b. Trust by Name i. Enter 2 to Trust by Name. Trust Mode: Trust by Name appears. ii. Enter 4 to Modify Server Name list. To add an HP Systems Insight Manager server's certificate name: A. Enter 1. You are prompted to add an HP Systems Insight Manager server's certificate name. B. Enter the name of the certificate of HP Systems Insight Manager server to be trusted and press Enter. The certificate name appears in the Trusted Server Names list. Note: You can add as many server certificate names as you want.
9. Configure HP SMH to restrict login access based on the IP address of the system from which the login is attempted. The following options are available: a. Enter 1 to enable an IP Restricted Login, which sets it to ON. IP Restricted Login:ON appears. To enable the IP Restricted Login: i. ii. Enter 1. IP Restricted Login is set to ON. Press n for next. The Set IP Address Restrictions screen appears. To add IP addresses to the Inclusion List: A. Enter 1 for Include Login Restriction IP Address. B.
10. Enter n to go to the next screen. The configuration completes, and a message appears indicating that HP SMH is successfully set up. The HP SMH service is stopped and started automatically. 11. Verify HP SMH is configured and working properly by navigating to it and verifying that it displays correctly.
9 Installing in-place on Linux using Linux Deployment Utility This chapter provides steps to install HP System Management Homepage (HP SMH) in-place on the Linux operating system using the Linux Deployment Utility.
6. In the Please enter the Operating System (OS) Group Names for user-level access. (Max five names, separated by semicolon or space) field, enter the operating system group name for user-level access. Note: You can enter up to five operating system group names for user-level access. Separate the group names with a semicolon (;) or space. 7. In the Allow Local Access field, enter YES to allow local access or NO to disallow local access. 8.
Installing HP SMH without preconfiguration You can install the HP SMH component without any configurations by clicking Install. You can configure HP SMH settings at any time by logging into HP SMH with root privileges.
10 Initializing the software for the first time After HP System Management Homepage (HP SMH) has been installed and configured for the first time, a process to create a private key and corresponding self-signed Base64-encoded certificate is initiated. This certificate is a Base64-encoded PEM file. Key and certificate information • • • In HP-UX, both public and private keys for HP SMH are stored in the /var/opt/hpsmh/sslshare directory. The files are called file.pem (private key) and cert.
11 Logging in and logging out of HP SMH This chapter provides browser and command line instructions for logging in to and out of HP System Management Homepage (HP SMH).
1. Navigate to https://hostname:2381/. To avoid an active scripting error, HP recommends that you add the HP SMH URL to Internet Explorer's Trusted Sites. To add HP SMH to Internet Explorer's Trusted Sites: a. b. c. d. e. f. g. From Internet Explorer, click Tools ⇒ Internet Options. Click the Security tab. The Security tab appears. Select the Trusted sites icon. Click Sites.... The Trusted sites dialog box appears. In the Add this website to the zone field, enter https://hostname:2381/ and click Add.
Logging in with Mozilla and Firefox To log in to HP SMH with Mozilla and Firefox: 1. Navigate to https://hostname:2381/. If you are using Mozilla or Firefox to browse to an HP-UX system, then you can use port 2381 if you changed the default configuration to have autostart disabled and start on boot enabled. If you keep the default-installed configuration, you can use the following URI: http://hostname:2301/ By default, HP-UX is installed with the autostart feature enabled.
• • • In the System Management Homepage banner, for HP-UX click Sign Out and for Linux and Windows click logout. Close every instance of the web browser that you use to log in to HP SMH. You can stop HP SMH from the HP-UX command line: /opt/hpsmh/lbin/hpsmh stop This will not stop the mini-daemon smhstartd, but will stop the HP-UX Apache-based web server. The next time you contact HP SMH through http://hostname:2301, the HP-UX Apache-based web server will again start up on port 2381 (https).
12 Uninstalling HP SMH This chapter provides instructions on how to uninstall HP System Management Homepage (HP SMH) from HP-UX, Linux, and Windows systems. It also provides instruction on how to uninstall it manually.
Uninstalling manually for Windows systems Uninstalling manually duplicates the actions of the HP SMH uninstaller, which can be accessed through Add/Remove Programs in the Control Panel. Use this procedure if you want to completely uninstall HP SMH, and the uninstaller has been inadvertently removed or corrupted. Note: Items marked if present are present if there is an existing HP SMH 2.0.1 or 2.0.2 installation.
Index A audience, 5 C console install Linux, 33 console Installation Linux system preparation, 41 requirements, 11, 14 RPMs on AMD64 and EM64T, 13 RPMs on Itanium, 13 RPMs on x86, 12 web browsers, 12 Windows, 23, 29 Itanium RPMs, 13 L getting started, 15 Linux install, 33 Linux Deployment Utility install, 47 Linux IA_32 install, 33 Linux Itanium-based system system preparation, 41 Linux x86_64 install, 33 logging in, 53 logging out, 53 H M HP SMH HP-UX install, 17 install requirements, 11, 14 Linux
U uninstalling, 57 W web browsers, supported, 12 web sites, 14 Windows install, 23 install ProLiant Remote Deployment Utility, 29 60 Index