
Software Package Builder 5.0 User's Guide


NOTE: The depot is opened as a READ-ONLY file. Validation errors can be viewed but cannot
be resolved from within SPB.
Validating a Depot for Installation Errors
To validate a depot for installation errors before installing the depot perform the following::
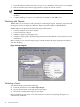
1. From the main menu, select Tools->Check Target.
2. Specify the host name in the New Hostname field and click Add New Host. The hosts will
be added to both Predefined Targets list and Selected Targets list.
Or
select the available host in the Predefined Targets field and click Add>> to populate the
Selected Targets list.
NOTE: The Predefined Targets list is empty during the first run, and will be populated
during subsequent sessions with the hosts on which installation error validation is performed
during the current session.
3. Select Forceful checkbox to ignore the packaging errors and warnings of the depot and
proceed with the installation error validation.
4. Click OK to preview installation errors in the main screen status panel under Command
Output tab.
NOTE: Before validating the depot for installation errors, the user should set ACL permissions
on the target machines. For more information on how to set ACL permissions, see SDUX
Administrator's Guide available at:
http://www.software.hp.com/products/SD_AT_HP/information_library.html
Comparing Two Depots
Use SPB to compare two or more depots that have identical content but different revision
information. This information is displayed in the Depot Properties and in the Attribute Table.
1. Once a depot is open and active, highlight the PSF element.
2. View the Attribute Table to compare depot properties
NOTE: The depot properties, which are set by SD when the depot is created are not valid PSF
attributes. Therefore, the Depot Properties will appear in the PSF as comments.
Creating a PSF from a Depot
Use SPB to create a PSF template with similar software elements from a depot. Once the PSF is
created, you can edit accordingly.
1. Select the appropriate depot tab.
2. From the main menu, select File->Save As.
3. Rename the depot and save as a PSF. The new PSF is created and its associated tab appears
at the top of the Package Structure.
Working with Depots 43