
Software Package Builder 5.0 User's Guide
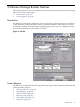


2. Navigate the Source Filesystem and locate the appropriate directory path.
3. Select the directory or files you want to add to the Destination Filesystem.
4. Click Add. The directory or file(s) are added to the selected directory in the Destination
Filesystem.
5. Repeat this process until you have mapped all the appropriate source files to the Destination
Filesystem.
6. From the Destination Filesystem, select the directory you want to map files into.
Procedure 4-6 To set file (or directory) permissions
1. Select the appropriate file (or directory) from the Destination Filesystem.
2. From the File Attributes table (or Directory Attributes table), click in the Mode field.
3. Select the mode appropriate for your file (or directory).
4. Once you have set all desired file permissions, click OK to exit and return to the main
window.
NOTE: SPB by default assigns the file mode access for a destination file or directory by inheriting
the setting from the original source. If you wish to accept the default settings, you need not do
anything.
TIP: You can apply a common mode across a select group of files in the File Attributes table
by right-clicking in a Mode field and selecting Apply to All.
Validating a PSF
Within SPB, validation occurs when you:
• Open an existing PSF
• Enter data
The results of the validation process appear on the Messages tab. If the PSF is valid, the message
Validation Status: PSF Passed Validation appears. If it is invalid, you should debug
the PSF as directed by the information provided in the Policy Help tab.
Setting Attributes
Most attributes are optional; however, there are a few required attributes. Setting optional
attributes can help to provide more control and precision when the software package is installed,
updated, and removed.
You can filter which attributes you want to display in the Attribute Table by selecting to view
only the required and currently set attributes.
Procedure 4-7 To filter the attribute display
1. Highlight any software element in the Package Structure.
2. From the View menu, select Show Required or Set Attributes.
3. View how the Attribute Table display has changed. The required attributes that you may
have entered, along with any pre-set, default attribute display.
To set attributes
1. Highlight a software element in the Package Structure. Its associated Attribute Table displays.
2. In the Attribute Table, click in the desired Attribute Value field and enter valid data.
28 Getting Started with Software Package Builder