
Software Distributor (SD-UX) Administration Guide HP-UX 11i v1, 11i v2, and 11i v3 (762797-001, March 2014)

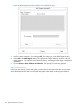
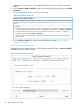
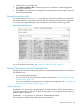
Table Of Contents
- Software Distributor Administration Guide
- Contents
- HP secure development lifecycle
- About This Document
- 1 Introduction to Software Distributor
- SD-UX Overview
- SD-UX Concepts
- Using the GUI and TUI Commands
- The Terminal User Interface
- Starting the GUI/TUI Commands
- Window Components
- Opening and closing items in the object list
- Marking Items in the Object List
- Preselecting Host Files
- Software Selection Window
- Session and File Management—The File Menu
- Changing Software Views—The View Menu
- Changing Options and Refreshing the Object List—The Options Menu
- Performing Actions—The Actions Menu
- Getting Help—The Help Menu
- XToolkit Options and Changing Display Fonts
- Working from the Command Line
- 2 Installing Software
- Installation with swinstall
- Features and Limitations
- Installing with the GUI
- Installing from the Command Line
- Installation Tasks and Examples
- Updating to HP-UX 11i
- Installing Patches
- Recovering Updated Files
- Installing Software That Requires a System Reboot
- Using Software Codewords and Customer IDs
- Re-installing Software Distributor
- Installing Multiple Versions
- Installing to an Alternate Root
- Compatibility Filtering and Checking
- Software Selection Checking
- Configuring Your Installation (swconfig)
- Verifying Your Installation (swverify)
- Installation with swinstall
- 3 Managing Installed Software
- 4 Managing Software Depots
- Depot Management Commands and Concepts
- Copying Software Depots
- Registering and Unregistering Depots (swreg)
- Verifying Signed Software Signatures
- Additional Depot Management Tasks and Examples
- Combining Patch Depots
- Creating a Tape Depot for Distribution
- Setting Depot Attributes
- Creating a Network Depot
- Managing Multiple Versions of HP-UX
- Listing Registered Depots
- Listing the Contents of a Depot (swlist -d)
- Source Depot Auditing
- Verifying a Depot (swverify -d)
- Removing Software from Depots
- Removing a Depot
- 5 HP-UX Patching and Patch Management
- 6 Using Jobs and the Job Browser
- 7 Remote Operations Overview
- 8 Reliability and Performance
- 9 SD-UX Security
- 10 Creating Software Packages
- Overview of the Packaging Process
- Identifying the Products to Package
- Adding Control Scripts
- Creating a Product Specification File (PSF)
- Product Specification File Examples
- PSF Syntax
- PSF Object Syntax
- Selecting the PSF Layout Version
- PSF Value Types
- Product Specification File Semantics
- Re-Specifying Files
- Packaging the Software (swpackage)
- Packaging Tasks and Examples
- Registering Depots Created by swpackage
- Creating and Mastering a CD-ROM Depot
- Compressing Files to Increase Performance
- Packaging Security
- Repackaging or Modifying a Software Package
- Packaging In Place
- Following Symbolic Links in the Source
- Generating File Revisions
- Depots on Remote File Systems
- Verifying the Software Package
- Packaging Patch Software
- Writing to Multiple Tapes
- Making Tapes from an Existing Depot
- 11 Using Control Scripts
- Introduction to Control Scripts
- General Script Guidelines
- Packaging Control Scripts
- Using Environment Variables
- Execution of Control Scripts
- Execution of Other Commands by Control Scripts
- Control Script Input and Output
- File Management by Control Scripts
- Testing Control Scripts
- Requesting User Responses (swask)
- Request Script Tasks and Examples
- 12 Nonprivileged SD
- A Command Options
- B Troubleshooting
- Error Logging
- Common Problems
- Cannot Contact Target Host’s Daemon or Agent
- GUI Won’t Start or Missing Support Files
- Access To An Object Is Denied
- Slow Network Performance
- Connection Timeouts and Other WAN Problems
- Disk Space Analysis Is Incorrect
- Packager Fails
- Command Logfile Grows Too Large
- Daemon Logfile Is Too Long
- Cannot Read a Tape Depot
- Installation Fails
- swinstall or swremove Fails With a Lock Error
- Use of Square Brackets ([ and ]) Around an IPv6 Address Causes an Error
- Some SD commands do not work after network configuration changes
- C Replacing or Updating SD-UX
- D Software Distributor Files and File System Structure
- Glossary
- Index
1. Select the text area after Job Title and type:
SDTESTJOB
This is the name of your install job.
2. Select OK to install the software now.
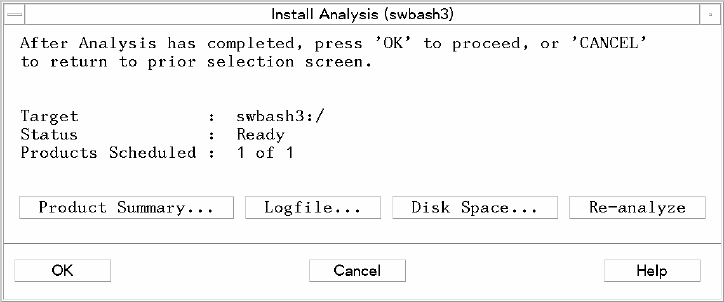
For single-target installations such as this tutorial, the Install Analysis dialog appears (Figure 52
(page 127)).
3. If this is your first pass through the tutorial, proceed to Step V.
4. (Optional) Previewing a Job
a. Select the Preview button. This tells SD to analyze the software without installing it.
b. Click OK. The Install Analysis dialog appears. This dialog lets you monitor the analysis
of a single-target job. You can also browse log files and product summary information.
c. When the target Status indicates Ready (analysis is successful), select OK. This returns
you to the Software Selection Window.
d. Select Actions→Install. The Install Preferences dialog appears.
e. Proceed with the installation by selecting OK in the Install Preferences dialog.
(If you repeat this tutorial and choose to preview a job that uses multiple targets, you will
find that the Install Analysis dialog does not appear. You can only preview job progress
from the Job Browser. See “Step VII: Monitor Results ” (page 128) for more information.)
5. (Optional) Scheduling a Job
a. Select the Schedule button. This activates the fields that let you specify the time and date
you at which you want your job to run. (For example, you may want to schedule a job
at midnight when few users are logged in.)
b. After you specify the schedule information, click OK. The system displays a note indicating
that the job has been scheduled.
c. Click OK in the dialog. The Target Selection Window reappears. Select File→Exit to
return to the Job Browser, from which you can monitor your scheduled job.
Step VI: Analysis and Installation
SD-UX analyzes the target before performing the actual install, copy, or remove operation. (If you
set up a preview job in Step IV, the install stops after the analysis.)
Figure 52 Install Analysis Dialog
Remote Operations Tutorial 127