
Software Distributor Administration Guide HP-UX 11i v1, 11i v2, and 11i v3 (5900-2561, March 2013)


(See Chapter 11: “Using Control Scripts ” (page 207))
• Software can be installed to alternate root directories.
2.1.2 Installing with the GUI
Overview
This section provides an overview of the swinstall GUI.
• In general, all information presented in “Installing from the Command Line” (page 47) also
applies to the swinstall GUI.
• This section also refers to additional information about standard GUI elements, discussed in
“Using the GUI and TUI Commands” (page 23).
• All information in this section also applies to the TUI program unless otherwise noted. See
“The Terminal User Interface” (page 23) for more information.
There are five steps in the GUI install process:
Table 6 GUI Installation Steps
Start the swinstall GUI.I. Start-Up
Provide the location of the software depot from which the software will
be installed.
II. Select Source
Choose the software to install.III. Select Software
Analyze (preview) the installation to determine if the selected software
can be installed successfully.
IV. Analysis (Preview)
Perform the actual software installation.V. Installation
Step I: Start-Up
To start the GUI or TUI for an install session, type:
/usr/sbin/swinstall
The GUI is automatically invoked unless you also specify software on the command line. To invoke
the GUI and specify software, include the -i option. For example, to use the GUI for a preview
(analysis only) session with BUNDLE1, type:
swinstall -i -p /MyDepot/BUNDLE1
The Software Selection window appears with the Specify Source dialog superimposed over it.
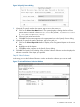
Step II: Select Source
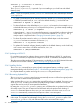
In this step, you must specify the source depot that contains the software you want to install. The
Specify Source dialog (Figure 16: “Specify Source Dialog ”,) automatically lists the local host and
default depot path.
(This step is skipped if you include the -s source option when you invoke the GUI.)
42 Installing Software