
Software Distributor Administration Guide HP-UX 11i v1, 11i v2, and 11i v3 (5900-2561, March 2013)
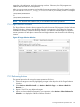
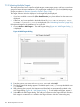
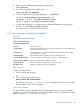
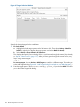
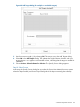
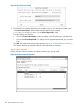
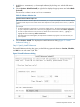
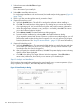

Figure 47 Target Selection Window
Specify the desired target for the installation:
1. For local default:
a. Highlight the local target system with a left mouse click. Then select Actions→Mark for
Install (or right-click to display the pop-up menu and select Mark for Install).
b. Select Actions→Show Software for Selection...
This displays the Specify Source dialog. If this is your first time through this tutorial, skip directly
to “Step III: Select Source” (page 127). After you have gone through this tutorial once, retry
Step I using remote targets.
— or —
For remote targets: choose Actions→Add Targets to install to a different target. This takes you
to the Add Targets dialog (Figure 48: “Add Target Dialog (for multiple or non default targets)”,).
2. Enter the target name in the Hostname: area (e.g., system_two) and select Add. This takes
you to the Select Target Path dialog.
126 Remote Operations Overview