
Software Distributor Administration Guide HP-UX 11i v1, 11i v2, and 11i v3 (5900-2561, March 2013)
4. Make sure your DISPLAY variable is properly set by typing:
echo $DISPLAY
5. Ensure that the examples are installed. Enter:
swlist SW-DIST.SD-EXAMPLES
6. Create the depot containing example package (i.e., SD-DATABASE):
cd /usr/lib/sw/examples/swpackage/depot_src
swpackage -s psf @ /var/adm/sw/examples/depot
swreg -l depot @ /var/adm/sw/examples/depot
7. To verify that the software is in the depot and is available for distribution to targets, enter:
swlist -s /var/adm/sw/examples/depot
You should see SD-DATABASE in the resulting list.
7.4.2 How to Perform a Single-Target Installation
Overview
The tutorial consists of these steps:
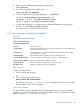
Table 30 Installation Steps
Overview of Installation Steps
Start the Job Browser.I. Start-up
Specify the targets where you want the software installed. You can use the default local
target or specify another target.
II. Select Targets
Provide the location of the software depot from which the software will be installed
with the Specify Source dialog.
III. Select Source
Use the Software Selection Window to select the software to install.IV. Select Software
Use the Install Preferences dialog box to set preview or scheduling options.V. Specify Install Preferences
Perform the actual software installation or preview.VI. Analysis and Installation
Monitor job progress and results using the Job Browser GUI.VII. Monitor Results
Delete the completed jobs using the Job Browser.VIII. Remove Jobs
Step I: Start-up
To initiate an install session:
1. Start the Job Browser by typing:
sd
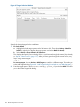
2. From the Job Browser window, choose
Actions→Create Job→Install Software...
The message “Invoking a swinstall process” displays at the bottom of the window,
then the Target Selection Window appears.
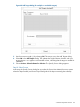
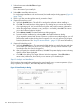
Step II: Select Targets
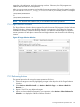
The Target Selection Window displays the local, default target. A target is where you want the
installation to go (in the example below, the target is the system swbash3). By default, the current
system is listed (Figure 47: “Target Selection Window”,).
7.4 Remote Operations Tutorial 125