
Software Distributor Administration Guide HP-UX 11i v1, 11i v2, and 11i v3 (5900-2488, September 2012)
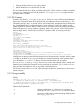
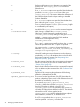
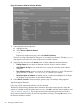

Figure 22 swremove Software Selection Window
1. Select software from the object list:
a. Highlight an item
b. Select Actions→Mark For Remove
— or —
Right-click to display the pop-up, then select Mark For Remove
The Marked? flag in the object list changes to Yes to match your selection. (The flag Partial
may appear if you select only some component of a software object.)
2. (Optional) Use choices from the Actions menu to make additional software selections:
• Change Target lets you select an alternate root from which to remove software.
• Add Software Group lets you recall and re-use a group of previously saved software
selections.
• Save Software Group saves the current list of marked software as a group. SD stores the
group definition in $HOME/.sw/software/ or a directory you specify.
• Show Description of Software (available only for a single item highlighted in the object
list) displays more information on the selected software.
3. Select Actions→Install to start the analysis (preview) step. The Analysis dialog appears.
Step III: Analysis (Preview)
In this step, SD-UX analyzes the software you have selected.
The Remove Analysis dialog displays status information about the analysis process. When the
analysis is complete and the host status shows Ready, click OK to start the actual installation (see
“Step IV: Removal” (page 81)). The Analysis dialog is then replaced by the Remove Window.
(If you started a preview session, the removal stops after the analysis. Clicking OK returns you to
the Software Selection window.)
80 Managing Installed Software