
Software Distributor Administration Guide for HP-UX 11i

Remote Operations Overview
Using the Remote Operations GUI
Chapter 6196
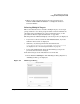
2. Enter the primary root name in the Hostname: area and select
Add.
3. The Select Target Path dialog appears. The default path is root (/).
To accept the default root (/), click
OK.
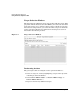
4. After selecting the root path, the Hostname and Root Path are
automatically updated in the Add Target dialog (Figure 6-2, “Add
Targets Dialog,”). To add additional targets, repeat 2.
5. Select
OK in the Add Targets dialog. This adds your selections to the
Target Selection Window. Each target is contacted as it is added to
the Target Selection Window. Networking may cause delays; if the
SD-UX daemon is not running on the target, the delay lasts until the
daemon times out.
From the Target Selection Window, any targets added using
Add
Targets...
are automatically marked Yes.
6. If there are any other desired targets in the Target Selection List
that are not marked and you want to install to them, highlight the
target by clicking on it.
Choose
Actions→Mark for Install. The Marked? column is set to Yes for
that target.
— or —
Hold down the right mouse button and choose
Mark for Install from the
resulting menu.
7. To unmark a target in the Target Selection Window (i.e., object list):
a. Highlight the target
b. Choose
Actions→Unmark for Install. The Marked? column is
cleared for that target.
— or —
Hold down the right mouse button and choose
Unmark for install.
At this point, all desired targets should be listed and have Yes in the
Marked? column. If you have not marked any targets, you cannot proceed
to the Selecting Software phase.