
C and C++ SoftBench User's Guide


Using SoftBench
Adding Existing Files to a Project
Chapter 2 59
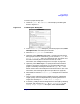
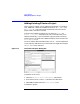
1. Select the "❍ Choose Files By Directory" radio button.
2. Enter the directory name, or select … to browse to the desired
directory.
3. Optionally, select the "m This Directory Down Recursively" radio
button. Note: The recursive option on a deep hierarchy can take a
long time, because this process looks at every file in the hierarchy.
The recursive option works best on fairly shallow or restricted
hierarchies.
4. Select the desired file types. For example, to add C++ source files and
header files, select both "C++ Source" and "C++ Include" in the
"Select types of files to add" list. If the file types you need are
not in the list, select More File Types to edit the list.
5. Select Add to add the qualified files to the "Files Selected" list.
Qualified files are files in the specified directory (and possibly its
subdirectories) with the specified file types.
6. To selectively delete files from the "Files Selected" list, select the
files and select the Delete button. (This does not delete files from your
file system.)
7. Select OK.
After you close the dialog box, the Files view displays the files that you
added to the project. The Files view is a logical representation of a file
set. It shows you all the files in the project, regardless of whether the
files exist on the file system.
The icon beside each file in the Files view shows whether the file exists.
When you create a file in the file system, or check a file out of
configuration management, the file's icon appearance changes. A page
with lines indicates that the file exists in the localworkspace and a blank
page indicates that it does not exist in the local workspace. A page with
an arrow indicates a target, and lines indicate whether it exists in the
local workspace or not. To update the Files view with the current file
status, choose "View: Refresh Files View".