
C and C++ SoftBench User's Guide


Using SoftBench
Setting Up a Project
Chapter 2 53
must properly handle paths relative to your build directory.
6. Optionally, select Add Existing Source Files… to specify the source files
during project creation. Alternatively, you can choose "Project: Add
File(s) to Project…" after you create the project.
7. Optionally, select Define Targets… to specify the build commands for
targets in the project. Alternatively, you can choose "Target: New…"
after you create the project.
8. Select Create to close the "Create Project" dialog box and create the
project.
Cloning a Project from an Existing Project
SoftBench allows you to clone existing projects. Cloning uses an existing
project definition as the basis for a new project. The cloning process
copies only the SoftBench description of the file set, target list, and build
configurations. It does not copy the physical project source and target
files.
See “One Project, Many Authors” on page 27 for a diagram of using
cloning.
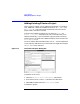
To clone a project:
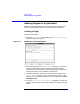
1. Choose "Project: New → Clone…".
2. In the "Clone Project" dialog box, provide the project name, your
local workspace root, and descriptive comment. choose a different
local workspace root for the cloned project; otherwise you might
overwrite files or targets unintentionally.
3. Select the project from the "Project to Clone" list.
If the project you are cloning is not in the list, then change the project
search path:
a. Enter the new "Project Search Path".
b. Select Search for Projects to update the "Project to Clone" list.
c. Select the project to clone.
For example, if you are cloning a project created by a coworker, you
need to tell SoftBench where the coworker's project definitions are
located. By default, SoftBench stores project definitions under
$HOME/.softbench.