
C and C++ SoftBench User's Guide


Using SoftBench
Setting Up a Project
Chapter 2 51
To create a project build project:
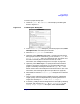
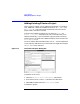
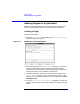
1. Choose "Project: New →Create…" which displays the dialog box
shown in Figure 2-4.
Figure 2-4 Create Project" Dialog Box
2. In the "Create Project" dialog box, provide the project name, local
workspace root, and a descriptive comment.
3. Select the "❍ Project Build" radio button.
4. Optionally, select Add Existing Source Files… to specify the source files
during project creation. Alternatively, you can choose "Project: Add
File(s) to Project…" after you create the project. The button and
the menu command perform the same function. (For more
information, see “Adding Existing Files to a Project” on page 58.)
5. Optionally, select Define Targets… to specify the build commands for
targets in the project. Alternatively, you can add targets after the
project is created by choosing the command "Target: New…". The
button and the menu command perform the same function. (For more
information, see “Defining Targets for Project Build” on page 60.)
6. Select Create to close the "Create Project" dialog box and create the
project.
7. Once you have created the project, added source files, and defined
targets, specify source file dependencies by selecting the files for a
target, then choosing "File: Link Source to Target…".
8. If necessary, modify the build configuration for the target by selecting
the target, then choosing "Target: Modify Properties…". In the
"Modify Target Properties" dialog box, select Customize Build