
C and C++ SoftBench User's Guide

Using SoftBench Graph Windows
Using Graph Window Areas
Appendix A 329
7. If you selected HP-GL, make sure the "HP-GL Device Type" option
menu reflects the hardware on which you intend to print the image.
8. Enter your filename, which can also include the path name. For
example, use savegraph.hpgl or savegraph.ps. Optionally, select
the … button to access a file selection dialog box for specifying the file
name.
9. Save the image. Selecting Apply saves the file and leaves the dialog
box up for further actions. Selecting OK saves the file and closes the
dialog box. Selecting Cancel closes the dialog box without performing
any actions. If you select Cancel, the dialog retains its current settings
until changed during the same session. Settings in this dialog are not
saved between sessions.
Many programs that convert the HP-GL or PostScript files to other
formats convert only the graphical objects and do not convert text. If
processed in this manner, the arc and node labels may be lost when you
print the file.
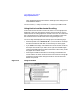
Saving xwd Images
The xwd option saves only the image on your screen. If necessary, adjust
your image size or location in the Graph Area or resize the window. Make
sure the graph window is fully exposed and displaying the information
you wish to save. Portions of windows obscuring the graph will appear in
the image. Black and white color schemes print best. When using
SoftBench color schemes, it may be necessary to convert to black and
white before printing. Check with your local system administrator for
conversion utilities.
To save your xwd file:
1. Select xwd from the "File Format" option menu. When you select this
option, the "Print Area", "Scaling", "Orientation", and "Page
Size" option menus are not sensitive and may not be modified.
2. Enter your filename in the "File Name" input box. The filename can
include the path name. For example, use savegraph.xwd. Optionally,
select the … button to access a file selection dialog box for specifying
the file name.
3. Save the image. Selecting Apply saves the file and leaves the dialog
box up for further actions. Selecting OK saves the file and closes the
dialog box. Selecting Cancel closes the dialog box without performing
any actions. If you select Cancel, the dialog retains its current settings