
HP-UX OSRA for Web Services 2.5 Blueprint and Configuration Guide
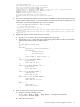


Installing and Configuring a Database Backup Tool
The following section describes how to use the HP Data Protector for testing purposes. In this
example, the Data Protector Cell Manager and agent are installed separately on two different
HP-UX systems.
Before performing the following test, install the Data Protector 6.0 server on a HP-UX system.
Use the following steps to install and configure the Data Protector 6.0 Agent:
1. To install HP Data Protector on the HP-UX-based server, download the HP Data Protector
for HP-UX PA-RISC - Installation Server 1 of 2 (CD ISO image) from the following website:
http://h20229.www2.hp.com/downloads/evals.html
2. Open the image and enter the following command:
# ./omnisetup.sh -install
3. Use the cell manager to install the agent on any of the HP-UX machines where the MySQL
server is installed.
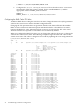
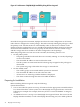
4. Add the MySQL slave server as a client of the Data Protector Cell Manager.
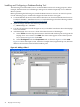
a. Select clients from the drop down menu in the left hand window pane and type in the
MySQL slave server name. Click Add. The client name appears in the Client Systems
list, as shown in Figure 4-3. Click next.
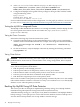
b. Select Disk Agent under the Components tab, as shown in Figure 4-4. Click next.
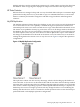
Figure 4-5 shows the output screen, where the example client, bugatti.ind.hp.com, has been
added to the client list in the left hand window pane.
Figure 4-3 Adding a Client 1
40 MySQL Tools and Tips