
Red Hat Directory Server 8.0 Administrator's Guide

1.2.1. Creating a Managed Role
Managed roles have an explicit enumerated list of members. Managed roles are added to
entries by adding the nsRoleDN attribute to the entry.
To create and add members to a managed role, do the following:
1. In the Directory Server Console, select the Directory tab.
2. Browse the tree in the left navigation pane, and select the parent entry for the new role.
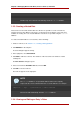
3. Go to the Object menu, and select New > Role.
Alternatively, right-click the entry and select New > Role.
The Create New Role dialog box is displayed.
4. Click General in the left pane. Type a name for the new role in the Role Name field.
The role name is required.
5. Enter a description of the new role in the Description field.
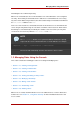
6. Click Members in the left pane.
A search dialog box appears briefly.
7. In the right pane, select Managed Role. Click Add to add new entries to the list of members.
The standard Search users and groups dialog box appears.
8. In the Search drop-down list, select Users from the Search drop-down list, then click
Search. Select one of the entries returned, and click OK.
9. After adding all of the entries, click OK.
The new role appears in the right pane.
NOTE
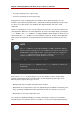
The nsRoleDN attribute is an operational attribute and must be explicitly
requested in the search command in the list of search attributes. For example:
ldapsearch ... args ... “(uid=scarter)” \* nsRole nsRoleDN
The Console will automatically show the nsRoleDN attribute.
Chapter 5. Managing Entries with Roles, Class of Service, and Views
134