
HP-MPI Version 2.0 for Windows Release Note


4 Installation Instructions
HP-MPI must be installed on all nodes which are used to launch or run jobs. The installation
directory used must be the same on all nodes. HP strongly recommends that you uninstall any
previous versions of HP-MPI for Windows before installing V2.0.
To install HP-MPI, log in as Administrator, and follow the instructions for either an interactive
or command line installation described below.
4.1 Standard Interactive Installation
Double-click Setup HP-MPI-2.0-060409.exe, and follow the onscreen prompts to install the
product.
4.2 Command-Line Installation for Windows HPCS
The HP-MPI installer can be invoked from the command line to enable unattended installation
from a command window. To install HP-MPI in this manner on a HPCS system, run the install
package on every node in the cluster, and include the /verysilent flag.
The installer assumes the default values for the installation directory and program group, unless
you override them by specifying additional command line parameters. To override the install
directory, specify the /DIR="x:\dirname" parameter. To override the program group, specify
the /GROUP="group name" parameter.
To easily install HP-MPI on all nodes in the cluster, log in as Administrator, and use the following
command to execute the install command:
headnode> clusrun /all "\\netshare\path\Setup HP-MPI-2.0-060409.exe" /verysilent /COMPONENTS=hpmpihpcs
Using the Compute Cluster Administrator Console GUI, you can select the compute nodes, then
select Action→Run Command. Run the HP-MPI install package with the /verysilent flag:
headnode> "\\netshare\path\Setup HP-MPI-2.0-060409.exe" /verysilent
If you require a license file, you must copy one to every node after HP-MPI is installed. To do
this, create the licenses directory and copy the mpi.lic file to this directory. Using the
clusrun command from the head node is the easiest way to accomplish this.
To create the licenses directory, enter the following on one command line:
headnode> clusrun /all mkdir "C:\Program Files (x86)\Hewlett-Packard\HP-MPI\licenses"
To copy the license file to all nodes, enter the following on one command line:
headnode> clusrun /all copy "\\netshare\path\mpi.lic" "C:\Program Files (x86)\Hewlett-Packard\HP-MPI\licenses"
4.2.1 Importing the HP-MPI Job Description File to the Head Node
A new feature for HPCS is the ability to schedule jobs using a generic job description file. To
schedule jobs using the HP-MPI job description file, import the file to your head node. This can
be selected on the Job Details section of a scheduled job.
NOTE: In Windows CCS, a job template was a template for individually saved jobs. For HPCS,
individually saved jobs are now called job description files, and job templates are generic templates
that can be applied to any cluster job. For more information on job description files, see “General
Information for Submitting Jobs” (page 31).
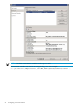
To import the job description file, from the HPC Management Console, click Configuration→Job
Description File and select Import on the right side. Import the HP-MPI Job Description
File.xml file from the installed HP-MPI help directory ("%MPI_ROOT%\help"). For information
on how to run using the file, see “General Information for Submitting Jobs” (page 31).
4.1 Standard Interactive Installation 21