
HP-MPI Version 1.1 for Windows Release Note


HP-MPI V1.1 for Windows Release Note
Building and running applications
38
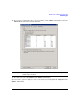
Go to VS Project, select View, select Property Manager and expand the project. This will
display the different configurations and platforms set up for builds. Include the appropriate
property page (HPMPI.vsprops for 32-bit applications, HPMPI64.vsprops for 64-bit
applications) in the Configuration/Platform section.
Select this page by either double-clicking the page or by right-clicking on the page and
selecting Properties. Go to the User Macros section. Set MPI_ROOT to the desired location
(i.e. the installation location of HP-MPI). This should be set to the default installation
location:
%ProgramFiles (x86)%\Hewlett-Packard\HP-MPI
NOTE This is the default location on 64-bit machines. The location for 32-bit machines
is %ProgramFiles%\Hewlett-Packard\HP-MPI
The MPI application can now be built with HP-MPI.
The property page sets the following fields automatically, but can also be set manually if the
property page provided is not used:
• C/C++ — Additional Include Directories
Set to "%MPI_ROOT%\include\[32|64]"
• Linker — Additional Dependencies
Set to libhpmpi32.lib or libhpmpi64.lib depending on the application.
• Additional Library Directories
Set to "%MPI_ROOT%\lib"
Building and running on a Windows 2003/XP cluster using appfiles
The example teaches you the basic compilation and run steps to execute hello_world.c on a
cluster with 4-way parallelism. To build and run hello_world.c on a cluster using an appfile,
perform Steps 1 and 2 from “Building and running on a single host” on page 34.
NOTE Specify the bitness using -mpi64 or -mpi32 for mpicc to link in the correct
libraries. Verify you are in the correct 'bitness' compiler window. Using -mpi64
in a Visual Studio 32-bit command window will not work.
Step 1. Create a file "appfile" for running on nodes n01 and n02 as: