
HP Storage Provisioning Manager (SPM) User Guide (5992-5070, March 2010)
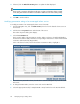

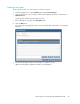
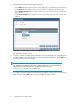
Table Of Contents
- HP Storage Provisioning Manager (SPM) User Guide
- Table of Contents
- 1 Introduction
- 2 Getting started with SPM
- 3 Configuring the storage catalog
- 4 Importing storage into the storage catalog
- 5 Monitoring the storage catalog
- 6 Managing storage catalog entities
- A Troubleshooting
- B Support and other resources
- Glossary
- Index

NOTE:
Managed array ports are always discovered; however, you must still manually set the SAN IDs
on the managed arrays. To do so:
1. From the Navigation tree, expand Catalog, then select Arrays.
The list of arrays displays in the List View pane and under Arrays in the Navigation tree.
2. Select the appropriate array in the Navigation tree, then click the Actions Properties button
at the bottom of the screen. Or, double-click the array in the List View pane.
The resource-specific Volume Properties dialog box opens.
3. Select the appropriate network or SAN from the list in the Network/SAN Connectivity field.
4. Click OK to save the settings and exit the dialog box.
Deleting an array
Arrays that do not contain volume services in SPM can be deleted from the catalog. Deleting an array
only removes the array from the catalog; no volumes or data are deleted.
To delete a specific array:
1. From the Navigation tree, expand Catalog, then select Arrays.
The list of arrays displays in the List View pane and under Arrays in the Navigation tree.
2. Select the appropriate array in the List View pane, then click the Actions Delete button at the
bottom of the screen.
The Delete Volume dialog box displays.
3. Click Yes in the dialog box.
Managing volume properties
Modifying properties of a volume service
NOTE:
On managed volume services, only the description and service group properties can be modified
using this procedure. All other information must be refreshed from the array. All properties on an
unmanaged array can be modified using this procedure.
To modify properties of a volume service:
1. From the Navigation tree, click on Volume Services, then click on the desired volume service in
the List View.
2. Click the Actions Properties button at the bottom of the screen.
The Volume Properties dialog box displays.
Managing storage catalog entities42