
HP Storage Provisioning Manager (SPM) User Guide (5992-5070, March 2010)

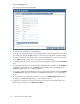
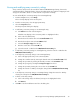
Table Of Contents
- HP Storage Provisioning Manager (SPM) User Guide
- Table of Contents
- 1 Introduction
- 2 Getting started with SPM
- 3 Configuring the storage catalog
- 4 Importing storage into the storage catalog
- 5 Monitoring the storage catalog
- 6 Managing storage catalog entities
- A Troubleshooting
- B Support and other resources
- Glossary
- Index
9. From the Select tags to apply to imported volumes table, select the appropriate boxes to indicate
the tags to apply to the volumes.
10. Click the Next button.
The Summary screen displays.
11. If the information displayed is correct, click the Finish button. If not, use the Previous button to
correct the information.
To create a volume on an unmanaged array:
1. From the Navigation tree, expand Arrays, then select the unmanaged array to which you want
to add a volume.
2. Click the Actions New Volume button at the bottom of the screen.
The Volume Properties dialog box displays.
3. In the Properties tab:
a. Enter the name of the volume into the Name field.
b. Enter a description in to the Description field.
c. Use the Service Group list to select the service group to which you want to assign the volume.
d. Enter the correct value into the Volume Serial Number field.
e. Enter the desired capacity into the Capacity field, then select the units of measure (for
example, GB or TB) from the capacity list.
f. Select the appropriate value from the list in the RAID field.
g. Click OK to save the information, or select another tab to continue configuration.
4. In the Presentations tab:
a. Click the Add button, directly under the Volume Presentations table in the dialog box.
b. Click on the blue field in the LUN column, then enter the appropriate LUN number.
c. Select the host mode from the list in the Host Mode column.
d. Select the box at the left of the entry to present the volume; leave it cleared to decline to
present it at present.
e. Select the type of port from the list in the Port Type field.
f. Enter the correct value into the Port ID field.
g. Select the appropriate network or SAN from the list in the Network/SAN Connectivity field.
h. Click the Add button, directly under the Presented to Initiators table in the dialog box.
i. Select the appropriate port type from the list in the Port Type field.
j. Enter the appropriate value in the Port ID field.
k. Make the appropriate selection from the SAN/Network Connectivity list.
l. Click OK to save the information, or select another tab to continue configuration.
5. In the Tags tab:
a. Select the appropriate boxes in the Assigned column to indicate which tags to apply to the
volume.
b. Click OK to save the information, or select another tab to continue configuration.
HP Storage Provisioning Manager (SPM) User Guide 31