
HP Storage Provisioning Manager (SPM) User Guide (5992-5070, March 2010)
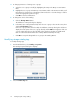

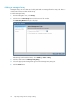
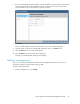
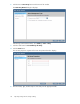
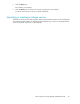
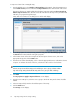
Table Of Contents
- HP Storage Provisioning Manager (SPM) User Guide
- Table of Contents
- 1 Introduction
- 2 Getting started with SPM
- 3 Configuring the storage catalog
- 4 Importing storage into the storage catalog
- 5 Monitoring the storage catalog
- 6 Managing storage catalog entities
- A Troubleshooting
- B Support and other resources
- Glossary
- Index
To import a volume from a managed array:
1. From the Global menu, select Catalog > Import Volumes. Alternatively, from the Navigation tree,
select Volume Services, then click the Actions Import Volumes button at the bottom of the screen.
The Import Volumes into Catalog dialog box displays, beginning with the Select an array from
which to import volumes table. The text on the left of the box lists the steps to be performed and
indicates your progress through the steps.
It may take a few minutes for the dialog box to refresh and display.
2. To see the properties for a chosen array, select the array, then click Show Array Properties. Click
the Cancel button when finished viewing the properties.
3. In the Name column of the Select array from which to import volumes screen, click on the
appropriate array, then click the Next button.
4. From the list of volumes that displays, select or clear the appropriate boxes to indicate the volumes
to import. To indicate all volumes in the list, select the box above the list of all volumes.
NOTE:
Volumes are provisioned from arrays and can belong to service groups. Volumes inherit
tags and security settings from both the array and service group to which it belongs.
5. Click Next
The Set properties to apply to imported volumes screen displays.
6. From the Service Group list, select the service group to which the array and volumes should be
added.
7. In the Description field, enter the desired description of the array.
8. Click the Next button.
The Set Tags screen displays.
Importing storage into the storage catalog30