
HP Storage Provisioning Manager (SPM) User Guide (5992-5070, March 2010)
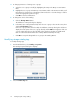

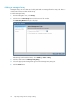
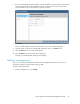
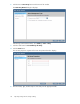
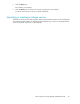
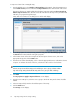
Table Of Contents
- HP Storage Provisioning Manager (SPM) User Guide
- Table of Contents
- 1 Introduction
- 2 Getting started with SPM
- 3 Configuring the storage catalog
- 4 Importing storage into the storage catalog
- 5 Monitoring the storage catalog
- 6 Managing storage catalog entities
- A Troubleshooting
- B Support and other resources
- Glossary
- Index
3. To add tags:
a. Click Add.
The newly created, empty entry displays in blue on the next empty line of the table.
b. Click on the blue entry in the Namespace column, then enter the desired Namespace.
A Namespace is a container for tags. The same tag value can be used for different tags; to
keep them functioning separately, put them in different Namespaces. All users can use the
same Namespace, or different users can create and use different Namespaces.
c. Click on the blue entry in the Value column, then enter the desired tag name.
d. Repeat these steps for each tag to be added.
e. Click the OK button to save the addition.
4. To remove a tag:
a. Click on the appropriate entry in the Namespace column.
b. Click Remove.
c. Repeat these steps for each tag to be removed.
5. Click OK to save the modifications.
Modifying Network/SAN IDs
To modify a SAN ID:
1. From the Global menu, select Catalog > Properties.
The Catalog Properties dialog box displays.
2. Select the Define SAN IDs tab.
3. To create a new Network/SAN ID:
a. Click Add.
The newly created blank entry displays in blue on the next empty line of the table.
b. Click on the blue entry, then enter the name to assign to the Network/SAN ID.
c. Repeat these steps for each SAN ID to be added.
d. Click the OK button to save the addition.
4. To remove an existing Network/SAN ID:
a. Click on the name of the Network/SAN ID to be removed.
b. Click Remove.
c. Repeat these steps for each SAN ID to be removed.
5. Click OK to save the modifications.
HP Storage Provisioning Manager (SPM) User Guide 23