HP Storage Provisioning Manager (SPM) User Guide Abstract IMPORTANT: The initial release of SPM supports EVA storage and is intended as a technology preview for early access use in non-production configurations. SPM will be expanded in subsequent releases to support additional storage devices and a wider set of production use cases.
Legal and notice information © Copyright 2010 Hewlett-Packard Development Company, L.P. Confidential computer software. Valid license from HP required for possession, use or copying. Consistent with FAR 12.211 and 12.212, Commercial Computer Software, Computer Software Documentation, and Technical Data for Commercial Items are licensed to the U.S. Government under vendor's standard commercial license. The information contained herein is subject to change without notice.
Contents 1 Introduction ....................................................................................... 7 Data storage and SPM ................................................................................................................ 7 SPM environment ........................................................................................................................ 7 Minimum requirements ......................................................................................................
Viewing and modifying array connectivity settings .................................................................. Viewing and modifying array capabilities settings .................................................................. Viewing and modifying array tags ........................................................................................ Viewing and modifying array security settings ........................................................................
Figures 1 Understanding the SPM environment ........................................................................... 8 2 Interactions between the server administrator, storage architect, and storage administrator .......................................................................................................... 10 3 Identifying regions of the SPM interface .....................................................................
Tables 1 Catalog access rights .............................................................................................. 19 2 Entity access rights .................................................................................................. 19 3 Document conventions .............................................................................................
1 Introduction IMPORTANT: The initial release of SPM supports EVA storage and is intended as a technology preview for early access use in non-production configurations. SPM will be expanded in subsequent releases to support additional storage devices and a wider set of production use cases.
Figure 1 Understanding the SPM environment . NOTE: MSAs are not supported in SPM version 1.0.
Minimum requirements SPM supports the following EVAs: Model EVA3000, EVA5000, EVA4x00, EVA6x00 and EVA8x00 EVA3000, EVA5000, EVA4x00, EVA6x00 and EVA8x00 EVA3000, EVA5000, EVA4x00, EVA6x00 and EVA8x00 Firmware CV EVA See the “HP StorageWorks Enterprise Virtual Array Compatibility Reference” on the Command View EVA Manuals page at http://h20000.www2.hp.com/bizsupport/TechSupport/DocumentIndex.
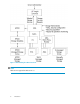
Figure 2 Interactions between the server administrator, storage architect, and storage administrator . NOTE: Although there are separate roles listed, your organization may have one person perform multiple roles, or multiple people performing the same role(s). The initial order of operations remains the same no matter who performs them. Browsing storage catalog entities Log into SPM to begin using the storage catalog. See “Logging in to SPM” on page 13.
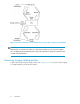
Identifying regions of the SPM interface 1. Global menu 2. List item filters 3. Navigation tree 4. Context-sensitive List View 5. Current selection and actions Figure 3 Identifying regions of the SPM interface . Selecting an item from the Navigation tree (the left-most pane) displays that item in the List View pane. Selecting an item in the List View pane displays detailed information about that item in the List View pane. Use the list item filters to filter the items in the List View.
Customize columns to display SPM allows each user (determined by the login user name) to customize the columns displayed in many of the List View screens. To select the columns to display: 1. From the Global menu, select Table > Display Columns. The Display Columns Configuration dialog box displays. 2. Select the tab for the display you want to change, such as Arrays from the top of the dialog box. 3.
2 Getting started with SPM Installing SPM SPM is installed with the logical servers feature in HP Insight Virtualization Manager software, part of the HP Insight Dynamics suite. You must have Microsoft™ .NET 3.5SR1 installed on your system to use the SPM software. Setting up and configuring SPM to communicate with arrays Before using SPM: • An HP EVA must be installed with CV. SPM must be able to communicate, through TCP/IP, with the CV installation for all EVAs used.
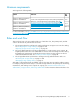
To log in, launch SPM, enter the login name and password in the appropriate fields, then click OK. Logging out of SPM Double-click the word Logout beneath the user identification at the top, right of the application. Alternatively, from the Global menu, select Catalog > Logout. The login screen displays.
3 Configuring the storage catalog The SPM storage catalog contains all entities—every service group, service request, array, and volume service—you add to the catalog. Begin building the storage catalog by defining the classification system. NOTE: Tags are applied to storage services and can be searched from HP Insight Dynamics. SAN IDs should be named exactly the same as the corresponding SAN IDs in HP Insight Dynamics. To configure the storage catalog, perform the following procedures.
To establish Catalog tags: 1. From the Global menu, select Catalog > Properties. The Catalog Properties dialog box displays. 2. Select the Define Tags tab. 3. Click Add. The newly created, empty entry displays in blue on the next empty line of the table. 4. In the Namespace column, enter the desired Namespace. A Namespace is a container for tags. The same tag value can be used by different tags. To keep them functioning separately, put them in different Namespaces.
3. Click Add. The newly created entry displays in blue on the next empty line of the table. 4. Enter the name to assign to the SAN ID. 5. Repeat these steps for each SAN ID to be added. 6. Click the OK button to save the new SAN IDs. These SAN IDs are populated throughout the catalog and can be applied to the appropriate entities. Creating a service group A service group provides a convenient way to apply tags and security settings to a group of storage services.
2. On the Properties tab, enter the desired Name and Description of the service group. 3. On the Tags tab, select all appropriate boxes in the Assigned column for tags to be attached to this service group. 4. To add users or groups and specify their permissions: 5. 6. a. b. Select the Security tab. Under the Group or User Names table, click the Add button. The Add Users or Groups dialog box displays. c.
group of the server running the SPM service. That is, only members of the local Administrators group are able to log into SPM until more subjects are granted catalog access. See Catalog access rights. Table 1 Catalog access rights Access right Description CatalogView Grants a user or group general permission to make inquires about the entities in the catalog. This access right is required to log into the SPM interface.
The following sections detail procedures to configure and modify security settings. • “Configuring catalog security” on page 20 • “Reviewing the storage catalog audit log” on page 20 Configuring catalog security To modify the security settings for the catalog: 1. From the Global menu, select Catalog > Properties. The Catalog Properties dialog box opens. 2. To add users or groups and specify their permissions: a. Under the Group or User Names table, click the Add button.
1. From the Global menu, select Catalog > View Logs. The HP Storage Provisioning Manager log page displays in a new browser window. 2. From the Audit Logs section, select the appropriate file name. Audit log entries can be copied for pasting content into another window on the desktop. Modifying storage catalog properties Modifying catalog security settings To modify the security settings for the catalog: 1. From the Global menu, select Catalog > Properties. The Catalog Properties dialog box opens. 2.
4. To change permissions of existing users or groups: a. 5. Select the user or group to modify by highlighting the entity in the Group or User Names table. b. Highlight the user or group in the Group or User Names table. In the Permissions table, scroll through the list of permissions in the Grant column and select or clear the box(es) to add or remove the appropriate permission types. c. Click OK to save the modifications. To change the owner of the Catalog: a. Click the Change Owner button.
3. To add tags: a. Click Add. The newly created, empty entry displays in blue on the next empty line of the table. b. Click on the blue entry in the Namespace column, then enter the desired Namespace. A Namespace is a container for tags. The same tag value can be used for different tags; to keep them functioning separately, put them in different Namespaces. All users can use the same Namespace, or different users can create and use different Namespaces. 4. 5. c.
Configuring the storage catalog
4 Importing storage into the storage catalog Only storage imported into the catalog can be matched to storage requests. To import volume services into the catalog, first import an array, then import the volumes. NOTE: SPM supports Arrays managed in one of three different ways. See “Adding an array resource” on page 25 for descriptions of the management methods. The management method is specified when the array is imported into the catalog, and cannot be changed without removing and re-importing it.
Adding a managed array Managed Arrays are those that are found by SPM and are managed from the array side. There is communication between SPM and the array. To add a managed array: 1. From the Navigation tree, select Arrays. 2. Click the Actions New Array button at the bottom of the window. The New Array Wizard dialog box displays. Alternatively, from the Global menu, select Catalog > New > Array. 3. Click the radio button for Manage Array Using. 4.
6. If you selected Manage Array Using SMI-S, enter the IP Address, Port, User Name, and Password into the appropriate fields. The IP address and port corresponds to the location of the SMI-S provider, and the login corresponds to the login for the arrays. 7. Click Next. The list of arrays displays. It may take a few minutes for the list to refresh and display. 8. Select the arrays to import by selecting (and clearing) the boxes in the Add column. 9. Click the Next button to see what will be added.
2. Click the Actions New Array button at the bottom of the window. The New Array Wizard dialog box displays. Alternatively, from the Global menu, select Catalog > New > Array. 3. Click the radio button for Do Not Manage the Array. 4. Click the Next button. The Set Array Properties segment of the New Array Wizard window displays. 5. 28 Enter the Name, Type, and Description of the array into the appropriate fields.
6. Click the Next button. The summary screen displays. 7. Click the Finish button to view the list of arrays, including the one just added. It may take a few minutes for the list to refresh and display. Importing or creating a volume service SPM imports volumes from an array using the Import Volumes Wizard. Volumes can be automatically discovered and made available for importing from managed arrays. Volumes on unmanaged arrays cannot be imported; they must be created manually.
To import a volume from a managed array: 1. From the Global menu, select Catalog > Import Volumes. Alternatively, from the Navigation tree, select Volume Services, then click the Actions Import Volumes button at the bottom of the screen. The Import Volumes into Catalog dialog box displays, beginning with the Select an array from which to import volumes table. The text on the left of the box lists the steps to be performed and indicates your progress through the steps.
9. From the Select tags to apply to imported volumes table, select the appropriate boxes to indicate the tags to apply to the volumes. 10. Click the Next button. The Summary screen displays. 11. If the information displayed is correct, click the Finish button. If not, use the Previous button to correct the information. To create a volume on an unmanaged array: 1. From the Navigation tree, expand Arrays, then select the unmanaged array to which you want to add a volume. 2.
6. In the Security tab: a. To add a group or user, click the Add button that displays below the Group or User Names table. The Add Users or Groups dialog box displays. b. In the Enter User or Group Names field, enter the user or group you would like to add, then click the Check Names button. If the user or group name entered is valid, the Add Users or Groups dialog box refreshes to display the exact syntax of the user or group added.
5 Monitoring the storage catalog Monitoring the storage catalog is primarily the responsibility of the storage administrator. Tasks include: • “Responding to Nonconforming fulfillment” on page 33 • “Monitoring inventory levels” on page 35 Responding to Nonconforming fulfillment Each goal within a storage request contains a list of constraints which describe the requirements that must be met by a fulfilling volume service.
4. Click the Actions Fulfillment button at the bottom of the screen. The Goal/Service Fulfillment dialog box displays, initially showing the Current Service Fulfillment tab. 5. To change the fulfillment, click the Unfulfill button. The Suggested Services tab displays. 6. Select a match from the list of candidate services, then view information about the match in the Volume Service Match Details table. Select the best match, then click the Fulfill button.
Monitoring inventory levels Service groups can be used to group together volume services created for a particular purpose or use, such as boot volumes, database volumes, or database volumes providing a tier or level of service (such as “Gold service”). When such a definition exists, it is important to monitor the inventory levels of available services of each type. To monitor the inventory of volume service(s) available: 1. In the Navigation tree, select Volume Services. 2. Select the Filters All button.
Monitoring the storage catalog
6 Managing storage catalog entities Managing storage catalog entities is the responsibility of the storage administrator. Types of entities are arrays, volume services, service groups, service requests, and goals. Tasks include adding, modifying, searching, and deleting entities. Each entity type and the possible management tasks are presented in the following sections.
3. Click the Properties button. The Array Properties dialog box displays. 4. To assign a name to an unmanaged array, enter the desired name into the Name field. (This setting cannot be changed on a managed array.) 5. To assign or change the array type of an unmanaged array, enter the appropriate type of array (for example, HP_EVA) in the Type field. (This setting cannot be changed on a managed array.) 6.
Viewing and modifying array connectivity settings Array controllers and ports are discovered from SMI-S and HPOO managed arrays, but must be entered manually for unmanaged arrays; however, the administrator must perform a mapping of each array port to the SAN to which it is connected. This is required for all arrays. To view and modify the connectivity settings of an unmanaged array: 1. From the Navigation tree, select Arrays. The list of arrays displays in the List View pane. 2.
Viewing and modifying array capabilities settings Array capabilities define what operations the array is capable of performing when requested through automation, and what host OS modes are supported by each array. To view or modify array capabilities settings: 1. From the Navigation tree, select Arrays. The list of arrays displays in the List View pane. 2. From the List View pane, select the appropriate array. 3. Click the Properties button. The Array Properties dialog box displays. 4.
3. Select the Security tab within the Array Properties dialog box. 4. To add a group or user, click the Add button that displays below the Group or User Names table. The Add Users or Groups dialog box displays. 5. In the Enter User or Group Names field, enter the user or group you would like to add, then click the Check Names button. If the user or group name entered is valid, the Add Users or Groups dialog box refreshes to display the exact syntax of the user or group added.
NOTE: Managed array ports are always discovered; however, you must still manually set the SAN IDs on the managed arrays. To do so: 1. From the Navigation tree, expand Catalog, then select Arrays. The list of arrays displays in the List View pane and under Arrays in the Navigation tree. 2. Select the appropriate array in the Navigation tree, then click the Actions Properties button at the bottom of the screen. Or, double-click the array in the List View pane.
3. Select the Properties tab. a. The current volume Name field can be changed by entering the desired name. b. The Description field can also be changed by entering the desired information. c. Select a service group from the Service Group list. d. Change the volume serial number, if necessary, by entering the correct information into the Volume Serial Number field. e.
4. If desired, click the Refresh from Array button to update the data displayed. NOTE: There may be a 30 minute delay between the time a volume configuration change is made on the array and when the information is available to SPM because of SMI-S caching delays. 5. Click OK to exit the window. Modifying presentation settings of an unmanaged volume service To modify presentation of an unmanaged volume service from SPM: 1.
7. To modify information in the Presented to Initiators table: a. Highlight an initiator in the table to select it. b. To change the port type, select the correct value from the list in the Port Type field. Although the software allows you to change the port type, it is unlikely to be required. 8. 9. c. To change the port ID, enter the correct value into the Port ID field. d. To change the Network/SAN Connectivity, select the correct value from the list in the Network/SAN Connectivity field. e.
Deleting a volume service To delete a volume service: 1. From the Navigation tree, click on Volume Services, then click on the desired volume service in the List View. 2. Click the Actions Delete button at the bottom of the window. The Delete volume verification dialog box displays. 3. Click the Yes button in the verification box. Managing service groups Modifying service group properties and tag settings To modify properties and tag settings of a service group: 1.
4. To add a group or user: a. Click the Add button that displays below the Group or User Names table. The Add Users or Groups dialog box displays. b. In the Enter User or Group Names field of the Add Users or Groups dialog box, enter the user or group you would like to add, then click the Check Names button. If the user or group name entered is valid, the Add Users or Groups dialog box refreshes to display the exact syntax of the user or group added.
Creating a service request To create a new service request: 1. From the Global menu, select Catalog > New > Request. Alternatively, from the Navigation tree, select Service Requests, then click the Actions New Service Request button at the bottom of the window. The Service Request Properties dialog box displays. 2. Enter a description of the service request in the Description field of the dialog box. 3. Click the OK button.
Creating a new goal Service requests contain one or more goals. To create a new goal: 1. From the Navigation tree, expand Catalog, then expand Service Requests. 2. Select the appropriate service request to which you are adding a goal, then click the Actions New Goal button. The goal-specific Goal Properties dialog box opens. 3. Enter a description of the goal in the Description field. 4. Click the Add button. The newly created entry displays in blue in the Constraints table.
6. Select the appropriate Requirement Type using the list: • Select Shall not when requiring volume services which do not contain the specified property. • Select Required when requiring volume services which do contain the specified property. • Select Not Recommended when seeking volume services in which a property is not desired but is allowed. • Select Recommended when seeking volume services in which a property is desired but not required. 7.
10. For a Capacity constraint, the Capacity Constraint dialog box displays. Enter the storage capacity limits into the Minimum Capacity field and the Maximum Capacity field. Use the list to select the units of measure (for example: MB or GB). Click the OK button to return to the Goal Properties window. 11. For a Presentation constraint, the Volume Presentation Constraint dialog box displays. NOTE: SPM v1.0 supports Fibre Channel arrays, only.
To create settings for a Presentation: a. If you wish to apply this constraint, select the Presented box; to save the information but not apply it yet, leave the Presented box clear. b. Use the arrows in the Logical Unit Number field to select the LUN number for the volume. c. Make the appropriate selection from the list in the Host Mode field. d. To add to the Initiators table, click the Add button. The new entry (blue field) appears in the next empty row. e.
A Troubleshooting Viewing operational logs SPM maintains an operational log for the storage catalog, listing all operations performed and all error events. To review the operational log: 1. From the Global menu, select Catalog > View Logs. The HP Storage Provisioning Manager log page displays in a new browser window. 2. Under Operational Logs, click the appropriate file name. The file opens. Operational log entries can be copied for pasting content into another window on the desktop.
Addressing common issues This table describes some common issues you may encounter while configuring or using the SPM. Symptom Possible causes Solution A general purpose web service call results in an error. Client does not have permission to make the call, according to the access control list of the entities involved. If appropriate, add the client to the list of entities. The user is unable to log in through the SPM user interface and commands that attempt to interact with live storage fail.
B Support and other resources Related documentation The following documents provide related information: • • • • • HP HP HP HP HP Storage Provisioning Manager release notes Insight Dynamics for ProLiant Installation and Configuration Guide StorageWorks Command View EVA user guide Insight Orchestration User Guide Virtualization Manager and Logical Server Management User Guide You can find these documents from the Manuals page of the HP Business Support Center website: http://www.hp.
HP websites For additional information, see the following HP websites: • • • • http://www.hp.com http://www.hp.com/service_locator http://www.hp.com/support/manuals http://www.hp.com/support/downloads Typographic conventions Table 3 Document conventions Convention Element Blue text: Table 3 Cross-reference links and e-mail addresses Blue, underlined text: http://www.hp.
NOTE: Provides additional information. Documentation feedback HP welcomes your feedback. To make comments and suggestions about product documentation, please send a message to storagedocsFeedback@hp.com. All submissions become the property of HP.
Support and other resources
Glossary application A client of a storage system, or a consumer of a storage service. application server A system that is hosting one or more applications and is running an operating system optimized for hosting applications. Storage may be direct attached (such as a storage server) or networked. Catalog The repository of service requests, services, service groups, and resources managed by SPM.
RAID A Redundant Array of Independent Disks is a RAID. A RAID volume consists of more than one drive, but appears to the operating system to be a single logical disk. RAID improves performance by disk striping, which involves partitioning each drive's storage space into units. By placing data on multiple disks, I/O operations can overlap in a balanced way, improving performance. resource A storage catalog entity representing a storage resource. A resource provides a set of services.
that the source of the capacity has been identified. In SPM a volume is a type of service. volume service A type of service supported by SPM. It consists of a service providing a block based volume abstraction. All services are provided by resources. A volume service is provided by an array. world wide name wwn, a unique 8–byte address used in a Fibre Channel storage network to identify each array in that network. SPM uses the format xx:xx:xx:xx:xx:xx:xx:xx:xx to display these values.
Glossary
Index A array adding, 25 deleting, 42 importing volumes from, managed adding, 26 creating a port, 41 managing, 37 modifying, 37 security settings, tags, 40 unmanaged adding, 27 audit log, 20 C capabilities constraint creating, capabilities settings, 40 connectivity settings deleting, connectivity settings adding, 39 modifying, 39 conventions document, 56 text symbols, D display columns, 12 document conventions, 56 documentation HP website, 55 providing feedback, 57 related, 55 G goal, 7 creating, 49 fulf
P T port creating, 41 presentation settings creating, modifying, 43 tags, 15, 50 adding, 23 array, 40 catalog, 16 goal, 50 modifying, 22 removing, 23 service group, 18, 32 volume service, volume service, 30, 31, 45 technical support HP, technical support service locator website, text symbols, 56 typographic conventions, R related documentation, 55 request nonconforming, 33 S SAN IDs creating, SAN IDs, 16 establishing, 16 modifying, 23 naming, 15 removing, 23 security, 18 audit log, 20 catalog, 13, 20,