
NIS/LDAP Gateway Administrator's Guide
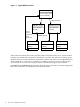
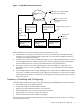

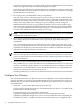

Figure 1-2 NIS/LDAP Gateway Environment
NIS/LDAP server
ypldapd daemon
running
NIS/LDAP server
ypldapd daemon
running
NIS client
ypbind daemon
running
ldappasswd
NIS client
ypbind daemon
running
ldappasswd
NIS client
ypbind daemon
running
ldappasswd
LDAP Directory
Server
LDAP Requests
Users
change
password
with
ldappasswd
LDAP directory replaces NIS
maps. No map transfers.
NIS servers become
NIS/LDAP Gateway
servers.
ypldapd replaces ypserv.
ldappasswd
replaces
yppasswd.
In the NIS/LDAP Gateway environment, four main differences exist:
1. An LDAP directory replaces your NIS master server and NIS maps. Map files and map
transfers are no longer needed. LDAP replication uses more efficient updates instead of
complete map builds and transfers.
2. All NIS slave servers become NIS/LDAP Gateway servers. The NIS/LDAP Gateway servers
run the ypldapd daemon, rather than the ypserv daemon. ypldapd requests information
from the LDAP directory and serves the information back to the NIS clients.
3. NIS clients continue to run the ypbind daemon, which establishes a connection to an
NIS/LDAP Gateway server, enabling client processes to get information from the LDAP
directory.
4. Users change their passwords using the ldappasswd command or an LDAP administration
tool such as a web browser rather than the yppasswd command. Users must use an LDAP
administration tool such as a web browser to change their personal information instead of
chfn(1) and chsh(1).
Summary of Installing and Configuring
The following summarizes the steps to take when moving to an NIS/LDAP Gateway environment.
• Install and configure an LDAP directory.
• Install and configure the NIS/LDAP Gateway.
• Migrate your NIS map information to your directory.
• Install ldappasswd on your NIS client systems, if desired.
• Stop the NIS server daemon, ypserv, if necessary
• Start the NIS/LDAP Gateway daemon, ypldapd.
These steps, plus verification and testing steps, are described in detail in Chapter 2 “Installing
the NIS/LDAP Gateway”.
Summary of Installing and Configuring 15