
NIS+ to LDAP Migration Guide

Migrating NIS+ to LDAP
Summary of Migration Steps
Chapter 2 17
Summary of Migration Steps
The section summarizes the steps you take when migrating NIS+ service
data to the LDAP directory server and installing the LDAP-UX Client
Services on all of NIS+ clients:
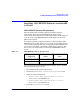
Migrating NIS+ Service Data to the LDAP Server
The section summarizes the steps you take when migrating NIS+ service
data from the NIS+ server to the LDAP directory server:
Step 1. Install and configure an Netscape Directory Server, if not already done to
replace the NIS+ root master server or subdomain master server. See
“Installing and Configuring Your LDAP Directory Server” on page 19 for
an overview of the task.
Step 2. Install the LDAP-UX Integration product including the NIS+ to LDAP
migration scripts on the NIS+ clients. See “Installing the LDAP-UX
Integration Product” on page 20 for an overview of the task.
Step 3. Extend the publickey schema to your Netscape Directory Server if you
want to migrate credential table entries including public keys and secret
keys of users and hosts from the NIS+ server to the LDAP directory
server. See “Extending Publickey or Automount Schema Into Netscape
Directory Server” on page 23 for details.
Step 4. Extend the automount schema to your Netscape Directory Server if you
want to migrate the AutoFS maps from the NIS+ server to the LDAP
directory server. “Extending Publickey or Automount Schema Into
Netscape Directory Server” on page 23 for details.
Step 5. Migrate your NIS+ database to LDIF (LDAP Directory Interchange
Format) files and import them to the Netscape Directory Server using
migration scripts. See “Importing Your NIS+ Data to Your LDAP
Directory Server” on page 26 for detailed information on how to migrate
your NIS+ data from the NIS+ server to the LDAP.
Step 6. Turn off the NIS+ replica servers.
Step 7. Migrate the NIS+ replica servers to act as LDAP replica servers, if it is
necessary.