
LDAP-UX Client Services B.05.01 Administrator Guide for HP directory servers and Windows ADS

2.4.3 Installing LDAP-UX Client Services on a client
Use swinstall to install the LDAP-UX Client Services software, the NativeLdapClient subproduct,
on a client system. For more information about the command, see the swinstall(1M) manpage. In
addition, see the LDAP-UX Integration Release Notes for any last-minute changes to this procedure.
You do not need to reboot your system after installing the product.
NOTE: Starting with LDAP-UX Client Services B.03.20 or later, system reboot is not required after
installing the product.
NOTE: For the HP 9000 and HP Integrity server client systems, you might need to install required
patches. For the detailed information about the required patches, see LDAP-UX Integration Release
Notes at:
http://www.hp.com/go/hpux-security-docs
Click HP-UX LDAP-UX Integration Software.
2.4.4 Configuring your HP directory server directory
This section describes how to configure your directory to work with LDAP-UX Client Services.
Examples are given for the HP-UX Directory Server. For information about supported directories,
see the LDAP-UX Integration Release Notes . If you have a different directory, see the documentation
for your directory for more information about how to configure it.
For more information, see Preparing Your LDAP Directory for HP-UX Integration at:
http://www.hp.com/go/hpux-security-docs
Click HP-UX LDAP-UX Integration Software.
1. Install the POSIX schema (RFC 2307) into your directory.
With most directory servers, the POSIX schema is already installed. However, if you need to
install this schema, you can use the /opt/ldapux/bin/ldapschema tool to install the
/etc/opt/ldapux/schema/rfc2307.xml schema file.
For information on the POSIX schema (RFC 2307), see:
http://www.ietf.org/rfc.html
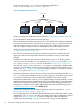
RFC 2307 consists of object classes such as: posixAccount, posixGroup, shadowAccount
(deprecated), etc. posixAccount represents a user entry from /etc/passwd. posixGroup
represents a group entry from /etc/group.
2. Restrict write access to certain passwd (posixAccount) attributes of the POSIX schema.
CAUTION: Make sure you restrict access to the attributes listed in the following paragraph.
Allowing users to change them could be a security risk
Grant write access of the uidnumber, gidnumber, homedirectory, and uid attributes
only to directory administrators; disallow write access by all other users. You might want to
restrict write access to other attributes in the passwd (posixAccount) entry as well.
With HP-UX Directory Server, you may use the Directory Server Console or ldapmodify to
set up ACIs so ordinary users cannot change these attributes in their passwd entry in the
directory.
The following access control instruction is by default at the top of the directory tree for an
HP-UX Directory Server (version 8.1). This ACI allows a user to change any attribute in their
passwd entry:
aci: (targetattr = "*") (version 3.0; acl "Allow self entry modification";
allow (write)userdn = "ldap:///self";)
You could modify this example ACI to the following, which prevents ordinary users from
changing their uidnumber, gidnumber, homedirectory, and uid attributes:
2.4 Customized installation (setup) for an HP directory server environment 65