
LDAP-UX Client Services B.05.01 Administrator Guide for HP directory servers and Windows ADS
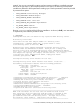

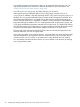

Setting up the LDAP-UX client using the newly created directory server.
Loading CA certificate from directory server to local host ... done.
* Extending schemas ... done.
No LDAP-UX Configuration Profile was found. Creating a new one.
* Downloading profile from DS ... done.
* Configuring ldapux_client.conf ... done.
* Provisioning LDAP-UX Client information into the Directory Server ... done.
* Setting up proxy user ... done.
* Configuring "/etc/nsswitch.conf" and "/etc/pam.conf" to use ldap ... done.
* Starting ldapclientd daemon ... done.
* Starting ldapcconfd ... done.
LDAP-UX was successfully configured.
2.3.4.3 Postinstallation steps for New Directory Server Installation mode
After completing a New Directory Server mode guided installation, perform these steps:
1. The autosetup process created a new HP-UX account, the Domain Administrator (also known
as domadmin). It also created three new groups: DomainAdmins, HostAdmins, and
UserAdmins. Ensure that the user and group numbers (UIDs and GIDs) of the information
you are importing or migrating does not collide with those numbers that were created by
autosetup, as explained in Section 2.5.1.1 (page 90).
2. Consider registering the new directory server using an LDAP server record in the host's DNS
domain (contact your DNS domain administrator). For more information, refer to RFC 2782.
3. When a new directory server instance is created, autosetup generates a CA and server
SSL/TLS certificate for this instance. The generated CA certificate can be distributed to other
HP-UX clients to preestablish trust and confidentiality with the directory server just created. The
CA certificate has been conveniently packaged in a Software Distributor depot file. The CA
product found in this depot will install the CA certificate in the /etc/opt/ldapux/cert8.db
file on any host where you install the CA product. As a means to preestablish trust with the
directory server, you can simplify distribution of this CA certificate by including the CA product
in an Ignite-UX depot. You can view the contents of this depot file with the swlist -s
/tmp/ca-west.acme.com.depot command.
4. Perform the postinstallation configuration tasks documented in Section 2.5 (page 89), as
needed.
2.3.5 Guided installation steps: Existing Directory Server Installation mode
This section explains how to install LDAP-UX for the first time on a host that already has a valid
directory server. Section 2.3.5.1 (page 52) shows how to perform the guided installation
interactively, explaining step-by-step how to respond to each prompt for user input. Section 2.3.5.2
(page 54) shows how to run a completely-automated (silent mode) guided installation.
NOTE: When configuring and setting up LDAP-UX, you will likely be prompted for credentials
of an administrator. If you are asked to enter the credentials (password) of a user, make sure that
the connection between your client and the HP-UX system (where you are running autosetup) is
secured and not subject to network eavesdropping. One option to protect such communication
might be to use the ssh protocol when connecting to the HP-UX host being configured.
2.3.5.1 Interactively running Existing Directory Server Installation mode
To interactively install LDAP-UX into an environment that already has a valid directory server, follow
these steps. This example assumes that you have preinstalled a CA certificate, as described in step
2.
1. Log in as root and run the autosetup command, as shown in the following example:
# /opt/ldapux/config/autosetup
52 Installing and configuring LDAP-UX Client Services for an HP server environment