LDAP-UX Client Services B.05.00 with Microsoft Windows Active Directory Server Administrator's Guide HP-UX 11i v2 and v3 Abstract This document applies to LDAP-UX Client Services B.05.00 only; it is not being updated for subsequent releases. For software releases subsequent to B.05.
© Copyright 2010 Hewlett-Packard Development Company, L.P. Confidential computer software. Valid license from HP required for possession, use or copying. Consistent with FAR 12.211 and 12.212, Commercial Computer Software, Computer Software Documentation, and Technical Data for Commercial Items are licensed to the U.S. Government under vendor's standard commercial license. The information contained herein is subject to change without notice.
Contents 1 Introduction.............................................................................................10 1.1 Overview of LDAP-UX Client Services....................................................................................10 1.2 How LDAP-UX Client Services works.....................................................................................11 2 Installing LDAP-UX Client Services...............................................................14 2.
2.5.1.1 Ensure user and group numbers do not collide with those already on the HP-UX host.............................................................................................................................53 2.5.1.2 Steps to importing name service data....................................................................53 2.5.2 Verifying LDAP-UX Client Services for Single Domain......................................................53 2.5.3 Configuring AutoFS support..................................
4.1.1.3 Lp printer types...................................................................................................70 4.2 How the LDAP printer configurator works.............................................................................70 4.2.1 Printer configurator architecture...................................................................................71 4.3 Printer configuration parameters.........................................................................................72 4.
.3.1 How SASL/GSSAPI works...........................................................................................96 6.3.2 Proxy user................................................................................................................96 6.3.2.1 User principal....................................................................................................96 6.3.2.2 Service/host principal........................................................................................97 6.3.2.
6.8 Managing hosts in an LDAP-UX domain.............................................................................129 6.9 Displaying the proxy user's distinguished name..................................................................129 6.10 Verifying the proxy user..................................................................................................129 6.11 Creating a new proxy user..............................................................................................129 6.11.
D Sample /etc/krb5.conf file......................................................................156 Glossary..................................................................................................158 Index.......................................................................................................
Figures 1 2 3 4 5 6 7 8 9 A simplified NIS environment.............................................................................................10 A simplified LDAP-UX Client Services environment.................................................................11 HP-UX Client login sequence with Windows 2003 R2/2008 (RFC 2307) ...............................12 The local start-up file and the configuration profile................................................................
1 Introduction LDAP-UX Client Services simplifies HP-UX system administration by consolidating account and configuration information into a central LDAP directory. This LDAP directory can reside on an HP-UX system, such as HP-UX Directory Server 8.1 and higher, or the account information could be integrated into Microsoft Windows 2003 R2/2008 Active Directory Server. Information provided in this manual specifically outlines the installation and administration tasks of LDAP-UX Client Services B.05.
greater scalability, operation with other applications and platforms, and less network traffic from replica updates. Figure 2 A simplified LDAP-UX Client Services environment Replicates Active Directory Domain Controller Active Directory Domain Controller Replicates LDAP Client Requests LDAP-UX client LDAP-UX client LDAP-UX Client Services for Microsoft Windows 2003 R2/2008 Active Directory supports the passwd and group name service data. Refer to the LDAP-UX Integration B.05.
Figure 3 HP-UX Client login sequence with Windows 2003 R2/2008 (RFC 2307) HP-UX Client Windows Server Login PAM Library PAM Kerberos Kerberos Services Active Directory NSS Engine uid: bobj NAS_LDAP cn: Bob Jolly unixHomeDirectory:/home/bobj uidnumbr: 208 gidnumbr: 20 loginshell:/usr/bin/ksh With LDAP-UX Client Services, HP-UX commands and subsystems can transparently access name service information from the Active Directory through PAM and NSS.
The configuration profile is a directory entry containing configuration information common to many clients. Storing this information in the directory lets you maintain it in one place and share it among many clients rather than storing it redundantly across the clients. Because the configuration information is stored in the directory, all each client needs to know is where its profile is. Each client downloads the configuration profile from the directory.
2 Installing LDAP-UX Client Services This chapter describes the decisions you need to make and the steps to install and configure LDAP-UX Client Services. 2.
The guided installation (autosetup) is most advantageous if: • You prefer simplicity, ease, and quickness of installation. • You prefer an installation that enables immediate use of LDAP-UX, with minimal input required; autosetup automatically provides default values for many parameters that must be provided manually during a customized installation (you can customize parameters later, if desirable).
existing Active Directory Server and directory information tree and configures a new LDAP-UX profile to follow the standard layout and attributes defined for an ADS domain. The guided installation prompts for several parameters, depending on the exact circumstances. These may include the DN and password of a user (the domain administrator, by default) who has sufficient privileges to add the local host to the Windows domain.
2. 3. 4. 5. 6. 7. 8. 9. 10. 11. 12. 13. directory server in your environment or asked if you wish to create a new directory server instance on the local host. To guarantee confidentiality and data integrity, autosetup uses the StartTLS extended operation on a regular LDAP connection with simple authentication (bind DN and password).
2.3.2 Using the guided installation autosetup command—syntax and options You can run the autosetup script interactively, responding to prompts to provide the setup information. You can pass parameters in the command line to reduce the need for providing input during the installation. You can run the script in silent mode, which requires no user interaction during the installation. To run the script interactively, simply enter the autosetup command as is.
-D privileged_user_DN Specifies the distinguished name (DN) of a user who has sufficient directory server privileges to create a new computer account. This typically specifies the domain administrator's distinguished name (DN). When installing LDAP-UX for the first time in a Windows Domain, it can be any user who has sufficient privileges to update the schema on the directory server and add a new computer account and password to the cn=computers container.
Directory Server is registered in the DNS domain, the directory server host name and port number must be specified with command-line options or with environment variable LDAP_HOSTPORT. If values are not given for any required parameters that do not have defaults, silent mode will abort. 2.3.2.2 autosetup environment variables The following environment variables can be used with autosetup when the corresponding option (defined in Section 2.3.2.
Example 2 autosetup: passing two parameters directly in the command line along with a password file # autosetup -D "cn=administratorcnldaptest.acme.com" -j /tmp/jfile -x document.hp.com This command specifies the domain administrator and a file that includes the password required for the domain administrator of the directory server being created. The command also specifies the Active Directory domain this host will join. When you invoke autosetup, you will not be prompted for these parameters.
NOTE: If you are planning a first-time deployment of managing user and group data in the directory server, HP suggests that you devise a strategy to avoid UID number and GID number overlap. Most likely, you will need to continue managing some accounts that are local to the hosts in the LDAP-UX domain. Often the root user, and sometimes application accounts (such as www for the httpd process) remain managed in the local /etc/passwd file.
NOTE: Unless you pre-install a CA or server certificate for the directory server, autosetup has no means of validating the identity of Kerberos and the directory server. The tool can download and permanently install the CA certificate for the specified Windows domain; however, to prevent from connecting with an impostor host, you should validate and pre-install the CA certificate for this domain. To determine how to discover and pre-install the domain’s CA certificate, see Section 2.4.6.2 (page 48).
* Editing the name-service switch configuration ... done. * Editing "/etc/pam.conf" ... done. Your LDAP-UX client has been successfully configured and is now a member of the "nwest.acme.com" domain. 2.3.3.2 Automating First Installation into a Windows Domain mode You can run autosetup in silent mode, providing pre-set values for required parameters in the command line or with environment variables. As discussed in Section 2.3.3.
NOTE: If you attempt to run autosetup on a host on which LDAP-UX (ldapclientd) is already running, the procedure aborts. If the LDAP-UX is installed on the host but not running, the procedure proceeds. However, if a previous LDAP-UX configuration profile is found on the system, the procedure warns you that proceeding will overwrite the file and asks if you want to proceed. You can proceed if your intention is to reconfigure LDAP-UX on the host.
NOTE: Unless you pre-install a CA or server certificate for the directory server, autosetup has no means of validating the identity of Kerberos and the directory server. The tool can download and permanently install the CA certificate for the specified Windows domain; however, to prevent from connecting with an impostor host, you should validate and pre-install the CA certificate for this domain. To determine how to discover and pre-install the domain’s CA certificate, see Section 2.4.6.2 (page 48).
2.3.4.2 Automating Existing Windows LDAP-UX Configuration mode mode You can run autosetup in silent mode and specify any required pre-set values for parameters in the command line or with environment variables. You must pre-establish trust with the remote directory server by installing the CA certificate prior to running autosetup.
1. 2. 3. 4. 5. Plan your installation (see Section 2.4.2 (page 28)). Install LDAP-UX Client Services on each client system (see Section 2.4.3 (page 33)). Install and configure the Active Directory, if not already done (see Section 2.4.4 (page 34)). Install the PAM Kerberos product (see Section 2.4.5.1 (page 37)) Run the setup program to configure LDAP-UX Client Services on a client system (see Section 2.4.5.2 (page 38)).
• If multiple domains are selected, how will data be stored in the forest? LDAP-UX Client Services treats the first domain configured as the local domain, and all other domains in the forest as remote domains. When retrieving data, the search always starts from the local domain. Frequently accessed information should be stored in the local domain. For remote domains, information can be stored in every remote domain or only in some remote domains. Determine the appropriate structure for your environment.
but you must write your own scripts or use other tools to merge the data into your directory. PosixAccount attributes can be added to your users already in the directory to leverage your existing directory data. For information about importing information into the directory, refer to Section 2.5.1 (page 52). For information on migration scripts, refer to the “Command and tool reference” chapter of the LDAP-UX Client Services Administrator's Guide.
CN=System, DC=cup, DC=hp, DC=com for a single domain. Figure 6 shows the same for a multiple domain environment.
• Do you want to use SSL or TLS for secure communication between LDAP clients and the Windows 2003 R2/2008 Active Directory Server? The LDAP-UX Client Services supports SSL or TLS with password as the credential, using either simple or SASL/GSSAPI authentication (SASL/GSSAPI is available for the Windows 2003 R2/2008 Active Directory Server only) to ensure confidentiality and data integrity between the clients and servers. StartTLS is a new extension operation of TLS (Transport Layer Security) protocol.
the user or group is not in the respective files. /etc/nsswitch.ldap is an example of this configuration. • Do you need to set up login authorization for a subset of users from a large repository such as a directory server? How will you set up the access policy file and /etc/pam.conf files to implement this feature? The PAM_AUTHZ service module for PAM provides functionality that allows the administrator to control who can log in to the system. These modules are located at /usr/lib/security/ libpam_authz.
NOTE: For LDAP-UX Cleint Services B.03.20 or later versions, system reboot is not required after installing the product. 2. Install the required patches. For patch information, refer to /opt/ldapux/ README-LdapUxClient (available after the NativeLdapClient subproduct is installed). NOTE: at: For information about required patches, see the LDAP-UX Integration Release Notes http://www.hp.com/go/hpux-security-docs Click HP-UX LDAP-UX Integration Software. 2.4.
2.4.4.2 Step 2: Create a proxy user The use of a proxy user is mandatory for Active Directory, as anonymous binding done not grant enough access rights to retrieve user, group, or any other name service data. Use the Windows 2003 R2 or 2008 management tool, Active Directory Users and Computers, to add a proxy user as a member of the "Domain Users" group. The proxy user is used by the LDAP-UX clients to bind to the ADS for access to the name service data on the ADS.
then click Next 10. You are given the screen which confirms your configuration, click on finish if everything is correct, otherwise, click Back to change. 11.
HP-UX machine to create /etc/krb5.keytab. Refer to Appendix D (page 156) for more information. This is one way to configure an HP-UX Kerberos client to communicate with multiple KDCs. For other possibilities using cross-realm authentication, refer to the [capaths] section of the krb5.conf manpage (that is: man krb5.conf). • The guided installation available with B.05.00 will take care of Kerberos integration between HP-UX and Windows. 2.4.4.
http://h20392.www2.hp.com/portal/swdepot/displayProductInfo.do?productNumber=J5849AA https://h20392.www2.hp.com/portal/swdepot/ displayProductInfo.do?productNumber=KRB5CLIENT For any last-minute changes, see the Configuration Guide for Kerberos Products in HP-UX Release Notes, available at: . http://www.hp.com/go/hpux-security-docs (Click HP-UX Kerberos Data Security Software) You also need to install the required patch.
4. 5. Enter the port number of the previous specified directory server that you want to store the profile, from Appendix A (page 145). The default port number is 389. Setup will check the directory to see if the profile schema has been extended with the LDAP-UX Client Services object class DUAConfigProfile. This must be done once (the schema is shared with subsequently-configured client systems). See Appendix B (page 146) for a detailed description of object classes.
12. Next, it will prompt you for selecting the authentication method for users to bind/authenticate to the server. You need to choose the authentication method from one of the following prompts based on your selection in step 11: • For TLS, you have a choice between SIMPLE (the default), or SASL/GSSAPI if you choose to not enable TLS. However, you have a choice between SIMPLE with TLS (the default), or SASL/GSSAPI with TLS if you choose to enable TLS. Skip to step 13.
20. Enter the maximum time in seconds the client should wait for binding to the directory before aborting ("bind time"). Enter 0 for no time limit. CAUTION: The default client binding time is 5 seconds. Depending on the load on your directory, this default value may not be high enough to service all database requests. 21. Enter the maximum time in seconds the client should wait for directory searches before aborting. Enter 0 for no time limit. 22. Enter the Profile Time To Live (TTL) value.
NOTE: The default search base DN for all requests will be set to the previously specified default search base DN (specified in step 14), usually the domain root. For very large databases, search performance can be greatly increased by specifying custom search descriptors. For example, to search user and group information, set the search base DN for the user and group services to CN=Users, DC=cup, DC=hp, DC=com.
25. Enter Yes to the question Are you ready to create the Profile Entry?, then press any key to continue. 26. At this point, you will choose whether or not to configure for Multiple Domains.
2.4.5.2.1 Remapping attributes for services This section describes detailed procedures on how to perform attribute mappings for dynamic group, LDAP printer configurator and X.500 group membership services. Attribute Mappings for LDAP Printer Configurator Support The default printer attributes, printer-name and printer-uri, are not defined in the Windows Active Directory Server. You need to define the alternate printer attributes and map them to printer-name and printer-uri respectively.
Attribute Mappings for Dynamic Group Support To enable dynamic group support, you must remap the default group member attribute, memberuid, to msDS-AzLDAPQuery (for Windows Active Directory Server). For detailed information about dynamic group support, see “Dynamic group support” (page 76). Use the following steps to remap the memberuid attribute to the dynamic group attributes, msDS-AzLDAPQuery (assuming that the directory server is Windows 2003 R2 ADS): 1.
4. Enter the attributes you want to map to the member attribute: [memberuid]: member NOTE: LDAP-UX supports DN-based (X.500 style) membership syntax. This means that you do not need to use the memberUid attributes to define the members of a POSIX group. Instead, you can use either the member or uniqueMember attribute. LDAP-UX can convert from the DN syntax to the POSIX syntax (an account name). For ADS, the typical member attribute would be either memberUid or preferably the member attribute. 5.
4. Add a host key to the /etc/krb5.keytab file The keytab file is the one described in the previous section on Windows 2003 R2/2008 using ktpass. You need to securely transfer the keytab file previously created to your HP-UX machine and name it krb5.keytab in the /etc directory. If you already have an existing/etc/krb5.keytab file, merge the new keytab file with the existing one.ktutil is a tool provided with the Kerberos product for you to maintain the keytab file. NOTE: 5. 6.
The default is to allow all users stored in the directory to log in. To disallow specific users to log in to a local system, you can configure the disable_uid_range flag in /etc/opt/ldapux/ ldapux_client.conf file, as described in Section 2.5.4.1 (page 60). 2.4.6 Configuring the LDAP-UX Client Services with SSL or TLS support The LDAP-UX Client Services supports either SSL (Secure Socket Layer) or TLS (Transport Layer Security) to secure communication between LDAP clients and the Active Directory Servers.
NOTE: If you already have the certificate database files cert8.db and key3.db on your client for your HP-UX applications, you can simply create a symbolic link /etc/opt/ldapux/cert8.db that points to cert8.db and /etc/opt/ldapux/key3.db that points to key3.db. 2.4.6.2.1 Steps to create certificate database files using the certutil utility The following steps show how you can create the security database files, cert8.db and key3.
these certificate database files with other applications that make use of a private key, you should set a password. 4. Add the downloaded CA certificate to the certificate database created in the preceding step. If the CA certificate was downloaded in binary DER form, use the following command: # /opt/ldapux/contrib/bin/certutil -d /etc/opt/ldapux -A -n "CA cert" -t “CT,,” -i cacert.
host name of the directory server (which could lead to a catch-22). However, since certificates normally embed the host name or fully qualified host name and LDAP-UX only has the IP address of the host, it is not possible for LDAP-UX to verify the host name on the certificate. If you want to configure the CNCERT validation level with the peer_cert_policy parameter, you must manually execute the following configuration steps: 1. 2.
Name: ldapserver.example.com Address: 192.168.1.1 2.4.6.3 SSL/TLS ciphers The SSL/TLS protocols support a variety of different cryptographic algorithms called ciphers for use in operations such as authenticating the server and client to each other, transmitting certificates, and establishing session keys. When an LDAP client connects to a directory server, the server usually picks the strongest cipher supported by both client and server.
LDIF, edit the LDIF, then import the LDIF into your directory. For example, you could manually add the unixAccount attributes to your existing entries under CN=Users and add their HP-UX information there. • Ensure that the user and group numbers to be imported or migrated do not collide with those already on the HP-UX host (see “Ensure user and group numbers do not collide with those already on the HP-UX host” (page 53)). 2.5.1.
This tests the NSS configuration in /etc/nsswitch.conf. If you do not see output similar to above, check /etc/nsswitch.conf for proper configuration. 2.
5. 6. Log in to the client system from another system using rlogin or telnet. Log in as a user in the directory and as a user in /etc/passwd to make sure both work. Optionally, test your PAM_AUTHZ authorization configuration: If the PAM_AUTHZ is configured without the pam_authz.policy file, verify the following: a. b. Log into the client system from another system using rlogin or telnet.
2.5.3.1 Automount schemas This section describes the following automount schema: new automount schema An automount schema is based on RFC 2307-bis. This schema defines new automountMap and automount structures to represent the AutoFS maps and their entries in the directory server. 2.5.3.1.1 New automount schema This schema is a new schema based on RFC 2307-bis. This schema defines new automountMap and automount structures to represent AutoFS maps and their entries in the directory server.
2.5.3.1.
Table 4 Migration scripts Migration Script Description migrate_automount_ads.pl Migrates AutoFS maps from files to LDIF. migrate_nis_automount_ads.pl Migrates AutoFS maps form the NIS server to LDIF. 2.5.3.4.1 Environment variables When you use the AutoFS migration scripts to migrate AutoFS maps, set the following environment variables: LDAP_BASEDN The base distinguished name of the directory server that the AutoFS maps are to be placed in.
#local mount point /mnt/direct/lab1 /mnt/direct/lab2 remote server:directory hostA:/tmp hostB:/tmp The following shows the resulting /tmp/auto_direct.
dn:cn=auto_indirect,dc=nisserv1 objectClass: top objectClass: automountMap automountMapName: auto_indirect cn: auto_indirect dn:cn=lab1,cn=auto_indirect, dc=nisserv1 objectClass: top objectClass: automount automountInformation: hostA:/tmp automountKey: lab1 cn: lab1 dn:cn=lab2,cn=auto_indirect,dc=nisserv1 objectClass: top objectClass: automount automountInformation: hostB:/tmp automountKey: lab2 cn: lab2 You can use the /opt/ldapux/bin/ldapmodify tool to import the LDIF file /tmp/auto_indirect.
NOTE: • White spaces between numbers are ignored. • Only one line of the list is accepted; however, the line can be wrapped. • The maximum number of ranges is 20. When the disable_uid_range is turned on, the disabled UIDs will not be displayed when you run commands such as pwget, listusers, and logins.
5. Verify the installation and configuration of your LDAP-UX Client Services, as described in “Verifying LDAP-UX Client Services for Single Domain” (page 53). 2.5.6 Downloading the profile periodically The product setup program, /opt/ldapux/setup, allows you to define a time interval after which the current profiles are being automatically refreshed. The start time for this periodic refresh is defined by the time the setup program was run and the value defined for ProfileTTL.
typically specifies the domain administrator's distinguished name (DN). An example of a DN for this variable is CN=Administrator,CN=Users,DC=ldaptest,DC=west,DC=com. -j password_filename Specifies a file that includes the bind password for the user specified with the -D option. Specifying this file enables the netleave script to run without prompting you for the password.
3 Active Directory multiple domains This chapter contains information specific to multiple domains. If you do not store and group information in multiple domains, you can skip this chapter. 3.1 Domain term definitions The following section defines common multiple domain terms. 3.1.1 Multiple domains Supported multiple domains refer to domains in an ADS forest. Domains from different forests are not supported. 3.1.
• Both Remote Domain Configuration and GCS If you are sure that you need some specific remote domains, but don't want to exclude other domains, you can configure both, specifying remote domains and configuring usage of the GCS. When both are configured, LDAP-UX searches in this sequence: 1. 2. 3. 4. local domain remote domains in the order of configuration GCS to determine in which domain the data resides specific domain determined by GCS 3.2.
NOTE: By default, the cn=system,DC=myorg,DC=mycom,DC=com configuration container only exists in the root domain. To create the standard profile path for LDAP-UX, manually create it in each domain using ADSI Edit before running the setup tool to configure profiles. 3.4 Understanding the ldapux_client.conf configuration file When you set up LDAP-UX, the /etc/opt/ldapux_client.conf file is automatically created to specify where the directory is located, the profile data path, and the logging configuration.
file will have the “local” section immediately followed by the “gc” section. Any remote domain sections in the file after the "gc" section are remote domains in the forest you configure. They are only used by LDAP-UX to download profiles from the server, and will be ignored by LDAP-UX for the multiple domain search scope. 3.5 Resolving duplicate entries In the Windows 2003 R2 or 2008 environment, a user account can exist in multiple domains.
3.6 Changing multiple domain configurations The following sections explain how to modify your multiple domain configuration. 3.6.1 Removing a remote domain from the search scope If you originally configure several remote domains without configuring the GCS, and you want to exclude a domain from the search scope, perform one of the following options: • Run the setup tool, /opt/ldapux/config/setup, to re-configure multiple domains and exclude the one you want to remove.
uid Used by getpwnam() and getgrnam() uidNumber Used by getpwuid() gidNumber Used by getgrgid() To add these attributes to the global catalog: 1. 2. 3. 4. 5. 6. 7. 8. 9. On your Windows 2003 R2 or 2008 GCS, click Start, then Run. In the open dialog box, type mmc, then click OK. Click the Microsoft Management Console menu, select Add/Remove Snap-in. Click Add under the Standalone tab to get to the Add Standalone Snap-in dialog box.
4 LDAP printer configurator support This chapter contains information describing how LDAP-UX supports the printer configurator, and how to configure the printer configurator to control its behaviors. 4.1 Overview Management of network printing is complex, and printers themselves are more complicated. Instead of having printer configuration and information scattered over client systems and printer servers, they can be stored and managed from a single repository.
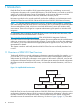
When ldapclientd is initialized, it will enable the printer configurator sevices at the same time. Once the printer configurator is up, it periodically searches for any existing printer entries in the LDAP Direcotry Server based on a predefined search filters. If there are any printer entries in the directory server, the printer configurator will extract the LP printer configuration from each printer entry.
Figure 7 Printer configurator architecture Directory Server *Defined Printer Attributes *Printer Entries dn: printerbyname: laser2,ou=printers,dc=hp,dc=com printerbyname: laser2 printer resource: lpd://hostA.corp.hp.com/lj2004 dn: printerbyname: laser8,ou=printers,dc=hp,dc=com printerbyname: laser8 printer-resource: lpd://jetdirect.unit1.hp.com/lj8100 LDAP Printer Configurator ldapclientd “hostA.corp.hp.com” LDAP-UX Client “hostB.cup.hp.com” Printer Server “jetdirect.unit1. hp.
local printer name, remote host name, and the remote printer name. The remote host name is the system or device that the remote printer is connected to. The remote host name must be the fully qualified name. 4.4.1.1 Default printer attributes LDAP-UX supports the following two default printer attributes: printer-name Defines information of local printer name. printer-uri Defines the remote host name and the remote printer name information. 4.4.1.
Printer Attribute Mappings To enable the LDAP printer configurator support, you must run the setup program to perform the attribute mappings and search filter changes. The tasks include the following:: • Remap the default group attributes, printer-name and printer-uri to the alternate printer attributes respectively. The attribute mappings are done in step 23 of “Step 2: Run the setup program” (page 38) in Section 2.4.5 (page 37).
dn: printer-name=laser2,ou=printers,dc=hp,dc=com printerbyname: laser2 printer-resource: lpd://hostC.hp.com/lj2004 printer-model: Hewlett Packard laserjet Model 2004N printer-service-person: David Lott The current remote LP laser2 printer configuration is removed from the client system, and the new laser2 printer configuration with new remote host name information is added to the client system.
5 Dynamic group support This chapter contains information about how LDAP-UX Client Services supports dynamic groups, how to set up dynamic groups, and how to enable or disable dynamic group caches. 5.1 Overview A system administrator can associate some users with a group, and apply security policies (e.g. access control, password policies) to the group. As a result, all users belong to the group inherit the specific policies.
http://msdn2.microsoft.com/en-us/library/ms952382.aspx An Example The following shows an example of a dynamic group entry (LDAP query group) created using Authorization Manager: dn: CN=group1,CN=AzGroupObjectContainer-dyngroup,CN=dyngroup, DC=hp,DC=com objectClass: top objectClass: group cn: group1 description: my dynamic group distinguishedName: CN=group1,CN=AzGroupObjectContainer-dyngroup, CN=dyngroup,DC=hp,DC=com instanceType: 4 whenCreated: 20060313181428.0Z whenChanged: 20060313182629.
sAMAccountName: $N21000-OA67EGECFDSP sAMAccountType: 1073741825 groupType: 32 objectCategory: CN=Group,CN=Schema,CN=Configuration,DC=hp,DC=com msDS-AzLDAPQuery: (cn=p*) GidNumber: 10005 5.2.1.3 Step 3: Setting read permissions for the proxy user The LDAP query groups (dynamic groups) created by Authorization Manager are not placed under the CN=Users container. Authorization Manager creates its own authorization store objects (for example, CN=dyngroup).
Group Service Configuration: Attribute: ----------name: gid: members: is mapped to: ------------cn gidnumber memberuid msDS-AzLDAPQuery member LDAP-UX retrieves group members and processes groups that a specific user belongs to by looking into all configured attributes. An LDAP query group specifies dynamic members using a search filter.
5.3.2 Group attribute mappings To enable the dynamic group feature support, you must run the setup program to remap the default group attribute, memberuid, to the dynamic group attribute, msDS-AzLDAPQuery. If msDS-AzLDAPQuery is not mapped to memberUid, LDAP-UX will not process dynamic groups. The attribute mappings are done in step 23 of “Step 2: Run the setup program” (page 38) in Section 2.4.5 (page 37).
For example, if a user belongs to 8 static groups and 20 dynamic groups, and you map memberUid to memberUid msDS-AzLDAPQuery , LDAP-UX will return 8 static groups and 12 dynamic groups. If you map memberUid to msDS-AzLDAPQuery memberUid, LDAP-UX will return 20 dynamic groups without any static groups. NOTE: As of HP-UX release 11i v3, you can increase the number of groups a user can be a member of (instead of the default 20).
NOTE: If the enable_dynamic_getgroupsbymember variable is set to 0, LDAP-UX will still return dynamic members for a specific group. If you don't want dynamic members returned, you must not include the msDS-AzLDAPQuery attribute in the memberUid group attribute mappings, which completely disable the dynamic group functionality with LDAP-UX. 5.
6 Administering LDAP-UX Client Services This chapter describes administrative procedures that will be used to keep clients operating efficiently and when expanding the computing environment. 6.1 Using the LDAP-UX client daemon This section contains the following information: • Overview of ldapclientd daemon operation. • Command line syntax and options for the ldapclientd command. • Configurable parameters and syntax in the ldapclientd configuration file ldapclientd.conf. 6.1.
◦ dynamic group ◦ netgroup ◦ X.500 group membership ◦ automount Except for the dynamic group map, all of the above maps share a common memory space. The Dynamic Group map cache is created as an independent memory space. The length of time the reply data is held in the cache is determined by a Time To Live timer. This timer can be set for all maps or can be set independently for each of the maps listed above. The cache can also be flushed by specifying an option on the ldapclientd command.
Meaning: This message can mean several things: • Attempted to use the control option features of ldapclientd when no ldapclientd daemon process was running, to control. • Attempted to start or control ldapclientdwithout superuser privilege. • The ldapclientd daemon process is too busy with other requests to respond at this time. Try again later. Message: Problem reading configuration file. Meaning: The/etc/opt/ldapux/ldapclientd.conf file is missing or has a syntax error.
• uiddn • domain_pwd • domain_grp • automount2 setting This will be different for each section. value Depending on the setting, this can be yes, no, or number. 6.1.4.3 Section details Within a section, the following syntax applies: [StartOnBoot] Determines if ldapclientd starts automatically when the system boots. enable= By default, this is enabled after LDAP-UX has been configured by the LDAP-UX setup program /opt/ldapux/config/setup.
poscache_ttl=<1-2147483647> The time, in seconds, before a cache entry expires from the positive cache. There is no [general] default value for this setting. Each cache section has its own default values (listed below). Specifying a value under [general] will override poscache_ttl defaults in other sections (where there is no specific poscache_ttl definitions for that section). negcache_ttl=<1-2147483647> The time, in seconds, before a cache entry expires from the negative cache.
negcache_ttl=<1-2147483647> The time, in seconds, before a cache entry expires from the negative cache. The default value is 240 (4 minutes). [group] Cache settings for the group cache (which caches name, gid and membership information). enable= ldapclientd only caches entries for this section, when it is enabled. By default, caching is enabled. poscache_ttl=<0-2147483647> The time, in seconds, before a cache entry expires from the positive cache.
NOTE: The cache_size option defined in the [general] section is used to configure for all other caches (passwdm netgroup, group, automount, domain_pwd, domain_grp, uiddn). [netgroup] Cache settings for the netgroup cache. enable= ldapclientd only caches entries for this section, when it is enabled. By default, caching is enabled. poscache_ttl=<0-2147483647> The time, in seconds, before a cache entry expires from the positive cache.
The time, in seconds, before a cache entry expires from the positive cache. Since new domains are rarely added to or removed from the forest, the cache is typically valid for a long time. The default value is 86400 (24 hours). negcache_ttl=<1-2147483647> The time, in seconds, before a cache entry expires from the negative cache. The default value is 86400 (24 hours). [automount] Cache settings for the automount entry cache (which caches automount entries in automount maps).
seconds). The minimum value is 1800 (30 minutes) and the maximum value is 1209600 (2 weeks). max_printers= 50 (default value) Defines the maximum printer objects that printer configurator services will handle. For example, a number of 100 printer entries is returned to the printer configurator after a scheduled printer search. If the max_printers value is set to 50, only the first 50 printer entries received by the printer configurator will be processed.
# Maximum number of connections ldapclientd can establish to # the directory server (or multiple servers when in a multi-domain # environment). # max_conn=100 # # Time between an inactive connection to the directory server is # brought down and cleaned up. # connection_ttl=300 # # Number of threads in ldapclientd. # num_threads=10 # # Time to clean up socket files created by client applications that # were terminated abnormally.
[domain_grp] enable=yes [automount] enable=yes [automountmap] enable=yes [dynamic_group] # "dynamic_group" has its own default cache_size, poscache_ttl and negcache_ttl. cache_size=10000000 enable=yes poscache_ttl=43200 negcache_ttl=43200 [longterm_cache] # Should long term cache enabled ? # enable=no # How long before data is considered stale and not usabled. 1,209600 = 2 weeks. # longterm_expired_interval=1209600 # How frequently should save long term data to permanemt storage. 900 = 15 minutes.
6.2 Integrating with trusted mode This section describes features and limitations, PAM configuration changes and configuration parameter for integrating LDAP-UX with Trusted Mode. 6.2.1 Overview Starting with LDAP-UX Client Services B.03.30, the product supports coexistence with Trusted Mode. This means that local-based accounts can benefit from the Trusted Mode security policies while LDAP-based accounts benefit from the security policies offered by the LDAP server.
6.2.2.2 Password and account policies The primary goal of integrating Trusted Mode policies and those policies enforced by an LDAP server is coexistence. This means that Trusted Mode policies are not enforced on LDAP-based accounts, and LDAP server policies are not enforced on local-based accounts. The password and account policies and limitations are described as followings: • Accounts stored and authenticated through the LDAP server adhere to the security policies of the directory server being used.
6.3 SASL/GSSAPI support LDAP-UX Client Services includes support for the SASL / Generic Security Services Application Programming Interface (GSSAPI) authentication method for Kerberos v5. Currently, Kerberos v5 is the only security mechanism that is implemented to work with GSSAPI. For this release, we provide SASL/GSSAPI authentication method support only for Microsoft Windows 2003 R2 or 2008 Active Directory. SASL/GSSAPI authentication is only for proxy user authentication for the name service subsystem.
specified, the realm information is retrieved from /etc/krb5.conf. The credential (password) is the same one used to create the user principal in the KDC. 6.3.2.2 Service/host principal A Kerberos keytab file contains service or host principals and associated keys information. Users can choose to bind using the service or host keys. The keytab file may contain multiple principals and keys. Users may configure which service key to use. For example, the following /etc/krb5.
6.3.3 Keytab file LDAP-UX allows you to specify the keytab file when you use the SASL/GSSAPI authentication. Run the setup program to specify the keytab file or use the kerberos_keytab_file option in /etc/opt/ldapux/ldapux_client.confto specify the keytab file. If you do not specify a keytab file, LDAP-UX will use the default file specified in /etc/krb5.conf. If there is no default keytab file configured in /etc/krb5.conf, then the keytab file /etc/krb5.
The PAM framework, together with the PAM_AUTHZ service module supplied with LDAP-UX Client Services, provide support for Account Management services. ( The PAM_AUTHZ functionality is provided by the PAM_AUTHZ library.) These services allow the administrator to control who can log in to the system based on netgroup information found in the /etc/passwd and /etc/ netgroup files.
PAM_AUTHZ Environment 1. The administrator defines access rules and saves them in a local access policy configuration file. 2. PAM_AUTHZ service module receives an authorization request from PAM framework. It processes all the access rules stored in the access policy configuration file. 3. If a rule indicates that the required information is stored in a LDAP server, PAM_AUTHZ constructs a request message and sends to the LDAP client daemon, ldapclientd.
Details about pam.conf configuration and sample files are included in “Sample PAM configuration (pam.conf) files for Windows ADS” (page 149). 6.4.3.2 Authentication with Secure Shell (SSH) and r-commands For LDAP-UX B.04.00 or earlier versions, a user defined in a directory server who tries to log on to a UNIX system using SSH key-pairs or the rhost enabled r-command will always be able to log in even if this user’s account has been locked or password has expired.
NOTE: • If the user's login name is root or UID is 0, PAM_AUTHZ does not process the access rules defined in the access policy file. The root user is always granted login access. • The default of PAM_AUTHZ is deny if no authoritative rule is found. The following describes situations where PAM_AUTHZ skips an access rule and does not process it: • An access rule contains the wrong syntax.
These fields have the following limitations: • No leading or trailing empty space is allowed in a field • Fields are separated by a separator, : • No leading or trailing empty space is allowed in a separator • An access rule is terminated by a carriage return 6.4.7.1 Fields in an access rule Table 8 shows a summary on all possible values and syntax of an access rule: Table 8 Field syntax in an access rule
Table 8 Field syntax in an access rule (continued)
For example, if the PAM_AUTHZ policy rule indicates that an account has been locked out or a password has expired, PAM_AUTHZ can return an appropriate PAM error code instead of a general deny error code. Use of the status rule only applies when the action is to call a library function. In this case, the status rule is always evaluated and always returns a code to the PAM subsystem. Therefore, the status rule should always be the last and only status rule in your policy file.
PAM_ACCT_EXPIRED:ldap_filter:(nsAccountLock=TRUE) In the above example, if a user account has been locked out and this access rule is evaluated to be true, the PAM_ACCT_EXPIRED code is returned by PAM_AUTHZ. In LDAP-UX Client Services B.04.10 or later, PAM_AUTHZ supports dynamic variable in the ldap_filter type of the access rule. A search filter can consist of one or more (attribute=$[function_name]) pairs and is defined in the
of each listed group by querying the name services specified in nsswitch.conf. That means the group entries may come from any sources (files, nis, ldap, etc). If the login user belongs to any groups in the list, the access rule is evaluated to be true. Otherwise, the rule is skipped. An example of a unix_group access rule is shown as follows: deny:unix_group:myunixgroup10,myunixgroup11,myunixgroup12 A user tries to log in and he is a member of myunixgroup12.
where $[HOSTNAME] represents a dynamic variable function which will be called to retrieve the local host name information. PAM_AUTHZ will then substitute its return value to the search filter. 6.4.9.1 Supported functions for dynamic variables In LDAP-UX Client Services B.04.10 and later, PAM_AUTHZ provides the following default dynamic variable functions in the libpolicy_commonauthz library.
given the opportunity to provide security policy enforcement, which normally occurs during the LDAP authentication process. To configure and use this feature for SSH key-pair or r-commands, you must perform the following tasks: • Set security policy enforcement access rule in the access policy file. See Section 6.4.10.1 (page 109) for details. • Set access permissions for global policy attributes. See Section 6.4.10.2 (page 110) for details. • Configure the PAM_AUTHZ library in the /etc/pam.
NOTE: If the status:rhds:check_ads_policy access rule is configured in the access policy file, you must perform the following tasks: • Define the allow:unix_local_user access rule in the access policy file to allow the local user to log in. • Since the status:rhds:check_ads_policy access rule is guaranteed to match and return a PAM return code. It is highly recommended to define the status:rhds:check_ads_policy access rule at the end of the access policy file.
If the above access rule is specified in the access policy file, the check_ads_policy routine in the libpolicy_ads library is loaded and executed. PAM_AUTHZ constructs a request message that will be used to find the current security policy configuration as well as examine the specific user’s security policy status attributes to determine if the user complies with the security policy.
Table 9 Global security attributes Attribute Description lockoutDuration This integer attribute defines the amount of time that an account is locked due to the Lockout-Threshold being exceeded. This value is stored as a large integer that represents the negative of the number of 100 nanosecond intervals from the time the Lockout-Threshold is exceeded that must elapse before the account is unlocked. maxPwdAge This integer attribute specifies the maximum amount of time a password is valid.
2. Create a new profile that specifies the new domain controller. The new profile can be identical to another profile, except the preferredServerList attribute specifies a new domain controller. Refer to Section 6.13 (page 130). Refer to Appendix B (page 146) for a description of the preferredServerList attribute. 3. 4. On all clients that are to use the new controller, edit the start-up file, /etc/opt/ldapux/ ldapux_client.conf, to refer to the new domain controller and the new profile.
a. b. c. Click the container of the object you want to create, click the Action menu, choose New and click on Object. Select the Object Class ( )unixIpNetwork, unixIpProtocol, unixIpService, or unixOncRpc, and provide the mandatory attribute values and object will be created. Click the created object, and select Properties from the Action menu to set the RFC 2307 attributes. 11. In the Select Which Properties to View dialog box, select Optional from the drop-down list on the right. 12.
ldapugadd, ldapcfinfo, ldapugmod, and ldapugdel in the “Command and tool reference” chapter of the LDAP-UX Client Services Administrator's Guide, or the ldapuglist(1M), ldapugadd(1M), ldapcfinfo(1M), ldapugmod(1M) and ldapugdel(1M) manpages. Use of the ldapugadd, ldapugmod and ldapugdel tools requires specification of LDAP administrator credentials with sufficient privilege to perform the requested operations in a directory server.
The ldapcfinfo tool can provide the following information by examining LDAP UG template files, LDAP UG configuration file or the LDAP-UX configuration profile: ◦ Determine if the LDAP-UX is properly configured and active. ◦ Discover the current LDAP UG configuration defaults, such as home directory and login shell. ◦ Discover the distinguished name (DN) of the LDAP-UX configuration profile and the directory server name which stores that profile.
dn: cn=Mike Lee,cn=Users,dc=org,dc=example,dc=com cn: Mike Lee uid: mlee uidNumber: 900 gidNumber: 2000 loginShell: /usr/bin/sh homeDirectory: /home/mlee gecos: mlee,Building-5,555-555-5555 dn: cn=Michael Sheu,cn=Users,dc=org,dc=example,dc=com cn: Michale Sheu uid: msheu uidNumber: 880 gidNumber: 2010 loginShell: /usr/bin/sh homeDirectory: /home/msheu gecos: msheu,Building-8,555-555-5000 dn: cn=Pat Fong,cn=Users,dc=org,dc=example,dc=com cn: Pat Fong uid: pfong uidNumber:750 gidNumber: 2000 loginShell: /usr/
memberUid: bjones dn: cn=group2,ou=groups,dc=org,dc=example,dc=com cn: group2 gidNumber: 580 memberUid: vtam memberUid: ajones memberUid: mphillips Run the following command to list a regular posixGroup entry which contains cn=groupA: .
NOTE: The LDAP-UX Client Services provides two default template files to work with Windows 2003 R2 or 2008 Active Directory Server. If you use ldapugadd to access a Windows ADS, you must manually use the following commands to re-link the default templates to the default templates for the Windows ADS: • ln -fs /etc/opt/ldapux/ug_templates/ug_passwd_ads.tmpl \ /etc/opt/ldapux/ug_templates/ug_passwd_default.tmpl • ln -fs /etc/opt/ldapux/ug_templates/ug_group_ads.
to cn, l and telephoneNumber in the LDAP-UX configuration profile. ldapugadd creates the password for new user, tsheu, using the password specified in the LDAP_UGCRED environment variable. After creating the user entry, ldapugadd attempts to add this user as a member of the group number 350. ./ldapugadd -t passwd -PW -g 350 -I "Tom Sheu,Building-1A,555-555-5555" tsheu Use the following command to display the new user entry, tsheu, with mapped attribute information: .
This option specifies arbitrary LDAP attributes and values. = parameters are optional and must be specified as the last parameters on the command line. = 6.7.4.2 Examples of adding a group Use the following command to add a new group entry for the group name, groupA. In this example, ldapugadd creates the new group, groupA, and defines initial group membership by adding the user account tsheu as a member. .
./ldapugadd -D -t passwd -d /net/home Command Arguments Applicable to -D The following describes arguments used in the previous examples of the ldapugadd -D commands: -D Uses this option to change local host defaults in the /etc/opt/ldapux/ldapug.conf file which are used by ldapugadd when creating new user or group entries in a directory server. -u : Sets new default minimum and maximum ranges that ldapugadd uses when provisioning an UID number for new user entries.
./ldapugmod -t passwd -I "Ann Louie,Building-6,222-2222" alouie The following command adds the description attribute and value to the user entry, mscott: ./ldapugmod -t passwd -A "description=test user entry" mscott Command Arguments The following describes arguments/options used in the previous examples for the ldapugmod -t passwd commands: -PW Sets the user or group password attribute. If you specify -PW, you must specify either the LDAP-UGCRED environment variable or the -PP option.
In the following example, a group entry in a directory server is as follows: dn: cn=GroupC,ou=Groups,dc=org,dc=example,dc=com cn: GroupC gidNumber: 500 MemberUid: alouie Description: A IT Group Description: A Group Entry Run the following command to add an instance of the description attribute and value to the group entry, GroupC, without removing already existing values for that attributes: .
a Windows 2003 R2 ADS, the ldapugdel -t passwd -O command removes the posixAccount object class and following attributes, • uidNumber • gidNumber • loginShell • gecos The ldapugdel -t group -O command removes the posixGroup object class and following attributes: • gidNumber • memberUId • userPassword 6.7.7.1 Examples This section provides examples of using ldapugdel.
use the -D option to specify the Distinguished Name (DN) of the entry being deleted. You can specify only one of -D, or parameter on the command line. 6.7.8 Checking LDAP-UX configuration The ldapcfinfo tool provides several capabilities used to report LDAP-UX configuration and status.
/etc/opt/ldapux/ug_templates/ug_passwd_ads.tmpl /etc/opt/ldapux/ug_templates/ug_passwd_std.tmpl /etc/opt/ldapux/ug_templates/ug_passwd_default.tmpl Run the following command to display a list of available template files that ldapugadd uses to a group entry for the group name service: ./ldapcfinfo -t group -L Assume that the /etc/opt/ldapux/ug_templates/ug_group_std.tmpl, /etc/opt/ ldapux/ug_templates/ug_group_default.tmpl /etc/opt/ldapux/ug_templates/ ug_group_ads.
dn: cn=ldapux-profile,cn=system,dc=org,dc=example,dc=com hostssl: 55.5.55.15:636 6.7.8.6 Displaying default search base Use the ldapcfinfo -t -b command to display the primary (first) configured search base in the LDAP-UX profile configuration for a specific service. The valid value can be passwd or group. The following command displays the LDAP-UX default search base for the passwd name service.
6.8 Managing hosts in an LDAP-UX domain LDAP-UX B.05.00 introduces utilities that simplify management of hosts, adding to the toolset provided for managing users and groups. Two utilities have been added, /opt/ldapux/bin/ldaphostmgr and /opt/ldapux/bin/ldaphostlist. These utilities let you discover, create, modify, and remove host objects in the directory server.
./ldap_proxy_config -p PROXY DN: CN=Proxy User, CN=Users, DC=cup, DC=hp, DC=com 6.12 Displaying the current profile You can display the profile in use by any client by running /opt/ldapux/config/ display_profile_cache on that client. The current profile is in the binary file/etc/opt/ ldapux/ldapux_profile.bin: cd /opt/ldapux/config .
6.16 Creating an /etc/krb5.keytab file In the ADS multiple domain environment, your HP-UX client machine will communicate with multiple Windows 2003 R2 or 2008 domain controllers. To set up Kerberos authentication, your HP-UX host needs to have a service key known by every domain controller, which also acts as KDC. The service key is created on Windows 2003 R2/2008 Server using ktpass (described in step 5 of "Section 2.4.4 (page 34)").
6.17.2 Search limits The default configuration for Active Directory sets the search size limit to 1,000 entries and the search time limit to two minutes. Setting search limits prevents users from consuming all the resources of a directory and helps to minimize "denial of service" attacks; however, on large databases they will not be enough to service commands or applications that generate enumeration requests. You can use the support tool ntdsutil to change these two values.
load and network usage. For example, when a user logs into the system, the OS typically needs to enquire about his/her account several times in the login process. This occurs as the OS identifies the user, gathers account information and authenticates the user. And further requests often occur as the account starts up new applications once a session is established. With caching, generally only one or two LDAP operations are required.
tear-down can cause relatively severe delays for client response. However, a persistent connection to the directory server will eliminate this delay. In the ldapclientd daemon, a pool of active connections is maintained to serve requests from the Name Service Subsystem (NSS). If the NSS needs to perform a request to the directory server, one of the free connections in this pool will be used. If there are no free connections in the pool, a new connection will be established, and added to the pool.
TIP: Enable LDAP logging only long enough to collect the data you need because logging can significantly reduce performance and generate large log files. You may want to move the existing log file and start with an empty file: mv /var/adm/syslog/local0.log /var/adm/syslog/local0.log.save Restart the syslogdaemon with the following command: (Refer to syslogd(1M)or details.) kill -HUP 'cat /var/run/syslog.pid'. 6.19.
TIP: Enable PAM logging only long enough to collect the data you need because logging can significantly reduce performance and generate large log files. You may want to move the existing log file and start with an empty file: mv /var/adm/syslog/ debug.log /var/adm/syslog/debug.log.save. Restore the file when finish. Restart the syslog daemon with the following command (Refer to syslogd(1M) for details.) kill -HUP 'cat /var/run/syslog.pid' 6.19.
• Make sure the client system can authenticate to the directory and find a user in the directory by searching for one of your user's information in the directory. Use theldapsearch command and information from the current profile. Try searching for a user's information in the directory as the proxy user with a command similar to following: cd /opt/ldapux/bin .
• Enable PAM logging as described under Section 6.19.2 (page 135) then try logging in again. Check the PAM logs for any unexpected events. • Enable LDAP-UX logging as described in Section 6.19.1 (page 134), then try logging in again. Check the log file for any unexpected events.
7 Modifying user information This chapter describes how to change user passwords and personal information. 7.1 Changing passwords Users can change their password with the passwd(1) command. Depending on how PAM is configured and depending on where the user's information is located (in the directory or in /etc/ passwd), users may be prompted for their password twice as PAM searches in the configured locations for the user's information. 7.
8 Mozilla LDAP C SDK The LDAP-UX Client Services provides Mozilla LDAP C SDK 6.0.5 support. The LDAP C SDK is a Software Development Kit that contains a set of LDAP Application Programming Interfaces (API) to allow you to build LDAP-enabled clients. The features provided in the SDK closely follow the interface outlined in RFC 2251. Using the SDK's capabilities, you can enable your clients to connect to LDAP v3-compliant servers and perform the LDAP functions.
9 Support and other resources 9.1 Contacting HP HP encourages your comments concerning this document. We are truly committed to providing documentation that meets your needs. To make comments and suggestions about product documentation, send a message to: http://www.hp.com/bizsupport/feedback/ww/webfeedback.html Please include document title, manufacturing part number, and any comment, error found, or suggestion for improvement you have concerning this document.
• compat mode performance enhancement For organizations that rely on the legacy netgroup /etc/passwd filtering, the compat mode performance enhancement significantly improves performance when numerous and large netgroups are used in the /etc/passwd file for controlling passwd fields. • Local-only profile support The centrally managed LDAP-UX configuration profile uses a schema defined by RFC 4876.
ldapsearch command, it satisfies a few specific feature requirements that allow applications to discover and evaluate hosts stored in a directory server without requiring intimate knowledge of the methods used to retrieve and evaluate that information in the directory server. In addition, ldaphostlist can be used to discover expiration information about ssh host keys if that information is managed in the directory server.
NOTE: This document applies to LDAP-UX Client Services B.05.00 only; it is not being updated for subsequent releases. For software releases subsequent to B.05.00, information about installing, configuring, and administering LDAP-UX Client Services with Windows ADS is provided by the LDAP-UX Client Services Administrator Guide, which now covers both HP directory server and Windows ADS environments. There will no longer be a separate administrator guide specific to Windows ADS integration.
A Configuration worksheet Use this worksheet to plan your LDAP-UX Client Services configuration. For installation and configuration details, refer to “Installing LDAP-UX Client Services” (page 14) for details. Each of the following should be configured once for each domain, except "Proxy user DN," which only needs to be configured once regardless of the number of domains in the system.
B LDAP-UX Client Services object classes This appendix describes the object classes used by LDAP-UX Client Services for configuration profiles. In release B.02.00, LDAP-UX Client Services used two object classes for configuration profiles: • PosixDUAProfile • PosixNamingProfile With release B.03.00, the PosixDUAProfile and PosixNamingProfile object classes have been replaced by a single STRUCTURAL object class DUAConfigProfile. In addition, four new attributes are added.
NOTE: The userPassword attribute is mapped to *NULL* to prevent passwords from being returned for increased security and to prevent PAM_UNIX from authenticating users in the directory server. Mapping to *NULL* or any other nonexistent attribute means do not return anything. authenticationMethod bindTimeLimit credentialLevel defaultSearchBase defaultServerList followReferrals preferredServerList profileTTL is how the client binds to the directory.
searchTimeLimit serviceSearchDescriptor is how long, in seconds, a client should wait for directory searches before aborting. 0 (zero) means no time limit. If this attribute has no value, the default is no time limit. is one to three custom search descriptors for each service. The format is Service:BaseDN ?Scope?(Filter) where Service is one of the supported services passwd, group, shadow, or PAM. BaseDN is the base DN at which to start searches.
C Sample PAM configuration (pam.conf) files for Windows ADS This appendix provides information about configuring PAM configuration files and includes several sample PAM configuration files used on an HP-UX 11i v2 (or higher) system. These /etc/pam.conf files are intended as examples only. The PAM configuration file /etc/pam.conf is the primary configuration file for the Pluggable Authentication Module (PAM) architecture.
IMPORTANT: Before modifying your pam.conf file, keep a backup of the original pam.conf file that includes the simplified authentication model. In this way, you can resort to the backup if your modified file causes problems. For example, you might inadvertently enter an invalid library name or erase a library name, causing login to be impossible for everyone. If no one is logged in with root permissions, the file errors cannot be fixed.
or no password has been entered, the user is prompted for a password. If the use_first_pass option had been specified instead, and the password does not match the database or has not been entered, authentication fails. If no options are specified, each module acts independently, each requesting passwords for its own database. # # # PAM configuration # # This pam.conf file is intended as an example only. # For more details, see pam.conf(4).
ftp account required OTHER account required # # Session management # login session required login session sufficient login session required dtlogin session required dtlogin session sufficient dtlogin session required dtaction session required dtaction session sufficient dtaction session required OTHER session required # # Password management # login password required login password sufficient login password required passwd password required passwd password sufficient passwd password required dtlogin passwor
# present in Kerberos or in Unix system. # # # # The module pam_hpsec(5) is stacked as mandatory module above # # all the modules for making security checks before # # authentication.
passwd passwd dtlogin dtlogin dtlogin dtaction dtaction dtaction OTHER password password password password password password password password password sufficient required required sufficient required required sufficient required required libpam_krb5.so.1 libpam_unix.so.1 try_first_pass libpam_hpsec.so.1 libpam_krb5.so.1 libpam_unix.so.1 try_first_pass libpam_hpsec.so.1 libpam_krb5.so.1 libpam_unix.so.1 try_first_pass libpam_unix.so.1 try_first_pass C.
# # Account management # login account required libpam_hpsec.so.1 login account required libpam_authz.so.1 policy=/etc/opt/ldapux/login.policy login account sufficient libpam_krb5.so.1 login account required libpam_unix.so.1 su account required libpam_hpsec.so.1 su account required libpam_authz.so.1 policy=/etc/opt/ldapux/su.policy su account sufficient libpam_krb5.so.1 su account required libpam_unix.so.1 dtlogin account required libpam_hpsec.so.1 dtlogin account required libpam_authz.so.
D Sample /etc/krb5.conf file This appendix provides a sample krkb5.conf file, which supports several domains. This krb5.
admin_server = FILE:/var/log/kadmin.log default = FILE:/var/log/krb5lib.log NOTE: Bold entry is required for multi-domain configuration.
Glossary Access Control Instruction A specification controlling access to entries in a directory. Access Control List One or more ACIs. ACI See See Access Control Instruction. ACL See See Access Control List.. Configuration profile An entry in a directory server containing information common to many clients, that allows clients to access user, group and other information in the directory. Clients download the profile from the directory. See also See also Client Configuration File..
remote domains. When LDAP-UX cannot find data from the local domain, remote domains will be searched. RFC Request for Comments; a document and process of standardization from the IETF. RFC 2307 The IETF specification for using LDAP as a Network Information Service. See http://www.ietf.org/ rfc/rfc2307.txt. Start-up file A text file containing information the client needs to access a directory server and download a configuration profile. See also See also Configuration profile..
Index Symbols /etc/group, 29 /etc/krb5.conf, 156 /etc/krb5.keytab, 131 /etc/nsswitch.
ftp, 12 G GCS, 64 adding to search scope, 68 removing from a search scope, 68 Global Catalog Server.
configuring for AutoFS support, 57 considerations using setup, 32 NSS configuration file (nsswitch.conf) configuring, 47 configuring for AutoFS support, 57 considerations during using setup, 32 nsswitch.ldap, 32 O object class posixDUAProfile, 146 posixNamingProfile, 146 overview, 10 P PAM, 11, 31, 55, 158 authorization configuration, 55 PAM configuration file (pam.
test clients, 53 test name service, 53 time limit on directory binding, 41 time limit on searches, 40, 41 TLS configuring, 48 tools ADSI, 113 ldapmodify, 139 Troubleshooting User cannot log in, 136 troubleshooting, 134 directory logging, 136 LDAP-UX logging, 134 PAM logging, 135 SSL/TLS ciphers, 52 syslog, 135, 136 typographic conventions, 144 U unconfiguring LDAP-UX, 62 user and group management, 114 User cannot log in, 136 user data, 29, 52 base DN, 40 Users and groups, adding, 113 V verify configuratio