
LDAP-UX Client Services B.04.15 with Microsoft Windows Active Directory Server Administrator's Guide (edition 8)
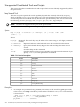
Table Of Contents
- LDAP-UX Client Services B.04.15 with Microsoft Windows Active Directory Administrator's Guide
- Table of Contents
- Preface
- 1 Introduction
- 2 Installing LDAP-UX Client Services
- Before You Begin
- Summary of Installing and Configuring LDAP-UX Client Services
- Planning Your Installation
- Installing LDAP-UX Client Services on a Client
- Configuring Active Directory for HP-UX Integration
- Step 1: Install Active Directory
- Step 2: Install SFU 2.0, 3.0 or 3.5 including Server for NIS
- Step 3: Create a Proxy User
- Step 4: Add an HP-UX Client Machine Account to Active Directory
- Step 5: Use ktpass to Create the Keytab File for the HP-UX client machine
- Step 6: Add POSIX Attributes into the Global Catalog
- Importing Name Service Data into Your Directory
- Configuring LDAP-UX Client Services
- Step 1: Run the Setup Program
- Step 2: Install the PAM Kerberos Product
- Step 3: Configure Your HP-UX Machine to Authenticate Using PAM Kerberos
- Step 4: Configure the Name Service Switch (NSS)
- Step 5: Configure the PAM Authorization Service Module (pam_authz)
- Step 6: Configure the Disable Login Flag
- Step 7: Verify LDAP-UX Client Services for Single Domain
- Step 8: Configure Subsequent Client Systems
- Configuring the LDAP-UX Client Services with SSL or TLS Support
- Downloading the Profile Periodically
- 3 Active Directory Multiple Domains
- 4 LDAP-UX Client Services with AutoFS Support
- 5 LDAP Printer Configurator Support
- 6 Dynamic Group Support
- 7 Administering LDAP-UX Client Services
- Using the LDAP-UX Client Daemon
- Integrating with Trusted Mode
- SASL GSSAPI Support
- PAM_AUTHZ Login Authorization
- Policy And Access Rules
- How Login Authorization Works
- PAM_AUTHZ Supports Security Policy Enforcement
- Policy File
- Policy Validator
- Dynamic Variable Support
- Constructing an Access Rule in pam_authz.policy
- Static List Access Rule
- Dynamic Variable Access Rule
- Security Policy Enforcement with Secure Shell (SSH) or r-commands
- Adding Additional Domain Controllers
- Adding Users, Groups, and Hosts
- User and Group Management
- Displaying the Proxy User's Distinguished Name
- Verifying the Proxy User
- Creating a New Proxy User
- Displaying the Current Profile
- Creating a New Profile
- Modifying a Profile
- Changing Which Profile a Client is Using
- Creating an /etc/krb5.keytab File
- Considering Performance Impacts
- Client Daemon Performance
- Troubleshooting
- 8 Modifying User Information
- 9 Mozilla LDAP C SDK
- A Configuration Worksheet
- B LDAP-UX Client Services Object Classes
- C Command, Tool, Schema Extension Utility, and Migration Script Reference
- LDAP-UX Client Services Components
- Client Management Tools
- LDAP User and Group Management Tools
- Environment Variables
- Return Value Formats
- Common Return Codes
- The ldapuglist Tool
- The ldapugadd Tool
- The ldapugmod Tool
- The ldapugdel Tool
- The ldapcfinfo Tool
- LDAP Directory Tools
- Schema Extension Utility
- Name Service Migration Scripts
- Unsupported Contributed Tools and Scripts
- D Sample PAM Configuration File
- E Sample /etc/krb5.conf File
- F Sample /etc/pam.conf File for HP-UX 11i v1 Trusted Mode
- G Sample /etc/pam.conf File for HP-UX 11i v2 Trusted Mode
- H Sample PAM Configuration File for Security Policy Enforcement
- Glossary
- Index
1
Systems have been configured with the same hostname, then the migration script migrate_host.pl, will create
multiple entries in its resulting LDIF file with the same DN for the hostname for each of the IP addresses. Since DNs
need to be unique in an LDAP directory, users should first manually merge the IP addresses with one designated
host record and delete the duplicated records in their LDIF file. A resulting merge might look as follows:
. . . .
dn: cn=machineA, ou=hosts, ou=unix, dc=cup, dc=hp, dc=com
objectClass: top
objectClass: computer
ipHostNumber: 15.13.130.72
ipHostNumber: 15.13.104.4
ipHostNumber: 15.13.95.92
cn: machineA
machineA
. . . .
2 Special characters (for example, Tab, control characters) are not allowed in the gecos field of password entries.
3 When migrating services data into the LDAP directory, users should keep in mind that only multiple protocols can
be associated with one service name, but not multiple service ports.
Environment Variables
When using the Perl scripts to migrate individual files, you must set the following mandatory
environment variables:
LDAP_BASEDN The base distinguished name where you want your data.
For example, the following command sets the base DN to DC=example,
DC=hp, DC=com:
export LDAP_BASEDN="DC=example, DC=hp, DC=com"
SYNC_NISDOMAIN Windows 2000 domain where the NIS objects reside.
General Syntax for Perl Migration Scripts
All the Perl migration scripts use the following general syntax:
scriptname inputfile [outputfile]
where:
scriptname
is the name of the particular script you are using. The scripts are listed below.
inputfile
is the name of the appropriate name service source file corresponding to the
script you are using.
outputfile is optional and is the name of the file where the LDIF is written. stdout is the
default output.
Examples
The following are some examples using the migration scripts.
The following command converts all NIS files in /etc to LDIF:
$ migrate_all_online.sh
The following commands convert /etc/passwd into LDIF and output it to stdout:
$ export LDAP_BASEDN="DC=example,DC=hp,DC=com"
$ migrate_passwd_ads.pl /etc/passwd
dn: cn=Joe Bloggs,cn=Users,dc=example, dc=hp, dc=com
objectClass: user
msSFUName: jbloggs
cn: Joe Bloggs
syncNisDomain: cup
loginShell: /usr/bin/sh
258 Command, Tool, Schema Extension Utility, and Migration Script Reference