Integrating HP-UX 11.x Account Management and Authentication with Microsoft Windows 2000 White Paper ! Printed in: U.S.A.
Legal Notices The information in this document is subject to change without notice. Hewlett-Packard makes no warranty of any kind with regard to this manual, including, but not limited to, the implied warranties of merchantability and fitness for a particular purpose. Hewlett-Packard shall not be held liable for errors contained herein or direct, indirect, special, incidental or consequential damages in connection with the furnishing, performance, or use of this material. Warranty.
Introduction Many enterprises contain a mixture of operating systems and platforms. Often a single user has both Windows 2000 and UNIX accounts on multiple systems. Having a common authentication service and account information data store across platforms improves security, administration and the end-user experience. Windows 2000 servers provide network-wide common authentication and data storage, but Windows clients don’t interoperate with other vendor’s solutions.
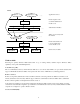
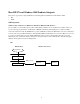
HP-UX and Windows 2000 Integration Products Both HP-UX and Windows 2000 operating systems offer new features which make the integration possible. HP-UX The following products, released as part of the system core and via Application CDs, provide the framework allowing HP-UX to become more flexible and more interoperable: PAM and NSS: As of release 11.0, HP-UX supports the Name Service Switch (NSS) and Pluggable Authentication Module (PAM) architecture.
PAM: login,su…. ….. application… Reads /etc/pam.conf to see which authentication module to use PAM Library PAM_UNIX PAM_LDAP PAM_Kerberos …. …. getgrnam() Reads /etc/nsswitch.conf to decide which name service module to use NSS Engine NSS_FILES NSS_NIS Authentication modules APIs to access user/system information NSS: getpwnam() Application services NSS_LDAP ….
Other than operating system improvements, Microsoft also provides the Services for UNIX (SFU) product to enhance the interoperability with UNIX-based systems. SFU 2.0 has features which make setting up a mixed enterprise environment a lot easier. The following figure illustrates the Windows 2000 components that HP-UX depends on for proper integration: Kerberos Services Windows 2000 authentication services Retrieve account information 1. NIS Server SFU 2.0 Active Directory Windows 2000 data store 2.
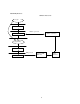
How HP-UX and Windows 2000 Products Integrate There are two approaches to integrate HP-UX account managemant and authentication with Windows 2000: • • NIS LDAP NIS Integration: Windows 2000 as NIS Server + HP-UX as NIS Client + HP-UX PAM_Kerberos Server for NIS is one of the SFU 2.0 tools, which enables Windows 2000 to serve as an NIS server. It utilizes AD to store user account and group information. An NIS client on HP-UX communicates with the NIS server on Windows 2000 to retrieve information from AD.
NIS+PAM_Kerberos: HP-UX client Windows 2000 server login PAM Library Kerberos protocol Kerberos Services PAM_Kerberos getpwnam() NSS engine NIS protocol NSS_NIS Server for NIS (SFU 2.
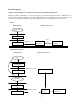
LDAP Integration: Windows 2000 as LDAP server + HP-UX as LDAP Client + HP-UX PAM_Kerberos HP-UX uses Windows 2000 AD to store user account and group information. The LDAP-UX client on HP-UX retrieves information from AD. The PAM Kerberos product on HP-UX uses Windows 2000 Kerberos Services to authenticate users who want to log into HP-UX machines. The following figure illustrates the integration between two platforms.
NIS vs. LDAP Integration: The NIS integration might be a better choice if you already deployed NIS in your environment, and all you want is to migrate the NIS server to use Windows 2000 so that you can have a central server for both UNIX and Windows 2000 user accounts. However, this integration limits the server and client communication to what NIS can provide. LDAP directory technology has been widely accepted by the industry.
Benefits of Integration Integrating HP-UX account management and authentication with Windows 2000 benefits system administrators and end-users in three major ways: Common Authentication With the integration, both Windows 2000 users and HP-UX users are authenticated by Windows 2000 Kerberos Services. This provides the benefit of common authentication. Common authentication in a heterogeneous environment is a big advantage. Every user gains system access using the same authentication method.
Configuring Windows 2000 and HP-UX Using NIS Integration This section describes how to configure your Windows 2000 and HP-UX system for NIS integration. Preparing Windows 2000 for HP-UX Integration The following four steps are all you need to do with Windows 2000 to integrate HP-UX NIS account management and authentication with Windows 2000. However, the sequence of installing Active Directory and SFU is important. When SFU 2.
The following describes how to configure your HP-UX machine as a NIS client and use PAM Kerberos to authenticate users logging into the machine. NIS Client Configuration Step 1: Configure HP-UX as a NIS client. Edit /etc/rc.config.d/namesvrs, and change the following variables: NIS_CLIENT=1 NIS_DOMAIN=nisdomain Nisdomain is the default NIS domain created by SFU 2.0, usually it is the first domain component of your domain root. For example, if your domain root is dc=la,dc=cal,dc=com, SFU 2.
Step 2: Configure your HP-UX machine to authenticate using PAM Kerberos. The PAM Kerberos Release Note contains detailed information on how to configure a HP-UX machine to use PAM Kerberos and use Windows 2000 as the KDC. Here is the brief description of the task. Create /etc/krb5.conf: /etc/krb5.conf is the Kerberos configuration file which specifies the default realm, the location of a KDC server and the log file names. The Kerberos client depends on the configuration to locate the realm’s KDC.
The keytab file is the one described in the previous section on Windows 2000 using ktpass. You need to transfer this file securely to your HP-UX machine and name it krb5.keytab in the /etc/ directory. If you already have an existing /etc/krb5.keytab file, you need to merge the new keytab file with the existing one. ktutil is a tool provided with the product for you to import the keys. This file should be readable only by root.
login session required /usr/lib/security/libpam_krb5.1 login session required /usr/lib/security/libpam_unix.1 dtlogin session required /usr/lib/security/libpam_krb5.1 dtlogin session required /usr/lib/security/libpam_unix.1 dtaction session required /usr/lib/security/libpam_krb5.1 dtaction session required /usr/lib/security/libpam_unix.1 OTHER session sufficient /usr/lib/security/libpam_unix.1 # # Password management # login password sufficient /usr/lib/security/libpam_krb5.
Configuring Windows 2000 and HP-UX Using LDAP Integration This section describes how to configure your Windows 2000 and HP-UX systems for LDAP integration. Preparing Windows 2000 for HP-UX Integration The following describes how to configure your Windows 2000 server to work with LDAP-UX Client Services. Software Installation Step 1: Install Active Directory into your Windows 2000 server. Follow the directions in “Step 1: Install Active Directory into your windows 2000 server” on page 12.
AD from malicious modification. See Appendix A for information about how to set the appropriate access control for a proxy user. Step 2: Add an account for HP-UX client machine to AD. Follow direction in “Step 2: Add an account for HP-UX client machine to AD” on page 12. Step 3: Use ktpass to create the keytab file for HP-UX client machine. Follow the directions in “Step 3: Use ktpass to create the keytab file for HP-UX client machine” on page 12.
After you run the setup tool successfully, use the tool /opt/ldapux/config/display_profile_cache to display the profile from a binary profile. By default, it displays the currently active profile in /etc/opt/ldapux/ldapux_profile.bin. You can check the display to see if the configuration is correct. Again, for detailed information on how to use create_profile_cache and display_profile_cache, refer to “Installing and Administering LDAP-UX Client Servicess with Windows 2000 Active Director”.
Security Traditionally, HP-UX stores user account information in the local /etc/passwd file. Unless, the system is in trusted mode, any user logging into the system can read all other users’ encrypted passwords in /etc/passwd; and that is still true even if the system deploys Network Information Service (NIS). The exposure of passwords is a security risk. Windows 2000 uses AD to store account information, but Kerberos client keys and passwords are well protected.
Administration The administrative tasks for users and groups will become a lot easier for system administrators. On the other hand, the integration will not cause any changes for end users. System administrator Although most user accounts and groups can be stored in AD, the HP-UX local /etc/passwd still has its value. It is recommended the super user account (root) to be configured in /etc/passwd, so that even if the network is down, root still can login to perform necessary tasks for recovery.
Manage account and password policies One of the benefits of the integration is a single point of account management. So, you will be able to manage and enforce account and password policies by using Active Directory. The Active Directory Users and Computers allows you to set account options and account expiration, etc. Those policies will become effective either when a user logs into Windows 2000 or the HP-UX machine.
Migration If you choose the LDAP approach to integrate HP-UX account management and authentication with Windows 2000, the LDAP-UX Client Services product provides a set of migration tools to help you migrate your user and group information from the local /etc/passwd and group files or NIS server to Active Directory. The tools create an ldif file based on the information you enter interactively or the environment variables you set in advance. All posix data except password will be migrated.
Appendix A: Setting a Proxy User’s Access Rights When using the LDAP-UX product to integrate HP-UX accounts into Active Directory, you need to configure a proxy user to retrieve user account information. The proxy user needs to be able to read all users' and groups' posix attributes. The following explains how you can grant the proxy user required access.
b) Click the container which contains the proxy user, usually it is "Users", choose "Delegate Control..." from the Action menu. c) The Delgation of Control Wizard starts, click "Next". d) A screen for you to select users and groups, click "Add” a list of users and groups are displayed, choose the proxy user from the list or type in the proxy user name, then click "Add" and "OK"(same as the above screen). e) Back to the screen to select users and groups, click "Next".
i) Repeat above steps to delegate user posix attributes to the proxy user by choosing "User objects" in f), and choose the following posix user attributes in g): Read gecos Read loginShell Read msSFUHomeDirectory Read msSFUPassword Read gidNumber Read uidNumber Read msSFUName Read shadowFlag Read shadowExpire Read shadowInactive Read shadowWarning Read shadowMax Read shadowMin Read shadowLastChange 26