
Using Microsoft Certificates with HP-UX IPSec A.02.01
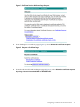
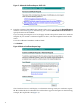
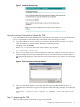
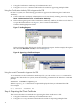
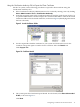
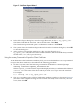
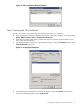


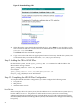

Figure 14 Certificate Details Dialog Box
5. The system opens the Certificate Export Wizard. For the format, select Base-64 encoded
X.509, as shown in Figure 11.
6. In the File to Export dialog box, enter the target file name, such as C:\my_ca_cert. The
Wizard will add the extension.CER to the file name. Click Next.
The Certificate Export Wizard opens a confirmation window. Click Finish.
7. The system closes the Certificate Export Wizard.
From the Certificate dialog box, select OK to close the dialog box.
From the CA Properties dialog box, select OK to close the dialog box.
8. Copy or move the CA certificate file to the client system. On HP-UX systems, HP recommends
that you install the file in the /var/adm/ipsec directory.
Step 6: Adding the Client and CA Certificate to HP-UX IPSec
On the HP-UX system, use the following ipsec_config add cert command to add the
certificates for the HP-UX system and the CA to the HP-UX IPSec storage scheme:
ipsec_config add cert -mycert mycert_filename
-cacert cacert_filename
See ipsec_config_show (1M) for more information.
Step 7: (Optional) Verifying the Client Certificate
On the HP-UX system, use the following ipsec_config show cert command to view the
client certificate:
ipsec_config show cert
Step 8: Downloading the Certificate Revocation List
On a system with a web browser, use the following procedure to download the Certificate
Revocation List (CRL):
18