Using Microsoft Certificates with HP-UX IPSec A.02.01 HP Part Number: J4256-90045 Published: May 2009 Edition: 1.
Table of Contents About This Document.........................................................................................................5 Typographic Conventions......................................................................................................................5 Introduction............................................................................................................................................7 Testing Environment....................................................
List of Figures 1 2 3 4 5 6 7 8 9 10 11 12 13 14 15 16 17 18 19 20 21 22 23 24 25 26 27 28 4 Certificate Services Welcome Page: Request.................................................................................11 Request a Certificate Page ............................................................................................................11 Advanced Certificate Request: PKCS #10.....................................................................................
About This Document This document describes how to use the HP-UX IPSec A.02.01 product with certificates issued from a Microsoft Windows 2003 Server configured as a root Windows Certification Authority (CA)1. It also describes how to configure Microsoft Windows clients to use certificates and interoperate with HP-UX IPSec. Typographic Conventions This document uses the following typographical conventions: %, $, or # A percent sign represents the C shell system prompt.
Introduction This document describes how to: • Configure HP-UX IPSec A.02.01 to use certificates issued from a Microsoft Windows root CA. This procedure includes information about requesting and issuing certificates, and configuring HP-UX IPSec to use certificates for IKE authentication. You can use the certificates for Internet Key Exchange (IKE) authentication with other HP-UX systems or with Microsoft Windows systems.
HP-UX IPSec Certificate Requirements To use security certificates with HP-UX IPSec A.02.01, your topology must meet the following requirements: • All security certificates must be administered using a PKI product from the same vendor. When you configure HP-UX IPSec, you must configure only one PKI vendor for all security certificate operations.
Configuring a Certificate for an HP-UX Client This section describes how to use the HP-UX ipsec_config utility to create a Certificate Signing Request (CSR) and acquire a certificate from a Microsoft Windows root CA for an HP-UX client, and how to configure HP-UX IPSec to use the certificate. This section also describes how to complete the necessary CA tasks using the Windows Certification Authority GUI and the web-based Microsoft Certificate Services utility.
C=country O=organization OU=organizationalUnit The attributes are all optional, but you must specify at least one. Separate multiple attributes using commas. The order of the attributes is ignored and the DN is not case sensitive. If there are spaces in the DN, you must enclose the DN in double quotes (““ ). For example: ipsec_config add csr -subject "CN=foo2,o=hp,ou=foo,c=us" HP-UX IKE Peers If all the IKE peers are HP-UX systems, HP recommends that you use the following ipsec_config add csr syntax.
Figure 1 Certificate Services Welcome Page: Request 3. From the Request a certificate page (Figure 2), select advanced certificate request. Figure 2 Request a Certificate Page 4. From the Advanced Certificate Request page (Figure 3), select Submit a certificate request by using a base-64-encoded CMC or PKCS#10 file.
Figure 3 Advanced Certificate Request: PKCS #10 5. Paste the contents of the CSR file (the contents of the ipsec.csr file) in the Saved Request window as shown in Figure 4. Alternatively, you can select Browse for a file to insert and specify the name of the CSR file. If you are using an enterprise root CA, the page contains a drop-down menu for a certificate template. If you created a certificate template for IPsec, select the template name from the menu. Leave the Additional Attributes window blank.
Figure 5 Certificate Pending Page Using the certreq Command to Submit the CSR As an alternative to the web-based Microsoft Certificate Services utility, you can use the Windows certreq command to submit the CSR, as described in the following procedure: 1. Copy the CSR file to the CA system if you have not already done so. On the CA system, enter the following command at the Windows command prompt: certreq csr_filename Where csr_filename is the name of the CSR file. For example: C:\> certreq c:\foo2.csr 2.
• • Using the Certification Authority GUI administration tool. Using the certutil command. This method is useful for approving multiple CSRs. Using the Certification Authority GUI to Approve the CSR On the CA system, use the following procedure to approve the CSR using the Certification Authority : 1. If the Certification Authority administration tool is not already running, start it by clicking Start→Administration Tools→Certification Authority. 2.
Using the Certification Authority GUI to Export the Client Certificate On the CA system, use the following procedure to export the client certificate using the Certification Authority GUI: 1. If the Certification Authority administration tool is not already running, start it by clicking Start→Administration Tools→Certification Authority. 2. In the left navigation pane of the Certification Authority window, click the icon for the CA to open the folders below it. In this example, the CA name is IPSecMSCA.
Figure 11 Certificate Export Wizard 5. In the File to Export dialog box, enter the target file name, such as C:\my_ipsec_cert. The Wizard will add the extension.CER to the file name. Click Next. The Certificate Export Wizard opens a confirmation window. Click Finish. 6. 7. The system closes the Certificate Export Wizard. From the Certificate dialog box, select OK to close the dialog box. After you have exported the certificate to a file, copy the file (such as C:\ my_ipsec_cert.CER) file to the client.
Figure 12 Select Certification Authority Window Step 5: Exporting the CA's Certificate On the CA system, use the following procedure to export the CA's certificate: 1. If the Certification Authority administration tool is not already running, start it by clicking Start→Administration Tools→Certification Authority. 2. In the left navigation pane of the Certification Authority window, right click the icon for the CA and select Properties. 3. The administration tool opens a CA Properties dialog box.
Figure 14 Certificate Details Dialog Box 5. 6. The system opens the Certificate Export Wizard. For the format, select Base-64 encoded X.509, as shown in Figure 11. In the File to Export dialog box, enter the target file name, such as C:\my_ca_cert. The Wizard will add the extension.CER to the file name. Click Next. The Certificate Export Wizard opens a confirmation window. Click Finish. 7. The system closes the Certificate Export Wizard.
1. Start a web browser. Connect to the Microsoft Certificate Services on the CA system using the following URL: http://ca_system/certsrv where ca_system is the CA system name or IP address. 2. The Microsoft Certificate Services utility starts and displays the Welcome page. Select Download a CA certificate, certificate chain, or CRL (Figure 15). Figure 15 Certificate Services Welcome Page: Download 3. The Microsoft Certificate Services utility displays the download page (Figure 16).
Figure 16 Download Page, CRL 4. When the utility opens the File Download dialog box, select Save to save the CRL to a file. Select a folder in which to store the file. HP recommends that you use the default file name (certcrl.crl). Click Save. Click Close after the download completes. 5. Copy or move the CRL file to an appropriate location if necessary. On HP-UX systems, HP recommends that you install the file in the /var/adm/ipsec directory.
ipsec_config add host foo1 -source 10.2.2.2 \ -destination 10.1.1.1 \ -action ESP_3DES_HMAC_SHA1 See ipsec_config_add(1M) for more information. IKE Policy The IKE policy must specify RSA signatures as the authentication method. The administrator configures the following IKE policy: ipsec_config add ike foo1 -remote 10.1.1.
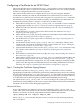
Configuring a Certificate for a Windows Client This section describes one method for configuring a certificate on a Windows client for IP Security to be compatible with HP-UX IPSec. The primary utility we use is the web-based Microsoft Certificate Services utility. For information on using alternative Windows utilities, see the Windows documentation set. This section describes how to configure a certificate for a Windows client using the following steps: 1.
Figure 17 Microsoft Certificate Services 3. From the Request a certificate page, select advanced certificate request. Figure 18 Request a Certificate Page 4. From the Advanced Certificate Request page, select Create and submit a request to this CA.
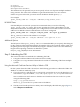
Figure 19 Advanced Certificate Request: Create 5. The Certificate Services utility opens the Identifying Information form: Figure 20 CSR Identifying Information Complete the form as follows: • Name The commonName (CN) attribute of the Distinguished Name (DN). This is typically the host name.
enter a value for at least one of the following four fields that specify DN attributes: Name, Company, Department, or Country. • E-Mail The e-mail address (also referred to as the user fully-qualified domain name, or user FQDN) for the subjectAlternativeName. This field is optional. Note that if you specify a user FQDN, Windows system do not use user FQDNs as IKE IDs. • Company The organization (O) attribute of the DN.
• Store certificate in the local computer certificate store Specifies that you want the key pair and certificate stored in the certificate store for the local computer. You must select this option. • Request Format Format for the CSR. HP used PKCS10. • Hash Algorithm Hash algorithm for the certificate signature. Select SHA-1. Leave the Attributes window (not shown) blank. Click Submit. The Certificates Services will display a confirmation message with your certificate request ID.
Figure 21 Certificate Services Welcome Page: View 3. The Certificate Services displays the pending certificate requests from your system (Figure 22). Click your certificate request. Figure 22 View Pending Certificate Requests Page 4. The Certificate Services opens the Certificates Issued page and displays an icon for your certificate. Click Install this certificate. Figure 23 Certificates Issued Page 5.
1. 2. Start a web browser and connect to the Microsoft Certificate Services on the CA as described in “Step 3: Installing the Client Certificate” (page 26). From the Welcome page, select Download a CA certificate, certificate chain, or CRL. The Microsoft Certificate Services utility displays the download page (Figure 24). Select DER (Distinguished Encoding Rules) for the encoding method. Click Download CA certificate. Figure 24 Download Page, CA Certificate 3. 4. 5.
Figure 25 Certificate Store Dialog Box 6. The Certificate Import Wizard displays a completion message. Click Finish. Click OK to close the Certificate box. Alternatively, if the CA's certificate is already stored in a file on the CA system, you can copy the file to the client. On the client system, right click the certificate file and select Install Certificate to start the Certificate Import Wizard and complete the certificate installation.
Figure 26 Verifying the Local Certificate in the Certificate Store 3. To view the CA's certificate, expand the Trusted Root Certification Authorities subfolder under the Certificates (Local Computer) folder by clicking the plus sign (+). The certificate manager will display icons for trusted root CA certificates in the right pane. Scroll down to the appropriate CA certificate and select Open to view more information about the certificate.
Figure 27 Configuring Certicate-Based Authentication 7. Click Browse. The IP Security configuration utility opens a Select Certificate box (Figure 27). Highlight the certificate for the CA you want to use and click OK. If you are not sure which certificate to use, you can highlight a certificate and click View Certificate for more information. Figure 28 CA Certificate Browser 8. 9. Click OK to close the Authentication Method Properties dialog box. Click Close to close the Rule Properties dialog box.
Glossary CA Certificate Authority. A trusted third party that authenticates users and issues security certificates. In addition to establishing trust in the binding between a user’s public key and other security-related information in a certificate, the CA digitally signs the certificate information using its private key. CRL Certificate Revocation List. A list of certificates that have been revoked (made invalid) by a CA. A CA administrator may want to revoke a certificate if a key value is compromised.