
HP-UX Host Intrusion Detection System Version 4.7 Administrator Guide HP-UX 11i v3 (766144-001, March 2014)


6 Using the Host Manager Screen
This chapter describes the tasks you can perform using the Host Manager screen. This chapter
addresses the following topics:
• “Managing Hosts” (page 74)
• “Adding New Hosts” (page 75)
• “Modifying a Host” (page 79)
• “Deleting a Host” (page 80)
• “Enabling and Disabling Hosts” (page 80)
• “Managing a Tag” (page 81)
• “Maintaining Host Files” (page 82)
Managing Hosts
The Host Manager screen enables you to specify the host systems that you plan to monitor using
HP-UX HIDS.
The information on each configured host is listed in the Host Manager screen. This information
includes the name of the host system, its IP address, the name of any optionally assigned tag, and
whether it is being monitored. Monitored hosts are also displayed on the System Manager screen.
You can create tags to identify particular group of hosts, or to provide a host with a descriptive
label or name. For example, you can categorize your hosts as Web Servers, DNS Servers, and
Group A Machines. The tags also enable you to simultaneously select all the hosts associated with
a given tag for a given action on the System Manager screen using the Edit > Select Tag menu
item.
IMPORTANT: If you have more than 23 agent hosts being monitored at any one time, you must
increase the number of kernel threads on the administration system. For more information, see
“Enabling More than 23 Agents (Thread Limits)” (page 31).
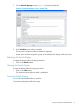
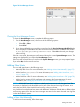
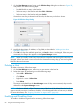
Opening the Host Manager Screen
To display the Host Manager screen, shown on Figure 24, go to the System Manager screen and
choose one of the following options:
• Select Edit >Host Manager .
• Press Ctrl+H.
74 Using the Host Manager Screen