
HP-UX Host Intrusion Detection System Version 4.4 Administrator Guide (5900-1634, April 2011)
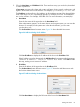
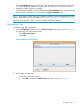
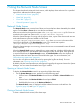

1. On the Host Manager screen, bring up the Edit Host Entry dialog box as shown in Figure 29,
and perform one of the following steps:
• Double-left-click an entry in the host list.
• Select an entry in the host list and select Edit > Edit Host.
• Select an entry in the host list and press Ctrl+H.
If more than one entry is selected in the host list, the first entry in the list is chosen.
Figure 29 Edit Host Entry Dialog
2. Modify the Host Name, IP Address, or Tag fields, as described in “Adding a New Host
Manually” (page 80).
3. Click OK to accept the modified agent host, or Cancel to leave it unchanged. If the entry was
monitored, the change also appears on the System Manager screen.
NOTE: When you modify a host entry’s host name, the old alert and error log file names are not
changed. When new alerts or errors arrive for the renamed host entry, they go into new log files
that have the new host name.
Deleting a Host
To delete a host entry, follow these steps:
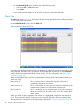
1. On the Host Manager screen, select one or more entries in the host list.
2. Delete the entries by performing one of the following steps:
• Select Edit > Delete Host.
• Click Delete.
• Right-click > menu > Delete Host.
• Press Delete.
The entries are deleted from the Host Manager screen. If they were monitored, they are also
deleted from the System Manager screen.
NOTE: If a host is deleted, all the Containers entry of the host will be deleted from the list. If an
agent is actively running a surveillance schedule, it must be stopped before its host entry is deleted.
For more information, see “Stopping Schedules on Agent Hosts” (page 47).
Enabling and Disabling Hosts
To enable or disable an agent host for monitoring, follow these steps:
84 Using the Host Manager Screen