
HP-UX Host Intrusion Detection System Version 4.4 Administrator Guide (5900-1634, April 2011)

3. Create a name for the new Container (SRP) Configuration.
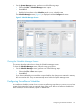
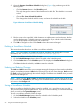
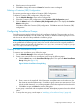
a. Click the Copy button on the Container (SRP) Configuration panel. This opens the Copy
Container (SRP) Configuration dialog box (Figure 8).
Figure 8 Copy Container (SRP) Dialog
b. Enter a name in the input field. It should be the name of a Container configured on the
host that needs to be monitored.
c. Click OK to accept and Cancel to quit the dialog box.
The new Container (SRP) configuration’s templates and values are identical to the old Container
(SRP) configuration’s.
4. To revise the new Container (SRP) configuration, follow the procedure provided in the
“Modifying a Container (SRP) Configuration” (page 58).
Modifying a Container (SRP) Configuration
To modify a Container (SRP) configuration, follow the steps:
1. On the Schedule Manager screen select the Configure tab.
2. Select the Container (SRP) configuration to be modified in the Container (SRP) Configuration
panel.
3. In the Select column of the Surveillance Groups panel, click the check boxes to mark the
surveillance groups you want to include in the Container (SRP) configuration. You can also
use the Select All and Clear All buttons to mark all or none of the groups.
4. Select the Timetable tab.
5. Specify the time and days, you want each group in the surveillance schedule to run. For more
information, see “Setting Surveillance Schedule Timetables” (page 65).
Renaming a Container (SRP) Configuration
This section provides steps to rename a Container (SRP) Configuration.
To rename a Container (SRP) configuration, follow the steps:
1. On the Schedule Manager screen select the Configure tab.
2. Select the Container (SRP) configuration in the Container (SRP) Configuration panel.
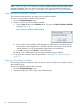
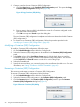
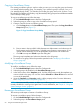
3. Click the Rename button in the Container (SRP) Configuration panel to open the Rename
Container (SRP) Configuration dialog box (Figure 9).
Figure 9 Rename Container (SRP) Dialog
58 Using the Schedule Manager Screen