
HP-UX Host Intrusion Detection System Version 4.3 administrator guide
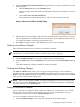

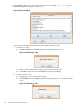
Table Of Contents
- HP-UX Host Intrusion Detection System Version 4.3 administrator guide
- Table of Contents
- About This Document
- 1 Introduction
- 2 Configuring HP-UX HIDS
- 3 Getting Started with HP-UX HIDS
- 4 Using the System Manager Screen
- Starting the HP-UX HIDS System Manager
- Stopping the HP-UX HIDS System Manager
- System Manager Components
- Starting HP-UX HIDS Agents
- Getting the Status of Agent Hosts
- Resynchronizing Agent Hosts
- Activating Schedules on Agent Hosts
- Stopping Schedules on Agent Hosts
- Halting HP-UX HIDS Agents
- Accessing Other Screens
- 5 Using the Schedule Manager Screen
- The Schedule Manager
- Configuring Surveillance Schedules
- Configuring Surveillance Groups
- Configuring Detection Templates
- Setting Surveillance Schedule Timetables
- Configuring Alert Aggregation
- Configuring Monitor Failed Attempts
- Configuring Duplicate Alert Suppression
- Viewing Surveillance Schedule Details
- Predefined Surveillance Schedules and Groups
- 6 Using the Host Manager Screen
- 7 Using the Network Node Screen
- 8 Using the Preferences Screen
- A Templates and Alerts
- Alert Summary
- UNIX Regular Expressions
- Limitations
- Template Property Types
- Buffer Overflow Template
- Race Condition Template
- Modification of files/directories Template
- Changes to Log File Template
- Creation and Modification of setuid/setgid File Template
- Creation of World-Writable File Template
- Modification of Another User’s File Template
- Login/Logout Template
- Repeated Failed Logins Template
- Repeated Failed su Commands Template
- Log File Monitoring Template
- B Automated Response for Alerts
- C Tuning Schedules and Generating Alert Reports
- D The Agent Configuration File
- E The Surveillance Schedule Text File
- F Error Messages
- G Troubleshooting
- Troubleshooting
- Agent and System Manager cannot communicate with each other
- Agent complains that idds has not been enabled, yet lsdev shows /dev/idds is present
- Agent does not start on system boot
- Agent halts abnormally, leaving ids_* files and message queues
- Agent host appears to hang and/or you see message disk full
- Agent needs further troubleshooting
- Agent does not start after installation
- Agents appear to be stuck in polling status
- Agent displays error if hostname to IP mapping is not registered in name service
- Aggregated alerts targets or details field are truncated and the same aggregated alert has several entries logged in the IDS_ALERTFILE
- Alert date/time sort seems inconsistent
- Alerts are not being displayed in the alert browser
- Buffer overflow triggers false positives
- Duplicate alerts appear in System Manager
- Getting several aggregated alerts for the same process
- GUI runs out of memory after receiving around 19,000 alerts
- The idsadmin Command needs installed agent certificates
- The idsadmin Command notifies of bad certificate when pinging a remote agent
- IDS_checkInstall fails with a kmtune error
- IDS_genAdminKeys or IDS_genAgentCerts does not complete successfully
- IDS_genAdminKeys or idsgui quits early
- Large files in /var/opt/ids
- Log files are filling up
- No Agent Available
- Normal operation of an application generates heavy volume of alerts
- Reflection X rlogin produces multiple login and logout alerts
- Schedule Manager timetable screen appears to hang
- SSH does not perform a clean exit after idsagent is started
- System Manager appears to hang
- System Manager does not let you save files to specific directories
- System Manager does not start after idsgui is started
- System Manager starts with no borders or title bar in X client programs on Windows
- System Manager times out on agent functions such as Activate and Status Poll
- UNKNOWN program and arguments in certain alert messages
- Using HP-UX HIDS with IPFilter and SecureShell
- Unable to Generate Administrator Keys and Agent Certificates on PA–RISC 1.1 Systems
- Troubleshooting
- H HP Software License
NOTE: The /etc/opt/ids/schedules/sample directory contains read-only copies of the
predefined schedules. Users who want to revert back to the original predefined schedules can
manually copy them from /etc/opt/ids/schedules/sample into /etc/opt/schedules.
Creating a New Surveillance Schedule
This section describes about how to create a new surveillance schedule.
To create a new surveillance schedule, follow the steps:
1. Go to the Schedule Manager screen.
2. Create a name for the new surveillance schedule.
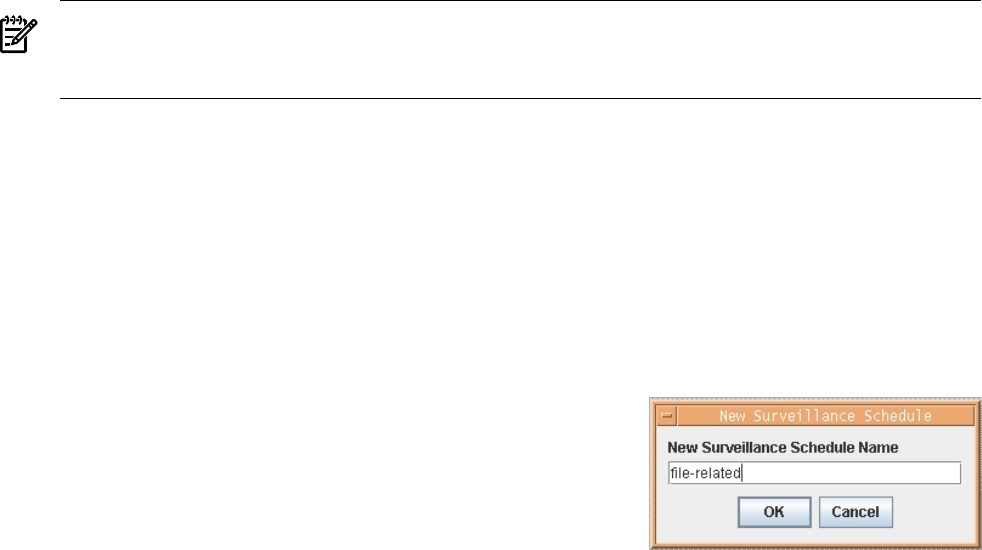
a. Press the New button on the Schedules panel. This opens the New Surveillance
Schedule dialog box (Figure 5-2).
Figure 5-2 New Surveillance Schedule Dialog
b. Enter a name in the input field. Valid characters are alphanumeric and underscore; the
first character must be alphanumeric. Schedule names are case-sensitive. If you include
invalid characters, you will be prompted to replace them with underscores.
c. Click OK to accept it and Cancel to exit the dialog box.
By default, a new schedule starts with all existing surveillance groups selected.
3. To set up the new schedule, follow the procedures in “Modifying a Surveillance Schedule”
(page 62).
Copying a Surveillance Schedule
If an existing surveillance schedule is similar to what you want to create, you can copy the old
one and change the copy.
To copy a surveillance schedule, follow the steps:
1. Go to the Schedule Manager screen.
2. Select the schedule you want to copy in the Schedules panel.
Configuring Surveillance Schedules 61