
Using DRD Activate and Deactivate to Recover from Boot Problems


Introduction
Dynamic Root Disk (DRD) provides a robust and reliable mechanism for creating, updating, and
booting a clone of a running system.
The commands drd activate and drd deactivate enable an administrator to choose an image
to be booted the next time the system is re-started: An image is said to be activated if it will be
booted. A drd activate command activates the inactive image. A drd deactivate command
activates the booted image.
This functionality overlaps with that supplied by the setboot command, but eliminates the need for
an administrator to associate a hardware address specified on a setboot command with a block
device special file specified on a drd clone command. (The 11iv3 setboot command accepts a
persistent device special file as an argument for the “-p” option, but the 11iv2 setboot command
requires a hardware address.)
In the terminology of the setboot command, drd activate sets the boot disk of the inactive
image to be the primary boot disk; drd deactivate sets the boot disk of the booted image to be
the primary boot disk. The drd activate and drd deactivate commands also provide the
extended options “-x alternate-bootdisk” and “-x HA_alternate_bootdisk” which
correspond to the options “-a” and “-h”, respectively, of the setboot command. The argument of
each of these drd extended options is a block device special file. The “-x
HA_alternate_bootdisk” is supported on those systems for which the “-h” option of setboot is
supported, that is, on Integrity systems and PA-RISC systems that support hardware partitions.
The following examples show how an administrator can use drd activate and drd deactivate to
implement various maintenance and recovery strategies.
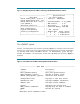
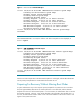
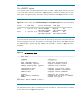
Using a preview of drd activate to check boot settings
An administrator may want to check the current settings of the boot disks and see if they would be
changed by a drd activate command. The preview (“-p”) option of drd activate displays the current
and prospective settings, as shown in the 11iv3 example in
Figure 1.
Figure 1 drd activate –p Command Output
== 08/20/07 16:58:16 MDT BEGIN Activate Inactive System Image Preview
* Checking for Valid Inactive System Image
* Reading Current System Information
* Locating Inactive System Image
* Determining Bootpath Status
* Primary bootpath : 0/4/1/0.0x5000c50000c9842d.0x0 (/dev/rdisk/disk9)
before activate.
* Primary bootpath : 0/4/1/0.0x5000c50000c9578d.0x0 after activate.
* Alternate bootpath : 0/4/1/0.0x5000c50000c9842d.0x0 (/dev/rdisk/disk9)
before activate.
* Alternate bootpath : 0/4/1/0.0x5000c50000c9842d.0x0 (/dev/rdisk/disk9)
after activate.
* HA Alternate bootpath : 0/4/1/0.0x5000c50000c9578d.0x0
(/dev/rdisk/disk7) before activate.