
Dynamic Root Disk A.3.12.* Administrator's Guide


system performance when using Ignite to create recovery images, which many system administrators
find acceptable.
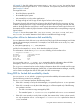
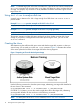
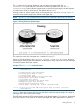
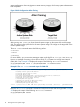
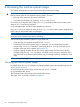
Figure 3 Disk Configurations After Cloning
After running drd clone, you have identical system images on the system disk and the target
disk. The image on the system disk is the active system image. The image on the target disk is the
inactive system image.
The drd clone command returns the following values:
0 Success
1 Error
2 Warning
For more details, you can examine messages written to the log file at /var/opt/drd/drd.log.
Here is an example of creating a clone from a HP-UX 11i v3 system to a storage area network
(SAN) disk. First, Example 2-8 displays the output of the following drd clone command:
# /opt/drd/bin/drd clone -t /dev/disk/disk14 -x overwrite=true
Example 8 The drd clone command output for SAN disk
======= 06/24/08 11:55:58 MDT BEGIN Clone System Image (user=root) (jobid=drdtest14)
* Reading Current System Information
* Selecting System Image To Clone
* Selecting Target Disk
* The disk "/dev/disk/disk14" contains data which will be overwritten.
* Selecting Volume Manager For New System Image
* Analyzing For System Image Cloning
* Creating New File Systems
* Copying File Systems To New System Image
* Making New System Image Bootable
* Unmounting New System Image Clone
======= 06/24/08 12:06:00 MDT END Clone System Image succeeded. (user=root) (jobid=drdtest14)
Next, the drd status command is executed to verify the clone disk and the original disk. Example
2-9 displays the output of the following drd status command:
# /opt/drd/bin/drd status
14 Cloning the active system image