
Dynamic Root Disk A.3.12.* Administrator's Guide


NOTE: A selected target disk will not be overwritten if it is part of the root volume. However, the
drd clone command will overwrite swap or raw data disks because it does not detect this type
of usage. For example, any raw disks in use by databases would be overwritten if given as the
target clone disk.
Using drd clone to analyze disk size
A simple way to determine if a disk is large enough for a DRD clone is to run drd clone in
preview mode:
Example 5 drd clone preview example on HP-UX 11i v2 or 11i v3
# /opt/drd/bin/drd clone –p –v –t /dev/dsk/cxtxdx
Example 6 drd clone preview example on HP-UX 11i v3 (using agile DSF)
# /opt/drd/bin/drd clone –p –v –t /dev/disk/diskn
The preview operation includes disk space analysis that shows whether a target disk is large
enough. If you prefer to investigate disk sizes before previewing the clone, you can use the
diskinfo command.
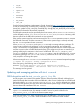
Creating the clone
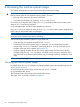
After determining that sufficient disk space exists and that the target disk contains no data you
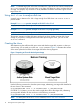
want to keep, you are ready to run the drd clone command. Figure 2-1 illustrates the content
of the active system disk and the clone target disk before cloning happens.
Figure 1 Preparing to Clone the Active System Image
Use the following command to clone the system image, substituting your target disk identifier for
the one shown in the command:
# /opt/drd/bin/drd clone -v -x overwrite=true -t /dev/dsk/c1t2d0
On HP-UX 11i v3 systems, you can also use the agile device file to the target disk, substituting
your target disk identifier for the one shown in the following command:
# /opt/drd/bin/drd clone -v -x overwrite=true -t /dev/disk/disk10
NOTE: For descriptions of the drd clone command, see The drd clone command.
12 Cloning the active system image