Dynamic Root Disk A.3.12.* Administrator's Guide HP-UX 11i v2, HP-UX 11i v3 HP Part Number: 5900-2571 Published: March 2013 Edition: 1.
© Copyright 2012, 2013 Hewlett-Packard Development Company, L.P. Confidential computer software. Valid license from HP required for possession, use or copying. Consistent with FAR 12.211 and 12.212, Commercial Computer Software, Computer Software Documentation, and Technical Data for Commercial Items are licensed to the U.S. Government under vendor's standard commercial license. The information contained herein is subject to change without notice.
Contents 1 About Dynamic Root Disk............................................................................5 Conceptual overview.................................................................................................................5 Terminology.............................................................................................................................5 Commands overview...............................................................................................................
8 Troubleshooting DRD................................................................................38 9 Support and other resources......................................................................39 Contacting HP........................................................................................................................39 New and changed information in this edition.............................................................................40 Locating this guide............................
1 About Dynamic Root Disk Conceptual overview This document describes the Dynamic Root Disk (DRD) toolset, which you can use to perform software maintenance and recovery on an HP-UX operating system with minimum system downtime. DRD enables you to easily and safely clone a system image from a root disk to another disk on the same system and modify the image without shutting down the system. DRD significantly reduces system downtime and allows you to do software maintenance during normal business hours.
image. The drd activate command always sets the primary boot path to the inactive (not booted) system image. • clone Clones a booted system to an inactive system image. The drd clone mode copies the LVM volume group or VxVM disk group, containing the volume on which the root file system (“/”) is mounted, to the target disk specified in the command.
Unmounts all file systems in the inactive system image previously mounted by a drd mount command. • unrehost Removes the system information file, EFI/HPUX/SYSINFO.TXT, from a disk that was rehosted, optionally preserving a copy in a file system on the booted system. For details of DRD commands syntax, including all options and extended options, see DRD commands (page 42).
2 Cloning the active system image This chapter describes how to use the drd clone command to clone the active system image. It also describes where the cloned image is saved. NOTE: You must be logged in as root to use any DRD command. The active system image The drd clone command creates a bootable disk that is a copy of the volume group containing the root file system (/).
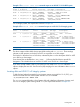
Example 1 The ioscan -fnkC disk command output on an HP-UX 11i v2 PA-RISC system # /usr/sbin/ioscan -fnkC disk Class I H/W Path Driver S/W State H/W Type Description ======================================================================= disk 0 10/0/14/0.0.0 sdisk CLAIMED DEVICE TEAC CD-532E-B /dev/dsk/c0t0d0 /dev/rdsk/c0t0d0 disk 1 10/0/15/1.5.0 sdisk CLAIMED DEVICE HP 18.2GMAN3184MC /dev/dsk/c1t2d0 /dev/rdsk/c1t2d0 disk 2 10/0/15/1.6.0 sdisk CLAIMED DEVICE HP 18.
Example 3 The ioscan -fNnkC disk command output on an HP-UX 11i v3 Integrity system # /usr/sbin/ioscan -fNnkC disk Class I H/W Path Driver S/W State H/W Type Description =================================================================== disk 4 64000/0xfa00/0x0 esdisk CLAIMED DEVICE HP 36.4GMAN3367MC /dev/disk/disk4 /dev/rdisk/disk4 /dev/disk/disk4_p1 /dev/rdisk/disk4_p1 /dev/disk/disk4_p2 /dev/rdisk/disk4_p2 /dev/disk/disk4_p3 /dev/rdisk/disk4_p3 disk 5 64000/0xfa00/0x1 esdisk CLAIMED DEVICE HP 36.
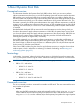
In Example 2-1, the disk with the active system image is /dev/dsk/c2t3d0. You need to choose a free disk to be the target of the drd clone command. Your system may have many more disks than Example 2-1 shows. The target disk must: • Be a block device special file. • Be writeable by the system. • Not currently be in use by other applications. • Be large enough to hold a copy of each logical volume in the root group.
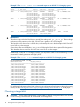
NOTE: A selected target disk will not be overwritten if it is part of the root volume. However, the drd clone command will overwrite swap or raw data disks because it does not detect this type of usage. For example, any raw disks in use by databases would be overwritten if given as the target clone disk.
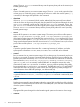
The -x option lets you choose whether to overwrite data on the target disk. The -x overwrite=true option tells the command to overwrite any data on the disk. The -x overwrite=false option tells the command not to write the cloned image if the disk appears to contain LVM, VxVM, or boot records. The default value is false. Cloning creates an inactive system image on the target disk at /dev/dsk/c1t2d0. Figure 2-2 shows the active system image being cloned to the target disk.
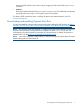
system performance when using Ignite to create recovery images, which many system administrators find acceptable. Figure 3 Disk Configurations After Cloning After running drd clone, you have identical system images on the system disk and the target disk. The image on the system disk is the active system image. The image on the target disk is the inactive system image.
Example 9 The drd status command output for SAN disk ======= 06/24/08 12:09:46 MDT * * * * * * * * * BEGIN Displaying DRD Clone Image Information (user=root) Clone Disk: Clone EFI Partition: Clone Creation Date: Clone Mirror Disk: Mirror EFI Partition: Original Disk: Original EFI Partition: Booted Disk: Activated Disk: ======= 06/24/08 12:10:01 MDT (jobid=drdtest14) (jobid=drdtest14) /dev/disk/disk14 AUTO file present, Boot loader present, SYSINFO.
3 Updating and maintaining software on the clone After cloning the active system image, you can use drd runcmd to run a limited set of commands and to apply patches to the inactive system image. This chapter describes this process. For details of the drd runcmd command, including available options and extended options, see The drd runcmd command. NOTE: You must be logged in as root to run any DRD command.
• swjob • kctune • update-ux • view • kcmodule • kconfig • mk_kernel • swm job See the Software Distributor Administrator's Guide, located at http://www.hp.com/go/sd-docs, as well as swinstall(1M), swremove(1M), swlist(1M), swmodify(1M), swverify(1M), swjob(1M), kctune(1M), update-ux(1M), view(1M), kcmodule(1M), kconfig(1M), mk_kernel(1M), and swm(1M) for additional information about these commands.
To determine if you need to update the drd_unsafe_patch_list files, see the Update the drd_unsafe_patch_list File procedure in the DRD Downloads and Patches page at https:// h20392.www2.hp.com/portal/swdepot/displayInstallInfo.do? productNumber=DynRootDisk#download. It is helpful during maintenance planning for system administrators to be able to determine which, if any, patches are not DRD-safe, and to make plans regarding these patches.
drd runcmd swinstall –s depot_server:/var/opt/patches \* • Files referenced in the command line must both: ◦ Reside in the inactive system image ◦ Be referenced in the DRD-safe command by the path relative to the mount point of the inactive system image This applies to files referenced as arguments for the -C, -f, -S, -X, and -x logfile options for an sw command run by drd runcmd and for the update-ux command -f option. • To use update-ux with a media source or local depot, SWM version A.3.5.
4 Accessing the inactive system image This chapter describes how to mount and unmount the inactive system image. IMPORTANT: If you choose to mount the inactive DRD system image, exercise caution to ensure that any actions taken do not impact the running system. You must: • Not stop/kill or restart any processes or daemons. • Only make kernel changes by executing: drd runcmd kctune.
Example 10 The drd mount command output # /opt/drd/bin/drd mount ======= 12/08/06 22:19:31 MST (jobid=dlkma1) BEGIN Mount Inactive System Image (user=root) * Reading Current System Information * Locating Inactive System Image * Mounting Inactive System Image ======= 12/08/06 22:19:52 MST END Mount Inactive System Image succeeded. (user=root) (jobid=dlkma1) The drd mount command automatically chooses the mount point for the inactive system image.
Example 12 Checking a warning message You verify software on the inactive system image with drd runcmd swverify and see a warning message. Task: Find additional information about the message. To see detailed information about the warning message supplied by the swagent log, execute the following command: # /opt/drd/bin/drd runcmd view /var/adm/sw/swagent.log Example 13 Creating a patch install file Task: Create a file containing a list of patches to be applied to the inactive system image.
Example 14 Editing symlinked files Task: You changed the value of NUM_BK in /opt/VRTS/bin/vxconfigbackup from 5 to 10 by editing the file. You want the change applied to the clone as well. Execute the following commands: 1. Mount the inactive system image: # /opt/drd/bin/drd mount 2.
Example 15 The drd umount command output ======= 12/08/06 22:09:22 MST (jobid=dlkma1) BEGIN Unmount Inactive System Image (user=root) * Reading Current System Information * Locating Inactive System Image * Unmounting Inactive System Image ======= 12/08/06 22:09:48 MST END Unmount Inactive System Image succeeded. (user=root) (jobid=dlkma1) The drd umount command: • Unmounts the file systems in the inactive system image. • Inactivates the inactive system image's volume group.
5 Synchronizing the inactive clone image with the booted system Overview The drd sync command is introduced in release B.11.xx.A.3.5 of Dynamic Root Disk (DRD) to propagate root volume group file system changes from the booted original system to the inactive clone image. Example 16 drd sync scenario Here is a sample scenario that can be improved by using the drd sync command: 1. A system administrator creates a DRD clone on a Thursday. 2.
For a sample shutdown script, see “drd sync system shutdown script” (page 28). Additional information is provided below in the comparison between the booted system and the clone. This information is provided by the preview option on the drd sync command, the preparatory actions that can be used to precisely control what files are synchronized, and the considerations advised when multiple iterations of the drd sync command are run.
filtered_out_by_non_synced_location_filter_sync_phase file, which is refreshed each time drd sync is run, even if the command is run with the -p preview option. 2. Files that have changed on the clone A file residing on the clone might have been changed by a drd runcmd operation, and it may have been updated on the booted system as well. This can occur even if the file is not listed in the Software Distributor Installed Products Database (that is, in the output of swlist –l file).
files_to_be_copied_by_drd_sync, even if the drd sync command is run with the -p preview option. Copying the files to the inactive clone image The drd sync command uses the /usr/bin/pax command to propagate changes from the booted original system to the inactive clone. IMPORTANT: The original system must be booted when drd sync is run, and changes are always propagated from the original system to the clone.
stop) # Synchronize the source disk with the cloned system drd mount >/dev/null 2>&1 # Ignore errors, may already be mounted. drd sync sync_ret=$? set_return $sync_ret "ERROR: Return code from drd sync is $sync_ret" rm -f $0 ${DRD_MOUNT_PT}$0 > /dev/null 2>&1 [[ -x $0 ]] && \ set_return 1 "ERROR: The $0 script (on image being shut down) could not be removed." [[ -x ${DRD_MOUNT_PT}$0 ]] && \ set_return 1 "ERROR: The ${DRD_MOUNT_PT}$0 script ($0 on clone) could not be removed.
6 Activating the inactive system image This chapter describes how to set the inactive system image so it will become the active system image the next time the system boots. For details of the drd activate command, including available options and extended options, see The drd activate command. NOTE: You must be logged in as root to run any DRD command. To make the inactive system image the active system image, run the following command: # /opt/drd/bin/drd activate -x reboot=true This command: 1.
Preparing the inactive system image to activate later If you do not want to make the inactive system image the active system image right away, you can configure the drd activate command so that it does not reboot the system.
Example 17 Booting the primary boot disk with an alternate boot disk (HP-UX 11i v2) # /usr/bin/more /stand/bootconf l /dev/dsk/c2t0d0s2 # # /usr/sbin/setboot Primary bootpath : 0/1/1/0.0.0 HA Alternate bootpath : 0/1/1/1.2.0 Alternate bootpath : 0/1/1/1.2.0 Autoboot is ON (enabled) # # /usr/sbin/ioscan -fnkC disk Class I H/W Path Driver S/W State H/W Type Description ====================================================================================== disk 0 0/0/2/0.0.0.
Example 18 Using drd deactivate after activating — legacy DSF In this example, /dev/dsk/c2t3d0 contains your root volume group, and you use drd clone to create an inactive system disk at /dev/dsk/c1t2d0. Next, you execute drd activate.
Example 19 Using drd deactivate after activating — agile DSF In this example, drd activate is executed on a system without performing a reboot, followed by running drd deactivate, and the end result is no change.
7 Rehosting and unrehosting systems A new feature of Dynamic Root Disk (DRD) version B.1131.A.3.2 is rehosting. Rehosting enables you to boot a DRD clone on a system other than the one where it was created. This new functionality is supported on LVM-managed root volumes running on Itanium® systems with HP-UX 11i v3. This capability enables a number of new uses for DRD clones.
Example 20 Provisioning a new system In this example, you have a blade named SALES01 that is running all the correct releases of the correct OE software, and you have another blade (not yet running anything) that you want to set up as SALES02 (a hostname not yet in use), with the identical OE software as SALES01. You would perform the following steps: 1. Clone the SALES01 system to a SAN LUN. 2.
If the rehosted disk is the only disk to be moved to the new system, the disk can be booted by interrupting the boot sequence and booting with the command: hpux –lq /stand/vmunix. The -lq option will disable quorum checking, allowing you to boot from the single copy. Unrehosting overview For details of the drd unrehost command, including available options and extended options, see The drd unrehost command. The drd unrehost command removes EFI/HPUX/SYSINFO.
8 Troubleshooting DRD This chapter provides information about unexpected DRD situations and outcomes. For the most recent troubleshooting information, check the DRD Frequently Asked Questions document at http://www.hp.com/go/drd-docs. 8.8.1.1 Q: Why can't I see the inactive system image file systems when I run the bdf command? A: You have to mount the inactive system image before you can see the file systems using bdf. Use the drd mount command to mount the inactive system image. 8.8.1.
9 Support and other resources This chapter contains support information and the available resources for the HP Dynamic Root Disk software product.
If you are providing documentation feedback, include the document title and manufacturing part number. All submissions become the property of HP. NOTE: HP cannot provide product support through this web page. To obtain product support, see “Contacting HP” (page 39). For a forum with other DRD users, visit the HP_UX_Docs twitter page: http://twitter.
variable The name of an environment variable, for example PATH or errno. value A value that you may replace in a command or function, or information in a display that represents several possible values. find(1) HP-UX manpage. In this example, “find” is the manpage name and “1” is the manpage section.
A DRD commands This appendix describes the DRD commands you can use to clone an image and work with the cloned image. The commands are: • drd-activate(1M) • drd-clone(1M) • drd-deactivate(1M) • drd-mount(1M) • drd-rehost(1M) • drd-runcmd(1M) • drd-status(1M) • drd-sync(1M) • drd-umount(1M) • drd-unrehost(1M) Chapters 2 through 6 describe how to use these commands to perform DRD operations. You must be logged in as root to use any DRD command.
-x extended_option=value Sets the extended option to a value. -x -? Displays the list of possible -x (extended) options. -X option_file Gets the extended options from a file. Extended options The following extended options are available: -x alternate_bootdisk=block_device_special_file This is the alternate boot disk. The alternate boot disk must be specified as a block device special file. -x HA_alternate_bootdisk=block_device_special_file This is the High Availability alternate boot disk.
the command line. The default is false. This option is available on every DRD command except drd runcmd. -x reboot={true|false} If true, specifies the system is rebooted at the successful completion of a drd activate operation. The default is false. -x verbosity=3 (Default.) Specifies the level of stdout/stderr verboseness. Replace 3 with the following values: 0 1 2 3 4 5 Only ERRORS and the starting/ending BANNER messages. Adds WARNING messages. Adds NOTE messages.
want to overwrite them, use the vgexport(1M) command first to remove any knowledge of them from the booted system. When run with the -x mirror_disk=block_device_special_file, you must specify the target's block device special file of the mirror disk. The block device special file should refer to an entire disk, not to a partition. For a system with an LVM root, this option requires that LVM mirroring is installed.
-x copy_autofile={true|false}block_device_special_file (Default is true) Controls whether to copy the EFI/HPUX/AUTO file from the active to the inactive system image. -x enforce_dsa={true|false} Usage: Advanced/Dangerous. Controls whether or not a failure in the disk space analysis (DSA) part of the analysis phase is fatal to the session. true: A failure in DSA will result in a failure of Analysis phase for the entire session. The command will not proceed.
-x reboot={true|false} If true, specifies the system is rebooted at the successful completion of a drd activate operation. The default is false. -x verbosity 3 (Default.) Specifies the level of stdout/stderr verboseness. Replace 3 with the following values: 0 1 2 3 4 5 Only ERRORS and the starting/ending BANNER messages. Adds WARNING messages. Adds NOTE messages. (Default) Adds INFO messages (informational messages preceded by the * character.) Adds verbose INFO messages.
-x ignore_unmounted_fs={true|false} (Default is false) Controls whether a clone fails when an unmounted file system in the root volume group is detected. -x logfile=/var/opt/drd/drd.log This is the path to the log file for this command. Each time DRD is run, this file will grow larger. This can be changed, for example, to a month-specific location for easier archiving, off-host backup, and rotation. -x log_verbosity=4 (Default.) Specifies the level of log verboseness.
Example 22 File system mount points /var/opt/drd/mnts/sysimage_001 /var/opt/drd/mnts/sysimage_001/var /var/opt/drd/mnts/sysimage_001/usr /var/opt/drd/mnts/sysimage_001/tmp /var/opt/drd/mnts/sysimage_001/stand /var/opt/drd/mnts/sysimage_001/opt /var/opt/drd/mnts/sysimage_001/home If the inactive system image was created by the drd clone command, the mount point for the root file system, chosen automatically by the mount command, is /var/opt/drd/mnts/ sysimage_001.
(Default is false) Controls whether a clone fails when an unmounted file system in the root volume group is detected. -x logfile=/var/opt/drd/drd.log This is the path to the log file for this command. Each time DRD is run, this file will grow larger. This can be changed, for example, to a month-specific location for easier archiving, off-host backup, and rotation. -x log_verbosity=4 (Default.) Specifies the level of log verboseness.
productNumber=DynRootDisk#download for information about the appropriate patches to install. • A system administrator can execute the drd rehost command after cloning a system image to setup the clone to run on another system. • The initial implementation of drd rehost only supports rehosting of an LVM-managed root volume group on an Integrity virtual machine to another Integrity virtual machine, or an LVM-managed root volume group on a Blade with Virtual Connect I/O to another such Blade.
Displays the list of possible -x (extended) options. -X option_file Gets the extended options from a file. Extended options The following extended options are available: -x alternate_bootdisk=block_device_special_file This is the alternate boot disk. The alternate boot disk must be specified as a block device special file. -x HA_alternate_bootdisk=block_device_special_file This is the High Availability alternate boot disk.
-x verbosity=3(Default.) Specifies the level of stdout/stderr verboseness. Replace 3 with the following values: 0 1 2 3 4 5 Only ERRORS and the starting/ending BANNER messages. Adds WARNING messages. Adds NOTE messages. (Default) Adds INFO messages (informational messages preceded by the * character.) Adds verbose INFO messages. Adds additional detailed INFO messages.
Extended options The following extended options are available: -x alternate_bootdisk=block_device_special_file This is the alternate boot disk. The alternate boot disk must be specified as a block device special file. -x HA_alternate_bootdisk=block_device_special_file This is the High Availability alternate boot disk. The High Availability alternate boot disk must be specified as a block device special file.
2 3 4 5 Adds NOTE messages. (Default) Adds INFO messages (informational messages preceded by the * character.) Adds verbose INFO messages. Adds additional detailed INFO messages. The drd status command The drd-status(1M) command displays system-specific information about the clone (the inactive system image) and the original disk (the active system image).
Extended options The following extended options are available: -x alternate_bootdisk=block_device_special_file This is the alternate boot disk. The alternate boot disk must be specified as a block device special file. -x HA_alternate_bootdisk=block_device_special_file This is the High Availability alternate boot disk. The High Availability alternate boot disk must be specified as a block device special file.
2 3 4 5 Adds NOTE messages. (Default) Adds INFO messages (informational messages preceded by the * character.) Adds verbose INFO messages. Adds additional detailed INFO messages. The drd sync command The drd-sync(1M) command propagates file system changes—whose modification time is newer than the clone creation time—from the booted original system to the inactive clone image. NOTE: The initial implementation of drd sync only supports refresh of the inactive clone from the booted original system.
0 Success 1 Error 2 Warning The drd sync command syntax is: drd sync [-?] [-p] [-q] [-v] [-x extended option=value] [-x -?] [-X option_file] Options -? -p -q -v -x Displays the usage message for a DRD command. This option cannot be used with other options. Displays the usage message for a DRD command. This option cannot be used with other options. Decreases the verbosity level by one each time it is specified. For example, -qq will reduce the verbosity from the default value of 4 to 2.
3 4 5 (Default) Adds INFO messages (informational messages preceded by the * character.) Adds verbose INFO messages. Adds additional detailed INFO messages. The drd umount command The drd-umount(1M) command unmounts all the file systems in the cloned system image. The drd umount command fails: • If the inactive system image was created by a drd clone command and no file system is mounted at /var/opt/drd/mnts/sysimage_001.
(Default is false) Controls whether a clone fails when an unmounted file system in the root volume group is detected. -x logfile=/var/opt/drd/drd.log This is the path to the log file for this command. Each time DRD is run, this file will grow larger. This can be changed, for example, to a month-specific location for easier archiving, off-host backup, and rotation. -x log_verbosity=4 (Default.) Specifies the level of log verboseness.
h20392.www2.hp.com/portal/swdepot/displayInstallInfo.do? productNumber=DynRootDisk#download. The drd unrehost command syntax is: drd unrehost[-?] [-p] -f system_information_file [-q] -t device_special_file [-v] [-x extended option=value] [-x -?] [-X option_file] Options -? -p -f -q -t -v -x Displays the usage message for a DRD command. This option cannot be used with other options. Sets preview mode.
-x logfile=/var/opt/drd/drd.log This is the path to the log file for this command. Each time DRD is run, this file will grow larger. This can be changed, for example, to a month-specific location for easier archiving, off-host backup, and rotation. -x log_verbosity=4 (Default.) Specifies the level of log verboseness. Replace 4 with the following values: 0 1 2 3 4 5 -x mirror_disk=block_device_special_file Specifies the target's block device special file of the mirror disk.
Glossary Booted system environment The system environment that is currently running — also known as the current, active, or running system environment. CLI Command line user interface Clone * (noun) - clone - a Cloned System Image . * (verb) - clone - to create a Cloned System Image. Cloned system image A copy of the booted volume group from the system image of a booted system environment — produced by the drd clone command.
System image The file systems and their contents that comprise an installation of HP-UX — residing on disk and therefore persisting across reboots. System recovery See Hot recovery Unrehost DRD command that removes the system information file, EFI/HPUX/SYSINFO.TXT, from a disk that was rehosted, optionally preserving a copy in a file system on the booted system.
Index A active system image, 8, 14 B bdf command output, 21 block device special file, 45 block device special files, 9, 10 C choosing target disk, 10 clone creation, 12 maintaining software, 16 cloned image; modifying, 5 cloning operation log, 45 command return values, 14 commands bdf, 21, 24 DRD, 42 drd activate, 5, 30, 42 drd clone, 6, 8, 12, 44 drd deactivate, 6, 47 drd mount, 6, 20, 48, 50 drd rehost, 6, 50 drd runcmd, 6, 53 drd status, 6, 55 drd sync, 6, 57 drd umount, 6, 23, 59 drd unrehost, 7, 60
E exclude_list, 58 extended options drd activate, 43 drd clone, 45 drd deactivate, 47 drd mount, 49 drd rehost, 52 drd runcmd, 53 drd status, 55 drd sync, 58 drd umount, 59 drd unrehost, 61 Extensible Firmware Interface (EFI) partitions, 44 F file systems, 21 firmware patches, 18 G guide locating, 40 I idisk partition, 9, 10 inactive system file system unmounting, 59 inactive system image, 8, 14 accessing, 20 activating, 30, 42 administrative tasks, 21 modifying, 20 mount point, 21 mounting, 53 synchroni