HP-UX Directory Server console guide HP-UX Directory Server Version 8.
© Copyright 2009 Hewlett-Packard Development Company, L.P. Confidential computer software. Valid license from HP required for possession, use or copying. Consistent with FAR 12.211 and 12.212, Commercial Computer Software, Computer Software Documentation, and Technical Data for Commercial Items are licensed to the U.S. Government under vendor's standard commercial license. The information contained herein is subject to change without notice.
Table of Contents 1 Overview of the console................................................................................................5 1.1 How the Console, Directory Server, and Administration Server work together..............................5 1.2 Console menus..................................................................................................................................7 1.3 Console tabs................................................................................................
5 Setting access controls.................................................................................................53 5.1 Granting admin privileges to users for Directory Server and Administration Server...................53 5.2 Setting access permissions on console elements.............................................................................55 6 Using SSL/TLS with the Console.................................................................................61 6.1 Overview of SSL/TLS..........
1 Overview of the console The Directory Console is the user interface to manage HP-UX Directory Server and Administration Server configuration and directory information. There is a single main Console window which administers the servers (collected and identified in administration domains). The main Console allows you to open server-specific Consoles to manage the settings and information in individual instances.
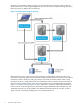
changing a port number. When a request is sent to the Directory Console to add or edit user entries, the Console sends a Lightweight Directory Access Protocol (LDAP) message directly to Directory Server to update the user directory. Figure 1-2 Simple system using the Console HP-UX Directory Server stores server and application configuration settings as well as user information.
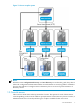
Figure 1-3 A more complex system NOTE: When the terms configuration directory and user directory are used in this guide, they refer to where the configuration information and the user information is stored, regardless of whether that is in the subtrees of a single instance of Directory Server or in two separate instances of Directory Server. 1.2 Console menus There are five menu items in the top menu the Console.
Figure 1-4 Main Console menus Table 1-1 Console menus Menu Description Console Manages the Console session, such as closing the window or exiting the session entirely. • For the main window, this menu also can be used to add and remove admin domain. • For the Directory Server Console, this allows people to log in as a different user. • For the Administration Server Console, it manages security issues, such as certificates and tokens. Edit Sets display preferences, for all three Consoles.
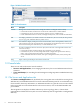
Figure 1-5 The Servers and Applications tab The top of the topology is the administration domain, a collection of host systems and servers that share the same user directory. The server which hosts Directory Server or Administration Server instances belongs to the administration domain; that is the host. A server group consists of all Directory Servers that are managed by a common Administration Server. A number of server groups can exist within an administration domain. 1.3.
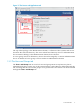
Figure 1-6 The Users and Groups tab Switch the directory being searched or where the entries are added through the options in the Users menu, as described in “Searching for users and groups”. 1.4 Server-specific consoles The main Console can open into two server-specific windows to manage the Administration Server and Directory Server. These windows are opened by clicking the server name in the navigation area, then clicking the Open button in the resources area. 1.4.
Figure 1-7 The Directory Server Console There are four tabs in the Directory Server Console: Tasks This tab provides shortcuts to common server operations, including starting and stopping the Directory Server instance, importing and exporting databases, and managing SSL certificates Configuration This tab defines all the server configuration settings, including SASL and SSL authentication, port numbers, schema, replication and synchronization, databases and suffixes, logging, and plug-ins Directory Th
Figure 1-8 The Administration Server console The Administration Server Console is simpler than the Directory Server Console, with only two tabs: Tasks This tab has shortcuts to common server operations, including starting and stopping the Administration Server instance, setting up logging, and managing SSL certificates Configuration This tab defines all the Administration Server configuration settings, including SSL authentication, port numbers, and logging, as well as the Configuration Directory Server
2 Basic Console tasks While most server management functions are carried out in server-specific console windows for the HP-UX Directory Server and Administration Server, the main Console itself has some basic management functions, such as creating server instances, searching the directory, setting some access controls, and allowing some entry modifications.
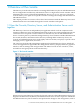
2.2 Opening a directory or Administration Server window The Conosle is the avenue to access instance-specific management windows for the Directory Server and Administration Server. To open a console window for a specific server instance: 1. Open the Console. /opt/dirsrv/bin/hpds-idm-console 2. 3. Click the Servers and Applications tab, which lists all the Directory Server and Administration Server instances within the configured Directory Server domain.
• • “Reordering table columns” “Customizing the main window” 2.3.1 Changing profile locations The Console formatting is stored in profiles. An entry's profiles can be stored locally, which means that they are only available at a specific workstation, or can be stored in the configuration directory, so they are accessible anywhere. To set the profile location: 1. Click Edit in the top menu, and choose Preferences. 2. 3. Click the Settings tab.
• • 4. In your configuration directory means that the settings are stored in the Directory Server configuration, making them available no matter where you log into the Console. On your computer's hard disk stores the setting profiles locally. This is mainly useful if you want specific, different settings used by default on different Consoles, such as a workstation and a laptop. Click OK. 2.3.2 Restoring default font settings 16 1. Click Edit in the top menu, and choose Preferences. 2. 3.
2.3.3 Changing console fonts Different parts of the Console, such as table headings and regular text, have different font settings. The font settings are stored in profiles, which define the font family, size, and formatting for every text element. There can be multiple font profiles available, and the font profiles can be private, such as settings for a specific user or group, or public, so that any user can access them. The default profile can be edited without having to create new profiles.
6. 7. Click OK to save the profile. Restart the Console to apply the changes. # /opt/dirsrv/bin/hpds-idm-console To load and use a saved font profile, open the Font tab in the Preference dialog, and simply select the font profile to use and click OK.
To delete a font profile, simply make sure that it is selected from the drop-down menu in the Fonts tab, and click the Remove button. 2.3.4 Reordering table columns The columns in a table can be rearranged by dragging them into a new position. 1. Click in the table heading. 2.
2. 20 Still holding down the left mouse button, drag the column to its new location. The other table columns will automatically shift down to their new positions.
3. When you release the mouse button, the column snaps into its new position. 2.
2.3.5 Customizing the main window Different elements of the main Directory Console window can be displayed or hidden; this is set by check boxes in the View menu. There are three parts of the Console which can be hidden: the navigation tree (the smaller panel on the left of the Console window); the decorative background and banner at the top of the Console window; and the status bar at the bottom of the Console.
2.3.6 Working with custom views The Console allows different views to be created to show different server and domain entries in the Directory Console window. Views show only a defined set of server entries; this makes it easier to maintain large numbers of instances or to have a quick way to perform specific tasks. 2.3.6.1 Creating custom views Custom views show different, defined server instances. Views are either public or private.
3. Choose whether the new view will be public or private, then click OK. • • 4. 5. 24 A public view is visible to all Console users by default, but access control instructions (ACIs) can be set to restrict access. For more information, see “Setting access permissions for a public view”. A private view is only visible to the user who sets it, and ACIs cannot be set to change the access to it. In the Edit View window, enter a descriptive name for this view.
To select a range of resources, click the SHIFT key and select the first and last entries; select multiple, separate resouces by holding down the CRTL key and selecting the entries. To edit a custom view, select it from the list, click the Edit button, and make the changes to the name or resources. To delete a custom view, select it from the list, and click the Remove button. 2.3.6.2 Switching to a custom view Choose the desired custom view from the drop-down list on the Servers and Applications tab.
3. 26 Set the access control instructions.
4. Click OK to save the ACI. For more information on setting access permissions and creating access control instructions, see Chapter 5 “Setting access controls”. 2.
3 Managing server instances The server instances managed by the Directory Console are arranged in a hierarchy. At the top is the admin domain. Within the domain are hosts, representing different server machines. Each host has server groups, which identifies an inter-related group of Directory Servers using the same Administration Server instance. The individual Directory Server instances and a single Administration Server instance belong withing a server group.
4. Click OK. 3.2 Creating and removing admin domains An admin domain is a container entry for server groups (and each server group contains Directory Server instances which are configured to work with the same Configuration Directory Server and the same Administration Server, which is also in the server group). 3.2.1 Creating and editing an admin domain To create a new admin domain: 30 1. 2. In the top menu, click the Console menu item. Select Create New Admininistration Domain. 3.
4. Click OK. To edit an admin domain, select the entry in the server window and click the Edit button. CAUTION: The admin domain settings affect all servers within the domain. Making any changes to the admin domain settings means that all servers in the domain must be restarted. 3.2.2 Removing an admin domain To remove an admin domain: 1. 2. 3. Highlight the admin domain to remove in the navigation tree. In the top menu, click the Console menu item. Select Remove Admininistration Domain. 4. Click Yes.
NOTE: Any server group and servers within the domain must be removed before the domain can be deleted. 3.3 Creating a new Directory Server instance After the default Directory Server and Administration Server instances are installed and configured, additional Directory Server instances can be created using the same schema and configuration and in the same installation directory, /opt/dirsrv.
4. Click OK. 3.4 Deleting a Directory Server instance 1. 2. In the Directory Console, select the instance to delete. Right-click the server instance, and select Remove Server. 3. Click Yes to confirm the deletion. 3.
4 Managing Directory Server users and groups Users for both multiple Directory Server instances and Administration Server can be created, edited, and searched for in the Directory Console. The main Console window can also be used to create organizational units and groups and to add entries to the new ous and groups. Chapter 5 “Setting access controls” describes how to work with user and group information when setting access privileges and other security information. 4.
3. Click Search. Results are displayed in the list box. To change the search directory: 36 1. 2. Click the Users and Groups tab. In the top menu, select the User menu item, and choose Change Directory. 3. Fill in the user directory information.
• User Directory Host. The fully qualified host name for the Directory Server instance. • User Directory Port and Secure Connection. The port number for the connection and whether this is an SSL (LDAPS). • User Directory Subtree. The DN of the subtree to search in the directory; for example, dc=example,dc=com for the base DN or ou=Marketing, dc=example,dc=com for a subtree. • Bind DN and Bind Password. The credentials to use to authenticate to the directory. 4. Click OK. 4.
Alternatively, open the User option in the top menu, and choose Create > User. 3. Select the directory subtree where you want to create the new entry. NOTE: When creating an administrator, there is no option to select the ou to which to add the user as there is with a regular Directory Server user. This is because the administrator is added to ou=Groups,ou=Topology,o=NetscapeRoot, with the admin users. The entry can be added to an ou or a view, if views have been added to the directory.
4. In the Create User window, enter user information. The Common Name and User ID fields are automatically filled in with the combined values the First Name and Last Name fields. These first, last, and common name fields are required; a password is also required for the user to be able to log into the Directory Server and the Console, but is not a required attribute. 5.
6. Click OK. 4.2.2 Groups A group consists of users who share a common attribute or are part of a list. Directory Server supports three types of groups: static, dynamic, and certificate. Each group differs by the way in which users, or members, are added to it: static group A static group has members who are manually added to it, so it is static because the members do not change unless an administrator manually adds or removes users.
1. Click the Users and Groups tab. 2. Click the Create button, and choose Group. Alternatively, open the User option in the top menu, and choose Create > Group. 3. Select the directory tree under which the entry is created. 4.
The subtree entry can be an ou or a view, if views have been added to the directory. 4. Enter the group's name and description. It is possible to save the new group entry at this point, without adding members. Click OK. 5. 6. 42 Click the Members link to add members to the group, and click the tab of the type of group membership, Static, Dynamic, or Certificate. Configure the members.
NOTE: The different kinds of groups and how to configure their members are explained in more detail in the HP-UX Directory Server administrator guide. 4.2.3 Organizational units An organizational unit can include a number of groups and users. An org unit usually represents a distinct, logical division in an organization, such as different departments or geographical locations. Each organizationalUnitName (ou) is a new subtree branch in the directory tree.
2. Click the Create button, and choose Organizational Unit. Alternatively, open the User option in the top menu, and choose Create > Organizational Unit. 3. 4. 44 Select the directory subtree under which to locate the new organizational unit. Fill in the organizational unit information. The Alias offers an alternative name for the organizational unit that can be used instead of the full name.
5. Click OK. 4.3 Modifying directory entries 4.3.1 Editing entries 1. Search for the entry to edit. See “Searching for users and groups” for more information on searching for entries. 2. Select the entry, and click Edit. 4.
3. Edit the entry information, and click OK to save the changes. 4.3.2 Allowing sync attributes for entries Directory Server and Active Directory synchronization unify some Unix and Windows-specific directory attributes; to carry over a Directory Server entry to Active Directory, the entry must have ntUser attributes. (Likewise, Windows entries must have posixAccount attributes.) Windows (NT) attributes must an be enabled on entries. By default, these attributes are added manually to individual entries.
3. Click OK. 4.3.3 Changing administrator entries When the Administration Server is installed, two entries are created with administrator access in the Console. The main entry is the Configuration Administrator, who is authorized to access and modify the entire configuration directory (o=NetscapeRoot). The Configuration Administrator entry is stored in the uid=username, ou=Administrators,ou=TopologyManagement,o=NetscapeRoot entry.
4.3.3.1 Changing the configuration administrator and password 48 1. 2. In the Users and Groups, click Advanced. Search for the Configuration Administrator. Select the Administrators object, and enter the administrator's username, Configuration Administrator by default. 3. Select the Configuration Administrator from the list of search results, then click Edit. 4. Change the administrator's uid and password. The uid is the naming attribute used to log into the Console and run commands.
5. Click OK. NOTE: If you are logged into the Console as the Configuration Administrator when you edited the Configuration Administrator entry, update the login information for the directory. 1. 2. In the Users and Groups tab, click the User menu in the top menu and select Change Directory. Update the Bind DN and Bind Password fields with the new information for the Configuration Administrator, and click OK. 4.3.3.2 Changing the admin password 1. 2. 3.
CAUTION: Do not change the admin username. 4. 5. Click Save. Restart the Administration Server. /opt/dirsrv/sbin/restart-ds-admin 4.3.3.3 Adding users to the configuration administrators group 50 1. In the Users and Groups tab, click the User menu in the top menu and select Change Directory. 2. Change to the o=NetscapeRoot subtree, which contains the configuration information and the Configuration Administrators group.
3. 4. 5. Search for the Configuration Administrators group, and click Edit. Click the Members link in the left of the edit window. Click Add, and search for the user to add to the group. 4.
NOTE: Only users in the o=NetscapeRoot database can be added to the Configuration Administrators group. This means that the entry must be created as an administrator, not a regular user, when added through the Console. See “Directory and administrative users”. 4.3.4 Removing an entry from the directory 1. Search for the entry to deleted. See “Searching for users and groups” for more information on searching for entries.
5 Setting access controls Access control instructions (ACIs) can be set in the Directory Console to set limits on what users can see and what operations they can performa on Directory Server and Administration Server instances managed in the Console. ACIs define what operations users can do with a specific instance of Directory Server or Administration Server.
4. 54 Search for the users to add as an administrators. In the results, highlight the selected users, and click Add to add them to the administrators list.
For more information on searching for users and groups, see “Searching for users and groups”. 5. Click OK to add the names to the Set Permissions Dialog list, then click OK again to save the changes and close the dialog. NOTE: Granting a user the right to administer a server does not automatically allow that user to give others the same right.
3. 56 In the ACI Manager window, click the New button.
The five inherited ACIs are not displayed by default; to see them listed, click the Show inherited ACIs checkbox. 4. Configure the ACI by setting, at a minimum, the users to which it applies and the rights which are allowed. To configure the ACI in the wizard (visually): a. Enter a name for the ACI in the ACI Name field. b. In the Users/Groups tab, click the Add button to open the search window. Search for and add the users to which apply the ACI. 5.
Select the users from the results list and click the Add button to include them. Click OK to save the list. c. 58 In the Rights tab, specify which operations are permitted as part of this ACI.
To hide a Console element entirely from the selected users, groups, and hosts, click Check None to block any access. d. Optionally, set the target entry in the subtree, host names, or times of day where the ACI is in effect. More complex ACIs may not be able to be edited visually; in those cases, click the Edit Manually button, and configure the ACI entry directly. 5.
Use the Check syntax button to validate the ACI. 5. 6. 60 Click OK to save the ACI. Restart Directory Console to apply the new ACI.
6 Using SSL/TLS with the Console Secure Sockets Layer (SSL) and Transport Layer Security (TLS) are protocols which set up secure, encrypted communication between an SSL/TLS server and a client which connects to it. In Directory Server, the Directory Server can be configured to communicate with LDAP over SSL, LDAPS. Likewise, the Administration Server can be configured to run over secure HTTP (HTTPS) rather than standard HTTP. Both the Directory Server and Administration Server are SSL servers.
• • A list of acceptable compression methods A randomly-generated number 2. The server responds to the client: • The chosen TLS/SSL version (this is the highest version in common with both the server and client) • The selected cipher suite (the most secure version the server and client have in common) • The selected compression method (the most secure version the server and client have in common) • A randomly-generated number of its own 3. The server then sends its certificate.
6.2.1 Generating a certificate request 1. 2. 3. 4. In the Directory Server Console, select the Tasks tab, and click Manage Certificates. Select the Server Certs tab, and click the Request button. This opens the Certificate Request Wizard. Click Next. Enter the Requester Information in the blank text fields, then click Next. • Server Name Enter the fully qualified host name of the Directory Server as it is used in DNS and reverse DNS lookups; for example, dir.example.com.
IMPORTANT: This must be a valid host name that can be resolved correctly by all server clients, or TLS/SSL will not work. • Organization Enter the legal name of the company or institution. Most CAs require this information to be verified with legal documents such as a copy of a business license. • Organizational Unit (optional) Enter a descriptive name for the organization within the company. • locality (optional) Enter the company's city name.
7. Click Done to dismiss the Certificate Request Wizard. After generating the certificate request, send it to the CA, and wait for the CA to issue the server certificate. When the CA issues the certificate, save it to a text file that is local to the Directory Server. The certificate must be available to install in the Directory Server. This file can also be used as a backup to re-install the certificate in the server in case the certificate is ever lost. 6.2.2 Installing the certificate 1.
2. 3. Select the Server Certs tab, and click Install. Give the certificate location or paste the certificate text in the text box, then click Next. • In this local file. Enter the absolute path to the certificate in this field. • In the following encoded text block. Copy the text from the CA's email or from the created text file, and paste it in this field.
4. 5. Check that the certificate information displayed is correct, and click Next. Give a name to the certificate, and click Next. 6. Provide the password that protects the private key. This password is the same as the one provided in step 5 in “Generating a certificate request”. After installing the server certificate, it is listed in the Certificates tab. If necessary, configure the Directory Server to trust the CA which issued the server's certificate. 6.2.
2. 68 Go to the CA Certs tab, and click Install.
3. If the CA's certificate is saved to a file, enter the path in the field provided. Alternatively, copy and paste the certificate, including the headers, into the text box. Click Next. 6.
4. 5. Check that the certificate information that opens is correct, and click Next. Name the certificate, and click Next. 6.
• Accepting connections from clients (Client Authentication) The server checks that the client's certificate has been issued by a trusted certificate authority. • Making connections to other servers (Server Authentication) This server checks that the directory to which it is making a connection (for replication updates, for example) has a certificate that has been issued by a trusted certificate authority. 7. Click Done. After installing the CA certificate, it is listed in the CA Certificates tab.
NOTE: It is important that the Administration Server and Directory Server have a CA certificate in common so that they can trust the other's certificates. 3. If the default port number of 636 is not used, change the secure port setting. a. Change the secure port number in the Configuration>Settings tab of the Directory Server Console, and save. b. Restart the Directory Server. It restarts over the regular port. /opt/dirsrv/slapd-example/restart-slapd 4. 72 5.
9. Set the preferences for client authentication. • Do not allow client authentication. With this option, the server ignores the client's certificate. This does not mean that the bind will fail. • Allow client authentication This is the default setting. With this option, authentication is performed on the client's request. • Require client authentication. With this option, the server requests authentication from the client.
NOTE: To use client certificate-based authentication with replication, configure the consumer server either to allow or to require client authentication. 10. To verify the authenticity of requests, select the Check hostname against name in certificate for outbound SSL connections option. The server does this verification by matching the host name against the value assigned to the common name (cn) attribute of the subject name in the being presented for authentication.
14. In the Configuration DS tab, change the port number to the new Directory Server secure port information, even if the default port of 636 is used. Check the Secure Connection checkbox. 15. In the User DS tab, select the Set User Directory radio button, and fill in the Directory Server secure port information, the LDAP URL, and the user database information. Check the Secure Connection checkbox. 16.
17. Restart the Directory Server. The server must be restarted from the command line. /opt/dirsrv/slapd-example/restart-slapd When the server restarts, it prompts for the PIN or password to unlock the key database. This is the same password used when the server certificate and key were imported into the database. Using a pin.txt file to store the token database passwords allows the Directory Server to restart without prompting for the password.
6.4.2 Creating a password file for the Administration Server Like the Directory Server, the Administration Server can use a password file during login when TLS/SSL is enabled. CAUTION: This password is stored in clear text within the password file, so its usage represents a significant security risk. Do not use a password file if the server is running in an unsecured environment. 1. 2. Open the Administration Server configuration directory, /etc/opt/dirsrv/admin-serv. Create a password file named password.
7 Support and other resources 7.1 Contacting HP 7.1.1 Information to collect before contacting HP Be sure to have the following information available before you call contact HP: • • • • • • Software product name Hardware product model number Operating system type and version Applicable error message Third-party hardware or software Technical support registration number (if applicable) 7.1.
• HP-UX Directory Server administration server guide The Administration Server is a support server that drives access to the Directory Server Console , provides a web server for Directory Server web applications, and stores some Directory Server configuration. This guide covers how to manage the Administration Server through the Console, through the command line, and through the web services. It also covers basic Administration Server concepts.
7.2.3 Troubleshooting resources • You can search a technical knowledge database available on the HP IT Resource Center (ITRC) website at: http://itrc.hp.com/ • To seek solutions to problems, you can post messages on the ITRC Forums page at the following website (select the HP-UX area in the Areas of peer problem solving section): http://forums.itrc.hp.com/ 7.3 Typographic conventions This document uses the following typographical conventions: Book title The title of a book.
Glossary A access control instruction See ACI. access control list See ACL. access rights In the context of access control, specify the level of access granted or denied. Access rights are related to the type of operation that can be performed on the directory. The following rights can be granted or denied: read, write, add, delete, search, compare, selfwrite, proxy and all.
bind distinguished name See bind DN. bind DN Distinguished name used to authenticate to Directory Server when performing an operation. bind rule In the context of access control, the bind rule specifies the credentials and conditions that a particular user or client must satisfy in order to get access to directory information. branch entry An entry that represents the top of a subtree in the directory.
CoS definition entry Identifies the type of CoS you are using. It is stored as an LDAP subentry below the branch it affects. CoS template entry Contains a list of the shared attribute values. See also template entry. D daemon A background process on a Unix machine that is responsible for a particular system task. Daemon processes do not need human intervention to continue functioning. DAP Directory Access Protocol. The ISO X.500 standard protocol that provides client access to the directory.
file type The format of a given file. For example, graphics files are often saved in GIF format, while a text file is usually saved as ASCII text format. File types are usually identified by the file extension (for example, .GIF or .HTML). filter A constraint applied to a directory query that restricts the information returned. filtered role Allows you to assign entries to the role depending upon the attribute contained by each entry. You do this by specifying an LDAP filter.
L LDAP Lightweight Directory Access Protocol. Directory service protocol designed to run over TCP/IP and across multiple platforms. LDAP client Software used to request and view LDAP entries from an LDAP Directory Server. See also browser. LDAP Data Interchange Format See LDAP Data Interchange Format. LDAP URL Provides the means of locating Directory Servers using DNS, then completing the query through LDAP. A sample LDAP URL is ldap://ldap.example.com.
are automatically replicated to the other server. In case of conflict, a time stamp is used to determine which server holds the most recent version. multiplexor The server containing the database link that communicates with the remote server. N n + 1 directory problem The problem of managing multiple instances of the same information in different directories, resulting in increased hardware and personnel costs. name collisions Multiple entries with the same distinguished name.
presence index Allows searches for entries that contain a specific indexed attribute. protocol A set of rules that describes how devices on a network exchange information. protocol data unit See PDU. proxy authentication A special form of authentication where the user requesting access to the directory does not bind with its own DN but with a proxy DN. proxy DN Used with proxied authorization.
S SASL An authentication framework for clients as they attempt to bind to a directory. Also Simple Authentication and Security Layer . schema Definitions describing what types of information can be stored as entries in the directory. When information that does not match the schema is stored in the directory, clients attempting to access the directory may be unable to display the proper results. schema checking Ensures that entries added or modified in the directory conform to the defined schema.
superuser The most privileged user available on Unix machines. The superuser has complete access privileges to all files on the machine. Also called root. supplier Server containing the master copy of directory trees or subtrees that are replicated to replica servers. supplier server In the context of replication, a server that holds a replica that is copied to a different server is called a supplier for that replica.
Index A Access Control to navigation tree, 53 admin domain creating, 30, 31 administration domain defined, 8 removing, 31 Administration Server defined, 5 Administration Server Administrator changing user name or password for, 49 defined, 47 administrators, overview of, 47 Directory Server Console overview of, 5 documentation providing feedback, 79 reporting errors in, 79 dynamic group, 40 E encryption, 61 F feedback email address for documentation, 79 fonts changing, 17 C G certificate password, 76 c
preferences, 14 font, 17 UI permissions, 14 R reporting documentation errors email address, 79 S searching changing the search directory, 36 for directory entries, 35 server defined, 8 opening a management window for, 14 server group defined, 8 modifying information for, 29 server instance creating, 32 modifying information for, 29 SSL, 61 Administration Server password file, 77 certificate password, 76 static group, 40 synchronization options enabling, 46 overview, 46 T tables changing column position i