
HP-UX Directory Server 8.1 administrator guide


1. In the Directory Server Console, select the Configuration tab.
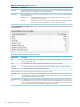
2. In the navigation tree, expand the Logs folder, and select the Errors Log icon.
The errors log configuration attributes are displayed in the right pane.
3. Select the Errors Log tab in the right pane.
4. To enable error logging, select the Enable Logging checkbox.
Clear this checkbox to keep the directory from maintaining an errors log. Error logging is
enabled by default.
5. Enter the full path and file name for the directory to use for the errors log in the Log File
field. The default path is /var/opt/dirsrv/slapd-instance_name/log/errors
directory.
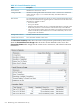
6. Set the maximum number of logs, log size, and time period when the file is archived.
For information on these parameters, see “Defining a log file rotation policy”.
7. Set the maximum size of combined archived logs, minimum amount of free disk space, and
maximum age for a log file.
For information on these parameters, see “Defining a log file deletion policy”.
8. To set the log level, use the Ctrl key and click the options for the directory to include in the
Log Level list box.
For more information about log level options, see the HP-UX Directory Server configuration,
command, and file reference.
NOTE:
Changing these values from the defaults may cause the errors log to grow very rapidly, so
HP recommends not changing the logging level unless you are asked to do so by HP technical
support.
9. Click Save.
14.1.5 Audit log
The audit log contains detailed information about changes made to each database as well as to
server configuration.
14.1.5.1 Viewing the audit log
Before the audit log can be viewed, audit logging must be enabled for the directory, so the audit
log will not be kept. “Configuring the audit log” has more information.
To view the audit log:
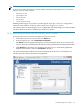
1. In the Directory Server Console, select the Status tab.
2. In the navigation tree, expand the Log folder, and select the Audit Log icon.
A table displays a list of the last 25 entries in the audit log.
• To refresh the current display, click Refresh. Select the Continuous checkbox for the
display to refresh automatically every ten seconds.
NOTE:
Continuous log refresh does not work well with log files over 10 megabytes.
• To view an archived audit log, select it from the Select Log pull-down menu.
14.1 Viewing and configuring log files 515