
HP-UX Directory Server 8.1 administrator guide

8. When you have finished editing the ACI, click OK.
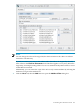
The Access Control Editor closes, and the new ACI is listed in the Access Control Manager
window.
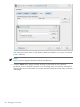
NOTE:
For any point of creating the ACI, you can click the Edit Manually button to display the LDIF
statement corresponding to the wizard input. You can modify this statement, but your changes
may not be visible in the graphical interface.
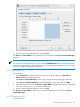
6.5.3 Editing an ACI
To edit an ACI:
1. In the Directory tab, right-click the top entry in the subtree, and choose Set Access
Permissions from the pop-up menu.
The Access Control Manager window opens, listing the ACIs belonging to the entry.
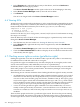
2. In the Access Control Manager window, highlight the ACI to edit, and click Edit.
3. Make the edits to the ACI in the Access Control Editor; the different screens are described
more in “Creating a new ACI” and in the online help.
4. When you have finished editing the ACI, click OK.
The Access Control Editor windows closes, and the modified ACI is listed in the Access
Control Manager.
6.5.4 Deleting an ACI
To delete an ACI:
6.5 Creating ACIs from the console 263