
HP-UX Directory Server 8.1 administrator guide


6.5 Creating ACIs from the console
You can use the Directory Server Console to view, create, edit, and delete access control
instructions for your directory:
• “Displaying the Access Control Editor”
• “Creating a new ACI”
• “Editing an ACI”
• “Deleting an ACI”
See “Access control usage examples” for a collection of access control rules commonly used in
Directory Server security policies, along with step-by-step instructions for using the Directory
Server Console to create them.
The Access Control Editor prevents creating more complex ACIs in visual editing mode,
especially ACIs with any of these characteristics:
• Deny access (“Permissions syntax”).
• Create value-based ACIs (“Targeting attributes”).
• Define parent access (“Parent access (parent keyword)”).
• Create ACIs that contain Boolean bind rules (“Using Boolean bind rules”).
• Create ACIs that use the roledn, userattr, authmethod keywords.
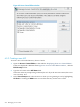
NOTE:
In the Access Control Editor, click the Edit Manually button at any time to check the LDIF
representation of the ACI changes made through the graphical interface.
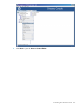
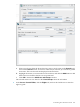
6.5.1 Displaying the Access Control Editor
1. Start the Directory Server Console. Log in using the bind DN and password of a privileged
user, such as the Directory Manager, who has write access to the ACIs configured for the
directory.
/opt/dirsrv/bin/hpds-idm-console
2. Select the Directory tab.
3. Right-click the entry in the navigation tree for which to set access control, and select Set
Access Permissions from the pop-up menu.
Alternatively, highlight the entry, and select Set Access Permissions from the Object
menu.
256 Managing access control