
HP-UX Directory Server 8.1 administrator guide


Add Only
The LDIF file may contain modify and delete instructions in addition to the default add
instructions. For the server to ignore operations other than add, select the Add only
checkbox.
•
• Continue on Error
Select the Continue on error checkbox for the server to continue with the import even
if errors occur. For example, use this option to import an LDIF file that contains some
entries that already exist in the database in addition to new ones. The server notes
existing entries in the rejects file while adding all new entries.
4. In the File for Rejects field, enter the full path to the file in which the server is to record all
entries it cannot import, or click Browse to select the file that will contain the rejects.
A reject is an entry that cannot be imported into the database; for example, the server cannot
import an entry that already exists in the database or an entry that has no parent object. The
Console will write the error message sent by the server to the rejects file.
Leaving this field blank means the server will not record rejected entries.
The server performs the import and also creates indexes.
NOTE:
Trailing spaces are dropped during a remote Console import but are preserved during both local
Console or ldif2db import operations.
4.1.2 Initializing a database from the console
The existing data in a database can be overwritten by initializing databases.
You must be logged in as the Directory Manager in order to initialize a database because an
LDIF file that contains a root entry cannot be imported into a database except as the Directory
Manager (root DN). Only the Directory Manager has access to the root entry, such as
dc=example,dc=com.
CAUTION:
When initializing databases from an LDIF file, be careful not to overwrite the o=NetscapeRoot
suffix unless you are restoring data. Otherwise, initializing the database deletes information and
may require reinstalling the Directory Server.
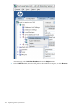
To initialize a database using the Directory Server Console:
1. Select the Configuration tab.
2. Expand the Data tree in the left navigation pane. Expand the suffix of the database to
initialize, then click the database itself.
3. Right-click the database, and select Initialize Database.
4.1 Importing data 147