
HP-UX Containers (SRP) A.03.01 Administrator's Guide


20
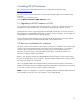
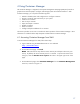
Figure 4.3 shows the System Properties tab after the user enabled the selected system properties
and rebooted the system.
Figure 4.3 Enabling the system properties
NOTE: From the Container Manager help files, select the Properties help menu item for more
information on the System Properties page.
4.5 Container Manager – creating a container
You can use the Container Manager to create a new container on your system. When you create a
container, you select the type of container: workload or system. For both types of containers, you can
specify optional services (such as PRM, IPFilter, and IPSec). For workload containers, you can specify
additional application templates (SSHD, Apache, Tomcat, Custom, and Oracle).
To create a container, follow these steps:
1. From the Container Manager home page, click Create a container.
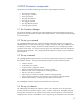
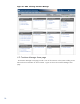
2. Select the Container Type that you want to create, either system or workload. (see
Figure 4.4)
3. Click Next to continue.
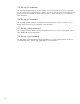
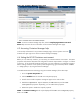
4. Enter a Container Name (see Figure 4.5).
NOTE: You cannot use the keywords system or workload as container names.
5. Modify any fields as desired.
6. Click Create. A result window pops up and shows the create command being executed and
the logs being generated on the host. Once the Create operation is complete, an operation
success or failure message is displayed.
7. Click Back to container listing and close the result window.
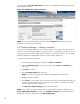
NOTE: If you created a workload container and you want to add an application template, go to
View and Modify Container that is below the Containers Listing tab and select the desired
template tab. Enter your selection and click Add Configuration.