HP CIFS Server and Encrypting Client Connections Version 1.
Legal Notices The information in this document is subject to change without notice. Hewlett-Packard makes no warranty of any kind with regard to this manual, including, but not limited to, the implied warranties of merchantability and fitness for a particular purpose. Hewlett-Packard shall not be held liable for errors contained herein or direct, indirect, special, incidental or consequential damages in connection with the furnishing, performance, or use of this material. Warranty.
Table of Contents Legal Notices ...................................................................................................................................... 2 Table of Contents................................................................................................................................. 3 Introduction......................................................................................................................................... 4 Overview..................................
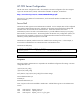
Introduction HP CIFS Server with Windows or other Server Message Block (SMB) clients does not have configurable encryption options for data being transmitted over-the-wire, and therefore SMB is not considered a secure protocol. The Windows 2008 and Vista enabled SMB2 does not add encryption capability. For installations that require over-the-wire data encryption for SMB client-server connections, a custom deployment is required.
Overview Configuring an encrypted SMB session is often referred to as "tunneling", and usually employs Secure Shell (SSH) on the client and server. The following deployment uses an SSH client (Putty) on Windows Vista, and HP-UX SSH on the HP CIFS Server. Kerberos authentication is used for the Windows domain user access. HP CIFS Server (Samba) is highly configurable and flexible, and thus has many possible configuration scenarios.
HP CIFS Server Configuration The HP CIFS Server configuration used in this example is the same configuration from the “Integrate Logins with HP CIFS Server, HP-UX, and Windows 2003R2” whitepaper, located here: http://www.docs.hp.com/en/15204/CIFSUnifiedLogin.pdf CIFS Server is using Kerberos for authentication, and a Microsoft Windows 2003R2 KDC and domain controller. Secure Shell HP-UX Secure Shell supports several authentication methods.
Add the following lines to the account section: sshd sshd sshd account required account sufficient account required libpam_hpsec.so.1 libpam_krb5.so.1 libpam_unix.so.1 Our existing CIFS Server Kerberos krb5.conf and krb5.keytab files (from the Unified Login configuration) are compatible with SSH, so using our existing configuration, the systems are ready to execute an SSH tunnel using Kerberos authentication. No other special CIFS or HP-UX configuration is required.
Windows Client Configuration The SSH client for Windows is Putty, which is a free client application that provides SSH, Telnet, and a terminal emulator. Use Putty version 0.60, which can be downloaded from: http://www.chiark.greenend.org.uk/~sgtatham/putty/ Putty will be used to configure the SSH tunnel from the Windows client to the HP CIFS Server. Windows Loopback Adapter The tunneling solution on the client requires the re-direction of port 139 (for Windows XP) and 139 plus 445 (for Windows Vista).
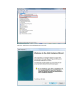
Start the “Welcome to the Add Hardware Wizard”:
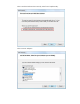
Select “Install the hardware that I manually select from a list(Advanced)". Select "Network Adapters".
Choose Microsoft Loopback Adapter, Now the Vista client has a Loopback Adapter installed, which is visible from the Vista Network and Sharing Center (see screenshot in the next section).
Loopback Adapter Properties After the Loopback Adapter is added, the network properties must be configured. Open the Network and Sharing Center, then select the properties for the new local area network connection – this will likely be Local Area Connection 2. Choose properties for TCP/IPv4.
Now enter a dummy IP address for the Loopback adapter – 10.0.0.1 is often used. This completes the Loopback Adapter installation and configuration.
Non-Plug and Play Drivers The next step is to go back to the Vista Device Manager and configure the “Non-Plug and Play TCP/IP Driver”. First, select "Show Hidden Devices" on the Device Manager. Expand "Non-Plug and Play Drivers".
Select "Message-Oriented TCP/IP and TCP/IPv6 (SMB Session)". Click the Driver tab, and select Demand, then click Start.
Client Proxy Server Configuration Next we remove any client proxy server configuration. Using Mozilla or Explorer, go to the LAN connection settings screen (Mozilla is shown). Select "No Proxy".
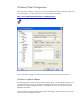
Putty SSH Client Configuration Start your Putty client, and prepare to save your SSH client configuration so that it is easily available to re-configure. This saved configuration must be enabled for every instance of the SSH connection to a specific server. When the Putty connection is terminated, the SSH tunnel is lost and must be restarted when Putty is executed again, so saving the configuration for an easy re-load is the recommended practice.
Next, select SSH and expand the Tunnels option. Observe the "Forwarded ports:" window in the graphic below. By default this window is blank. Enter the following data to achieve a correct configuration: in the "Source port" window, enter "10.0.0.1:139" - this is confusing because the window is too small for the text and because Putty adds the "L"; next, in the "Destination" window add "SambaServer.hp.com:139" (substitute your server name or IP address). Now click "Add".
Now click "Open". The client Putty session must have an open connection to the server for the tunnel to be active. The Putty session login screen will pop up. Log onto the HP-UX server as your CIFS/Samba username. In this case, the username is "buffy", and is an Active Directory user with POSIX attributes (as configured in the Unified Login whitepaper). The SSH tunnel configuration is done. Next the CIFS Server share access is established.
CIFS/Samba Share Access The SSH tunnel will be established from the client Loopback Adapter to the HP CIFS Server, and a share can be opened to the server. Click the Vista icon on the Desktop lower left-hand corner and choose “run” or the "Start Search" window. Enter the IP address of the Loopback Adapter as a UNC name. Click “OK”. The subsequent Explorer window will display the exported services from the HP CIFS Server.
Connection Details The Vista client has an open connection over the Putty SSH tunnel to the HP CIFS Server through the Secure Shell daemon. Below is the output from an HP CIFS Server smbstatus command that shows the smbd process for the open connection. Note that the process shows an open service for multiple server shares - the server port entry allows for the single mount of all available services, although individual permissions would prohibit or allow access to actual server directories.
Observe this Wireshark trace of a Vista client read of a CIFS Server file called "Sunnydale". The text of the file is the string "Sunnydale", although the text could also be confidential credit card data, health care patient records, or sensitive company financial reports. The standard Windows SMB session transmits data in the clear over an SMB connection to the server, so this data could be visible in a multitude of common client-server connection scenarios, including this example.
Observe the same file access over an SSH connection as described above. The data is encrypted and unintelligible when sniffed from the network. Sensitive data is protected using the tunneling configuration as described above.
Summary The tunneling procedure above provides an encrypted connection over the SMB protocol from a Windows Vista or XP client to an HP CIFS Server. Although the procedure tasks are explained in detail, this process is not quick or easy for the average enterprise user. However, the value of a secure SMB session for critical users in specific connectivity scenarios makes the complexity worthwhile.
© 2009 Hewlett-Packard Development Company, L.P. The information contained herein is subject to change without notice. The only warranties for HP products and services are set forth in the express warranty statements accompanying such products and services. Nothing herein should be construed as constituting an additional warranty. HP shall not be liable for technical or editorial errors or omissions contained herein.