
HP CIFS Server Administrator Guide Version A.03.01.03 (5900-2006, October 2011)
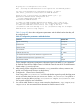
Table Of Contents
- HP CIFS Server Administrator Guide Version A.03.01.03
- Contents
- About this document
- 1 Introduction to the HP CIFS Server
- 2 Installing and configuring HP CIFS Server
- HP CIFS Server requirements and limitations
- Step 1: Installing HP CIFS Server software
- Step 2: Running the configuration script
- Step 3: Modify the configuration
- Step 4: Starting HP CIFS Server
- Other Samba configuration issues
- 3 Managing HP-UX file access permissions from Windows NT/XP/2000/Vista/Windows 7
- Introduction
- UNIX file permissions and POSIX ACLs
- Using the Windows NT Explorer GUI to create ACLs
- Using the Windows Vista Explorer GUI to create ACLs
- POSIX ACLs and Windows 2000, Windows XP, Windows Vista, and Windows 7 clients
- HP CIFS Server Directory ACLs and Windows 2000, Windows XP, Windows Vista, and Windows 7 clients
- In conclusion
- 4 Windows style domains
- Introduction
- Configure HP CIFS Server as a PDC
- Configure HP CIFS Server as a BDC
- Domain member server
- Create the Machine Trust Accounts
- Configure domain users
- Join a Windows client to a Samba domain
- Roaming profiles
- Configuring user logon scripts
- Home drive mapping support
- Trust relationships
- 5 Windows 2003 and Windows 2008 domains
- 6 LDAP integration support
- Overview
- Network environments
- Summary of installing and configuring
- Installing and configuring your Directory Server
- Installing LDAP-UX Client Services on an HP CIFS Server
- Configuring the LDAP-UX Client Services
- Enabling Secure Sockets Layer (SSL)
- Extending the Samba subschema into your Directory Server
- Migrating your data to the Directory Server
- Configuring the HP CIFS Server
- Creating Samba users in directory
- Management tools
- 7 Winbind support
- 8 Kerberos support
- 9 HP CIFS deployment models
- Introduction
- Samba Domain Model
- Windows Domain Model
- Unified Domain Model
- 10 Securing HP CIFS Server
- 11 Configuring HA HP CIFS
- 12 HP-UX configuration for HP CIFS
- 13 Tool reference
- Glossary
- Index
No proxy user is configured at this client.
Note : Starting the LDAP-UX daemon is now required for the LDAP-UX product !
You have created/changed the configuration profile. To make it
take effect, you need to start/restart the LDAP-UX daemon
Would you like to start/restart the LDAP-UX daemon (y/n) ? [y]:
Updated the LDAP-UX daemon configuration file
/etc/opt/ldapux/ldapclientd.conf
Restarted the LDAP-UX daemon!
To enable the LDAP Pluggable Authentication Module, save a copy of the
file /etc/pam.conf then add ldap to it. See /etc/pam.ldap for an example.
To enable the LDAP Name Service Switch, save a copy of the file
/etc/nsswitch.conf then add ldap to it. See /etc/nsswitch.ldap for an example.
LDAP-UX Client Services setup complete.
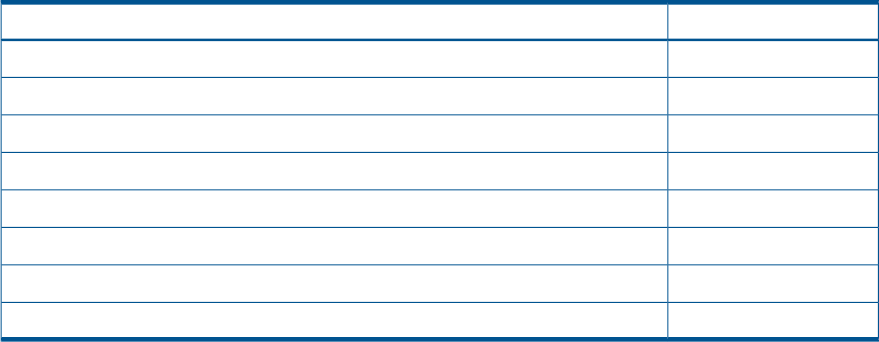
Table 11 (page 85) shows the configuration parameters and the default values that they will
be configured with.
Table 11 Configuration parameters and default values
Default valueParameter
AnonymousType of client binding
5 secondsBind time limit
no limitSearch time limit
YesUse of referrals
0 - infiniteProfile TTL (Time To Live)
YesUse standard RFC-2307 object class attributes for supported services
YesUse default search descriptions for supported services
SimpleAuthentication method
For the detailed configuration parameters information listed in the table 6-1, see "Appendix
B: LDAP-UX Client Services Object Classes" of LDAP-UX Client Services B.03.20 Administrator's
Guide at http://www.docs.hp.com.
3. After entering all the configuration information, setup extends the schema, creates a new
profile, and configures the client to use the directory.
4. Configure the Name Service Switch (NSS).
Save a copy of the /etc/nsswitch.conf file and edit the original to specify the ldap name
service and other name services you want to use. See the /etc/nsswitch.ldap file for a
sample. You may be able to just copy /etc/nsswitch.ldap to /etc/nsswitch.conf.
See nsswitch.conf(4) for more information.
5. You will be asked whether or not you want to start the client daemon, /opt/ldapux/bin/
ldapclientd. You must start the client daemon for LDAP functions to work.
Configuring the LDAP-UX Client Services 85