
HP CIFS Server Administrator Guide Version A.03.01.03 (5900-2006, October 2011)
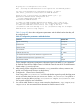
Table Of Contents
- HP CIFS Server Administrator Guide Version A.03.01.03
- Contents
- About this document
- 1 Introduction to the HP CIFS Server
- 2 Installing and configuring HP CIFS Server
- HP CIFS Server requirements and limitations
- Step 1: Installing HP CIFS Server software
- Step 2: Running the configuration script
- Step 3: Modify the configuration
- Step 4: Starting HP CIFS Server
- Other Samba configuration issues
- 3 Managing HP-UX file access permissions from Windows NT/XP/2000/Vista/Windows 7
- Introduction
- UNIX file permissions and POSIX ACLs
- Using the Windows NT Explorer GUI to create ACLs
- Using the Windows Vista Explorer GUI to create ACLs
- POSIX ACLs and Windows 2000, Windows XP, Windows Vista, and Windows 7 clients
- HP CIFS Server Directory ACLs and Windows 2000, Windows XP, Windows Vista, and Windows 7 clients
- In conclusion
- 4 Windows style domains
- Introduction
- Configure HP CIFS Server as a PDC
- Configure HP CIFS Server as a BDC
- Domain member server
- Create the Machine Trust Accounts
- Configure domain users
- Join a Windows client to a Samba domain
- Roaming profiles
- Configuring user logon scripts
- Home drive mapping support
- Trust relationships
- 5 Windows 2003 and Windows 2008 domains
- 6 LDAP integration support
- Overview
- Network environments
- Summary of installing and configuring
- Installing and configuring your Directory Server
- Installing LDAP-UX Client Services on an HP CIFS Server
- Configuring the LDAP-UX Client Services
- Enabling Secure Sockets Layer (SSL)
- Extending the Samba subschema into your Directory Server
- Migrating your data to the Directory Server
- Configuring the HP CIFS Server
- Creating Samba users in directory
- Management tools
- 7 Winbind support
- 8 Kerberos support
- 9 HP CIFS deployment models
- Introduction
- Samba Domain Model
- Windows Domain Model
- Unified Domain Model
- 10 Securing HP CIFS Server
- 11 Configuring HA HP CIFS
- 12 HP-UX configuration for HP CIFS
- 13 Tool reference
- Glossary
- Index

• Assigns your base DN as your LDAP suffix for user and group searches.
• Starts the product daemon, ldapclientd, if you choose to start it. For LDAP-UX Client
B.03.20, you must start the client daemon for LDAP-UX functions to work.
NOTE: If the value of the security parameter is ads , running setup for the LDAP-UX Client
Services is not required.
Quick configuration
You can do a quick configuration of the LDAP-UX Client Services by selecting the default values of
the configuration parameters.
NOTE: The LDAP server is dctvm86.ind.hp.com (15.146.157.80) and dctvm105.ind.hp.com is
the LDAP client and Samba server.
Prerequisites for a quick configuration
To do a quick configuration, you must have:
• Base path in the LDAP server that you want to use for creating a new profile
• Credentials for the USER DN [cn=Directory Manager] for creating a new profile
To do a quick configuration:
1. Edit the /opt/ldapux/migrate/migrate_common.ph file and change the default group
object class under $RFC2307BI structure from ou=Group to ou=Groups.
2. Log in as root and run the setup program:
$ cd /opt/ldapux/config
$ ./setup
NOTE: The setup program displays a series of questions and provides default answers.
Press the Enter key to accept the default values, or change the values and press Enter. At any
point during the setup, you can press Ctrl-B to back up or Ctrl-C to exit the setup program.
The following is a sample log for LDAP-UX Client services.
Select which Directory Server you want to connect to:
1. HP-UX, Red Hat or Tivoli Directory
2. Windows 2003 R2/2008 Active Directory
To accept the default shown in brackets, press the Return key.
Directory Server: [1]:
Enter the host name of the directory where you want to store the profile.
Enter either the fully qualified host name (for example: sys001.hp.com)
or IP address (for example: 15.13.118.130 or 2001:0db8:3c4d:0015:0:0:abcd:ef12).
To accept the default shown in brackets, press the Return key.
Directory server host [dctvm105.ind.hp.com = 15.146.157.105]:
To accept the default shown in brackets, press the Return key.
Directory Server port number [389]:
nl
Enter the distinguished name (DN) of an existing LDAP-UX profile entry
you want to use or the DN where you want to store a new LDAP-UX profile
entry. For a new entry, all parent entries of the DN must already exist in
the directory or this step will fail,
(for example: cn=ldapuxprofile, ou=ldapuxprofile, dc=hp, dc=com)
Profile Entry DN: []: cn=samba-ldap, dc=org, dc=hp, dc=com
nl
Enter the distinguished name (DN) of the directory user allowed to
create a new LDAP-UX profile entry or to check an existing profile entry.
Configuring the LDAP-UX Client Services 83