
HP CIFS Server Administrator Guide Version A.03.01.03 (5900-2006, October 2011)
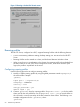

Table Of Contents
- HP CIFS Server Administrator Guide Version A.03.01.03
- Contents
- About this document
- 1 Introduction to the HP CIFS Server
- 2 Installing and configuring HP CIFS Server
- HP CIFS Server requirements and limitations
- Step 1: Installing HP CIFS Server software
- Step 2: Running the configuration script
- Step 3: Modify the configuration
- Step 4: Starting HP CIFS Server
- Other Samba configuration issues
- 3 Managing HP-UX file access permissions from Windows NT/XP/2000/Vista/Windows 7
- Introduction
- UNIX file permissions and POSIX ACLs
- Using the Windows NT Explorer GUI to create ACLs
- Using the Windows Vista Explorer GUI to create ACLs
- POSIX ACLs and Windows 2000, Windows XP, Windows Vista, and Windows 7 clients
- HP CIFS Server Directory ACLs and Windows 2000, Windows XP, Windows Vista, and Windows 7 clients
- In conclusion
- 4 Windows style domains
- Introduction
- Configure HP CIFS Server as a PDC
- Configure HP CIFS Server as a BDC
- Domain member server
- Create the Machine Trust Accounts
- Configure domain users
- Join a Windows client to a Samba domain
- Roaming profiles
- Configuring user logon scripts
- Home drive mapping support
- Trust relationships
- 5 Windows 2003 and Windows 2008 domains
- 6 LDAP integration support
- Overview
- Network environments
- Summary of installing and configuring
- Installing and configuring your Directory Server
- Installing LDAP-UX Client Services on an HP CIFS Server
- Configuring the LDAP-UX Client Services
- Enabling Secure Sockets Layer (SSL)
- Extending the Samba subschema into your Directory Server
- Migrating your data to the Directory Server
- Configuring the HP CIFS Server
- Creating Samba users in directory
- Management tools
- 7 Winbind support
- 8 Kerberos support
- 9 HP CIFS deployment models
- Introduction
- Samba Domain Model
- Windows Domain Model
- Unified Domain Model
- 10 Securing HP CIFS Server
- 11 Configuring HA HP CIFS
- 12 HP-UX configuration for HP CIFS
- 13 Tool reference
- Glossary
- Index
acctFlags: [W ]
displayName: client1$
3. Run the smbpasswd program on the Samba PDC server to create the Windows account:
• Use the following command to add the Windows account for a Windows client to the
/var/opt/samba/private/smbpasswd file if the passdb backend option is set
tosmbpasswd:
$ smbpasswd -a -m client1$
An example of the associated machine entry in the /etc/opt/samba/private/smbpasswd
file for a client machine named "client1" would be:
client1$:*803:808:ED816822D0393DAAD3B435B51404DD:321
ABEEFE10EC431B9BBFF1A1C0C047:[W ]:LCT-0000000:
• Use the following command to add the sambaSamAccount entry for a Windows client
to the LDAP directory server if the passdb backend option is set to ldapsam or
ldapsam_compat:
$ smbpasswd -a -m client1
An example of the associated machine entry in the LDAP directory server for a client
machine named "client1" would be:
objectClass: posixAccount
objectClass: sambaSamAccount
cn: client1$
uid: client1$
uidNumber: 1002
gidNumber: 202
homeDirectory: /home/temp
loginShell: /bin/false
gecos: Samba_Server
description: Samba_Server
userPassword: {crypt}x
pwdLastSet: 1076466300
logonTime: 0
logofftime: 2147483650
kickoffTime: 2147483650
pwdCanChange: 0
pwdMustChange: 2147483650
rid: 1206
primaryGroupID: 1041
lmPassword: E0AFF63989B8FA6576549A685C6ADFC1
ntPassword: E0AFF63989B8FA6576549A685C6ADFC1
acctFlags: [W ]
displayName: client1$
4. Logon to Windows NT as a local admin user.
5. From the Windows NT desktop, click 'Start', 'Settings' and 'Control Panel'. When the Control
Panel window opens, double-click on the 'Network' icon. When the 'Network' window opens,
click the 'Identification' tab. Refer to Figure 4-1 below.
6. Enter the Samba domain name in the 'Domain' field, and click on the 'Change' button. Refer
to Figure 4-3 below.
Join a Windows client to a Samba domain 63