
HP CIFS Server Administrator Guide Version A.03.01.03 (5900-2006, October 2011)
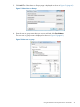

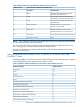

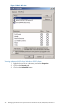

Table Of Contents
- HP CIFS Server Administrator Guide Version A.03.01.03
- Contents
- About this document
- 1 Introduction to the HP CIFS Server
- 2 Installing and configuring HP CIFS Server
- HP CIFS Server requirements and limitations
- Step 1: Installing HP CIFS Server software
- Step 2: Running the configuration script
- Step 3: Modify the configuration
- Step 4: Starting HP CIFS Server
- Other Samba configuration issues
- 3 Managing HP-UX file access permissions from Windows NT/XP/2000/Vista/Windows 7
- Introduction
- UNIX file permissions and POSIX ACLs
- Using the Windows NT Explorer GUI to create ACLs
- Using the Windows Vista Explorer GUI to create ACLs
- POSIX ACLs and Windows 2000, Windows XP, Windows Vista, and Windows 7 clients
- HP CIFS Server Directory ACLs and Windows 2000, Windows XP, Windows Vista, and Windows 7 clients
- In conclusion
- 4 Windows style domains
- Introduction
- Configure HP CIFS Server as a PDC
- Configure HP CIFS Server as a BDC
- Domain member server
- Create the Machine Trust Accounts
- Configure domain users
- Join a Windows client to a Samba domain
- Roaming profiles
- Configuring user logon scripts
- Home drive mapping support
- Trust relationships
- 5 Windows 2003 and Windows 2008 domains
- 6 LDAP integration support
- Overview
- Network environments
- Summary of installing and configuring
- Installing and configuring your Directory Server
- Installing LDAP-UX Client Services on an HP CIFS Server
- Configuring the LDAP-UX Client Services
- Enabling Secure Sockets Layer (SSL)
- Extending the Samba subschema into your Directory Server
- Migrating your data to the Directory Server
- Configuring the HP CIFS Server
- Creating Samba users in directory
- Management tools
- 7 Winbind support
- 8 Kerberos support
- 9 HP CIFS deployment models
- Introduction
- Samba Domain Model
- Windows Domain Model
- Unified Domain Model
- 10 Securing HP CIFS Server
- 11 Configuring HA HP CIFS
- 12 HP-UX configuration for HP CIFS
- 13 Tool reference
- Glossary
- Index
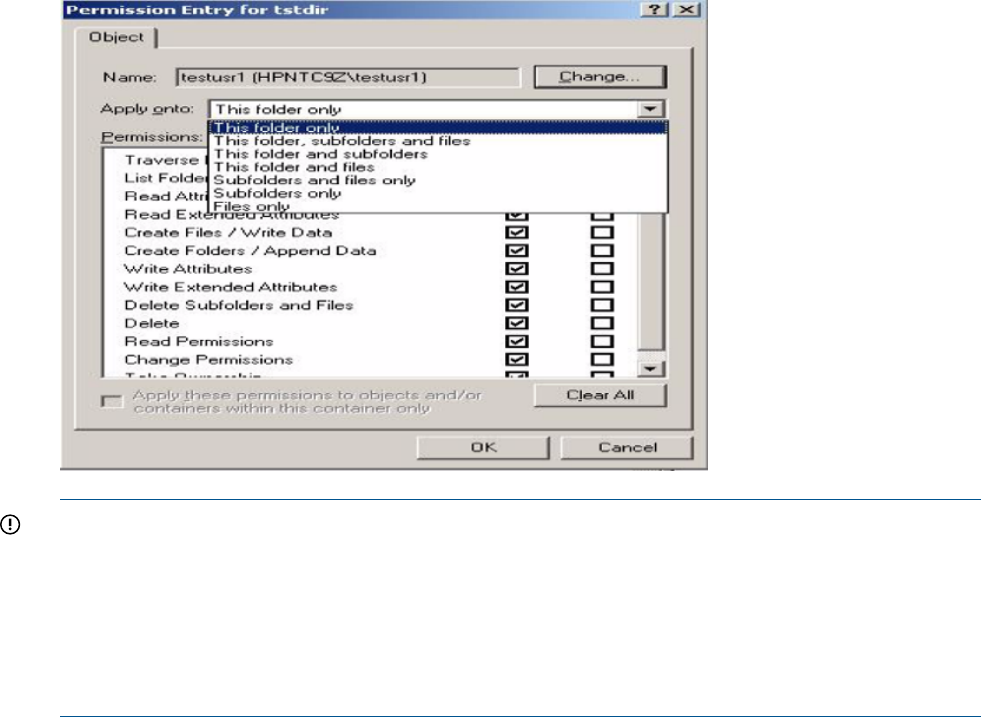
Figure 17 Modifying an ACE type with apply to value
IMPORTANT: If you want different permissions on default and access ACEs for the same user or
group, you must select two different ACE entries in the advanced ACE view dialog box before you
click on the OK button.
If you modify an ACE entry and clear both Allow and Deny check boxes, the Windows 2000 or
XP client removes that ACE and does not send it to the HP CIFS Server.
To prevent a directory owner from losing access, both access and default ACEs for the owner
should be set to Full Control permissions.
Removing an ACE entry from Windows 2000/XP clients
For mandatory ACLs (user, owning group, everyone), removing an ACE entry from the Advanced
Windows permission screen does not remove that ACE entry on the UNIX system. The HP CIFS
Server generates the missing ACEs from the existing access ACEs on the file.
For any other user or group ACEs, removing an ACE entry from the Advanced Windows screen
will remove that ACE entry on the HP CIFS Server.
Examples
Following are three examples to show the changes of the directory ACEs on the HP CIFS Server
when an ACE entry is removed from the Windows 2000/XP client.
Example 1:
In the example 1, assume that the existing directory ACEs for testdir on the HP CIFS Server
are:
# file:testdir
# owner:testuser
# owning group:users
access:owner:rwx
access:owning group:rwx
access:other:rwx
default:owner:rwx
default:owning group:r-x
HP CIFS Server Directory ACLs and Windows 2000, Windows XP, Windows Vista, and Windows 7 clients 49